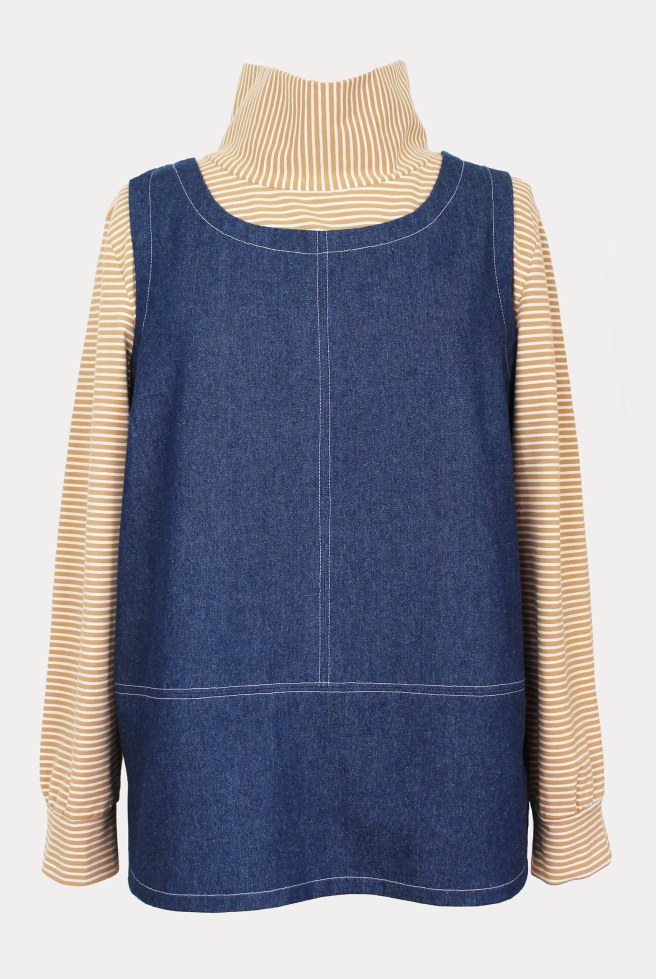
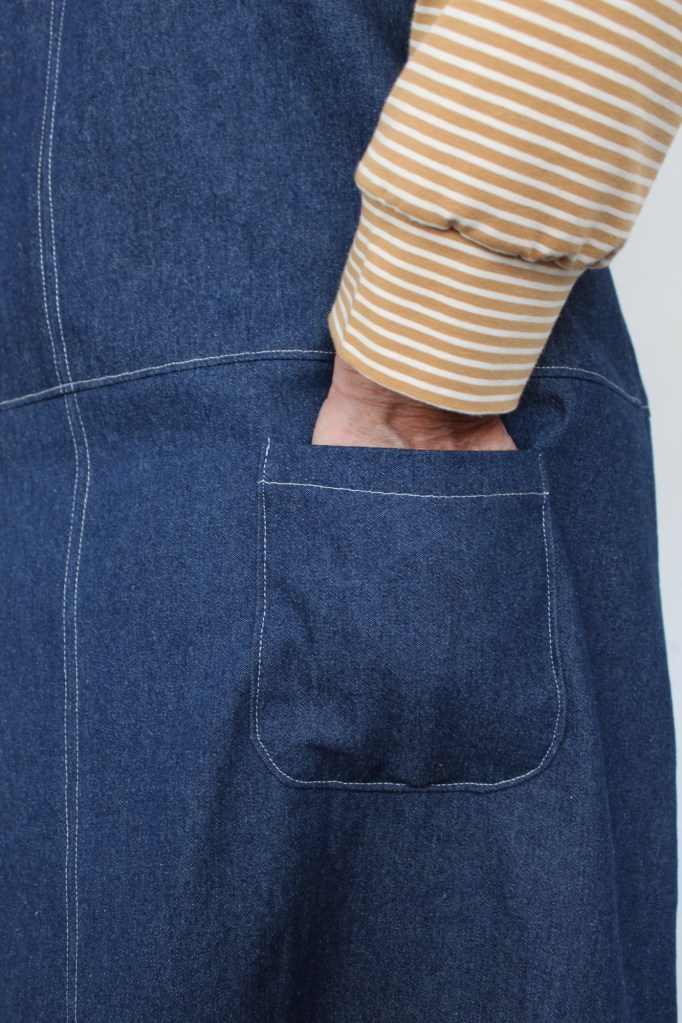
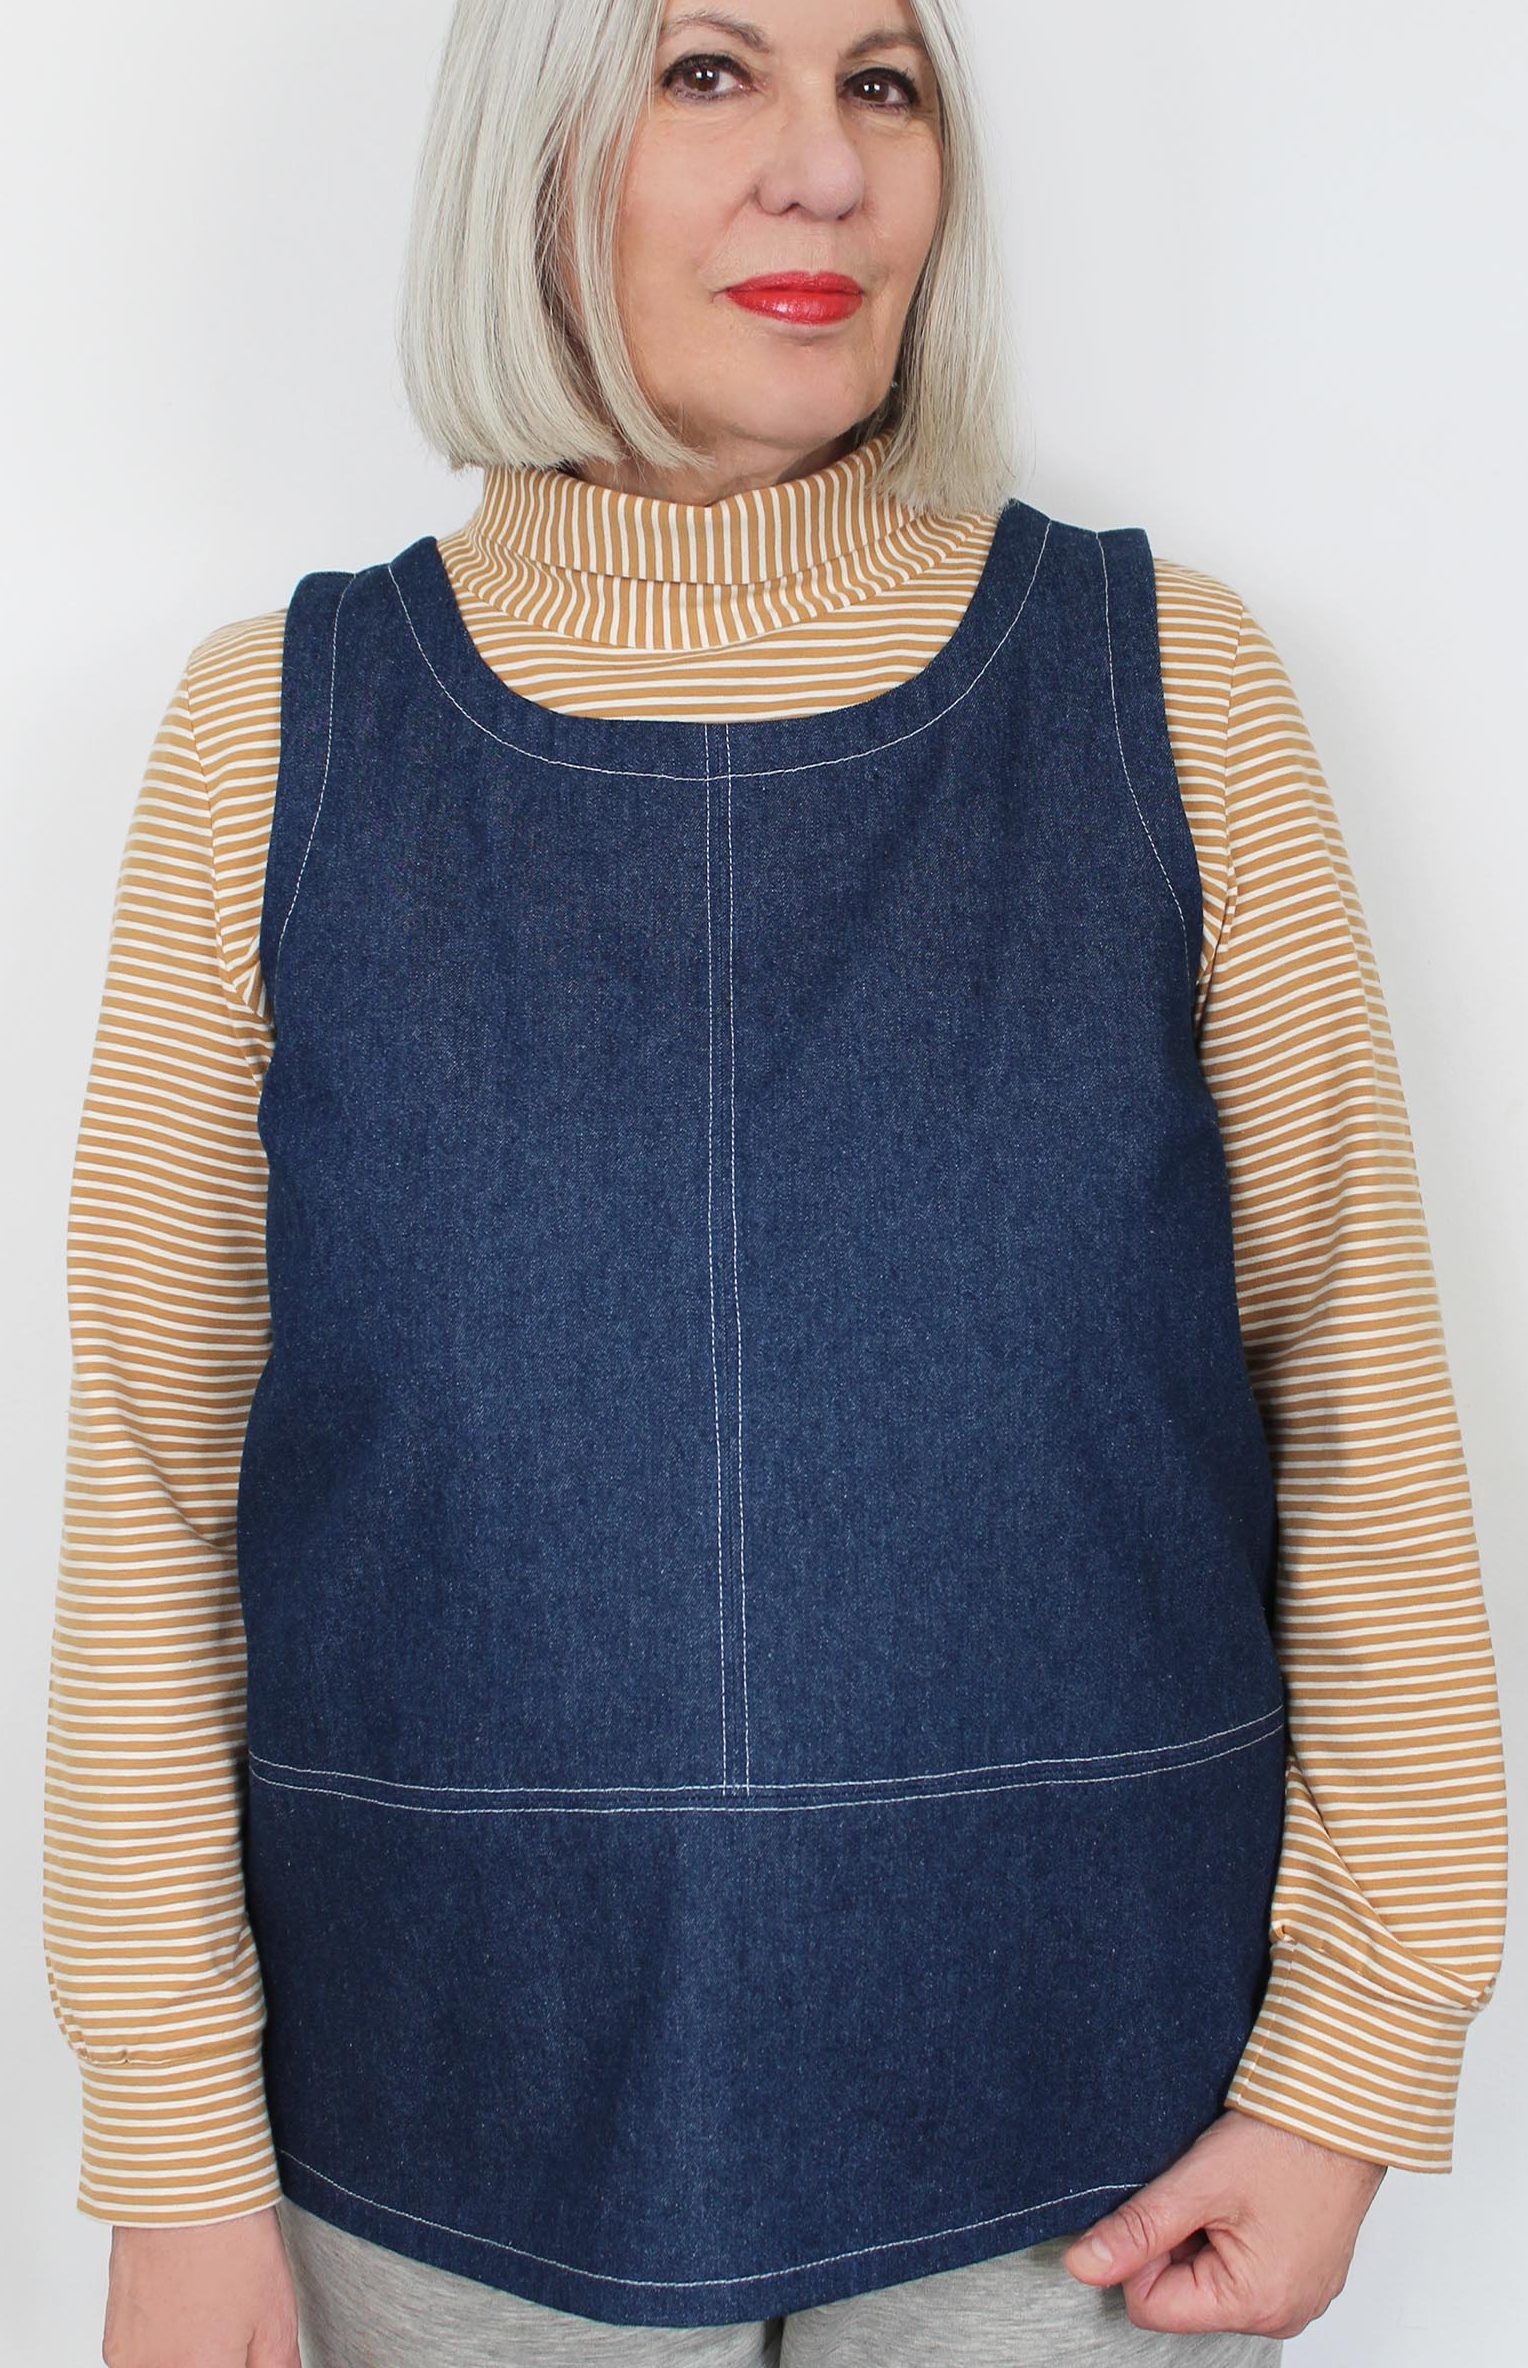
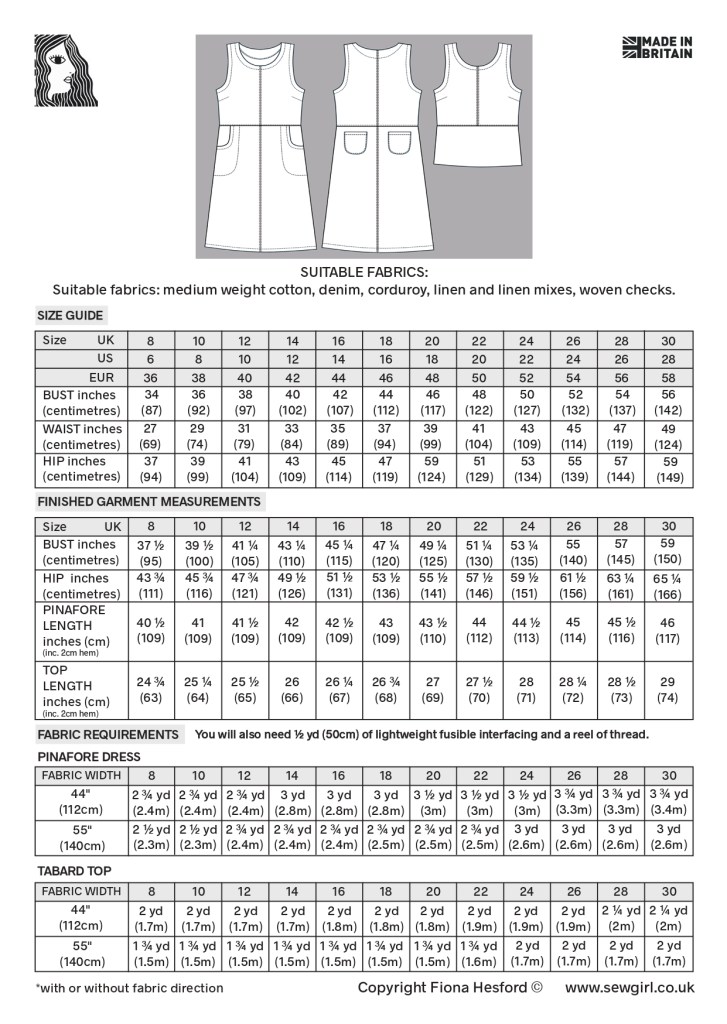
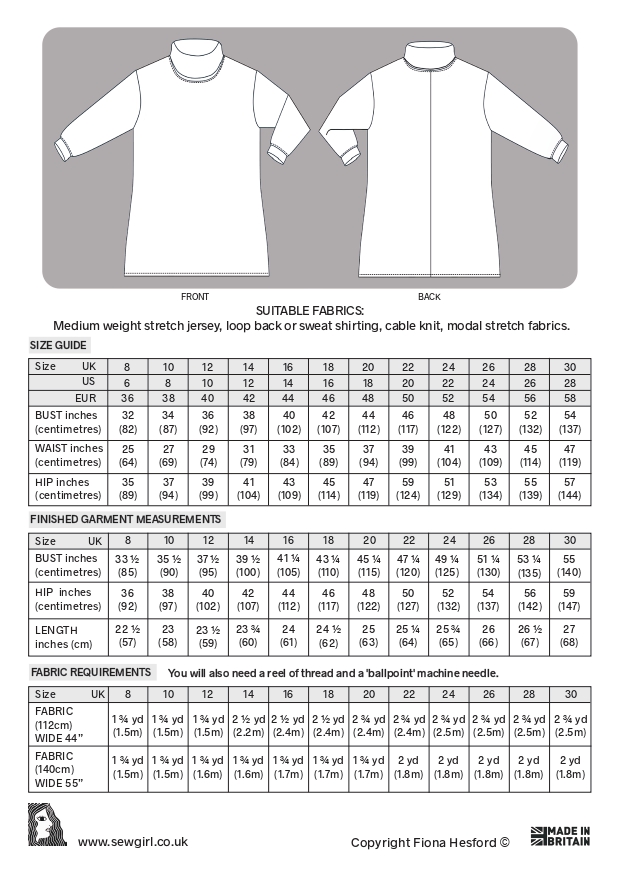
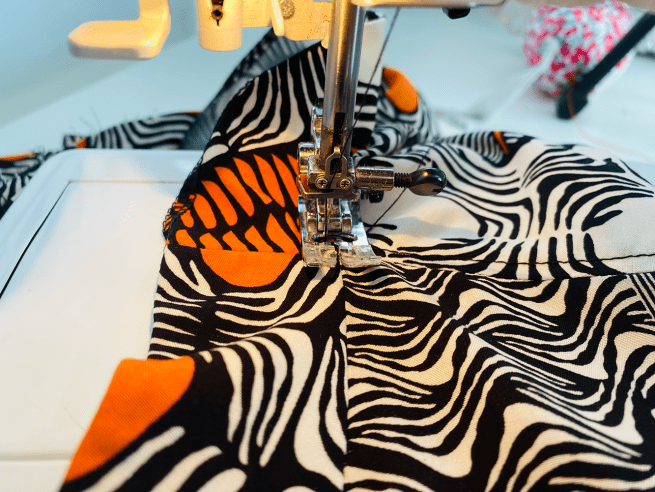
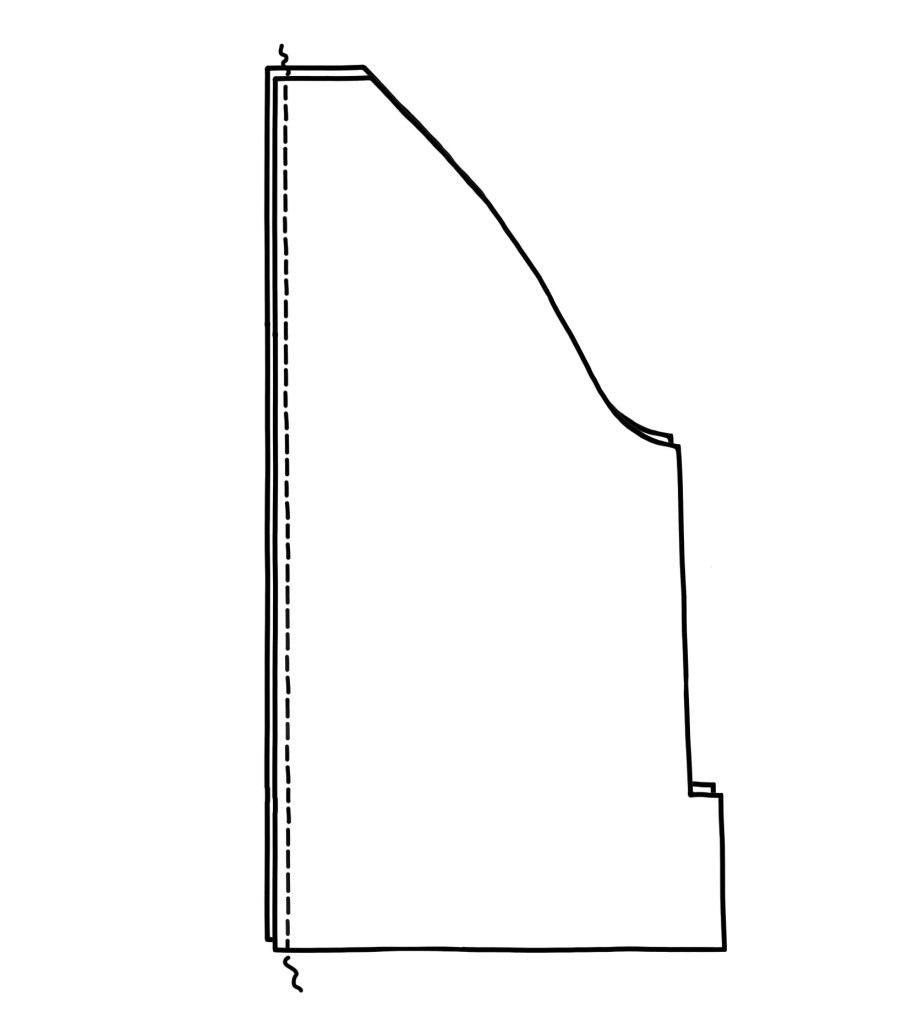
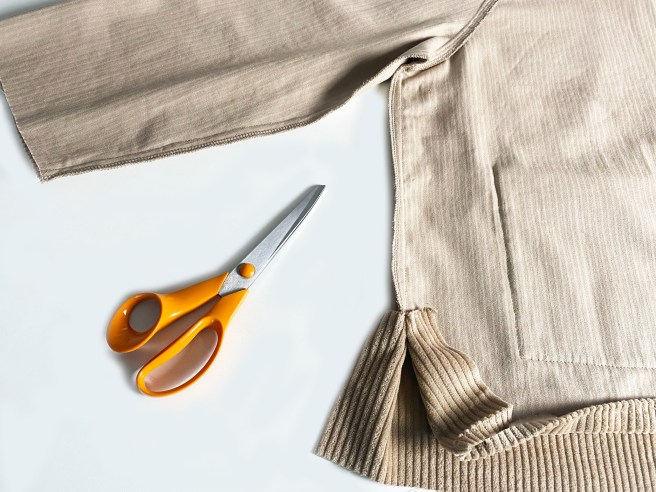
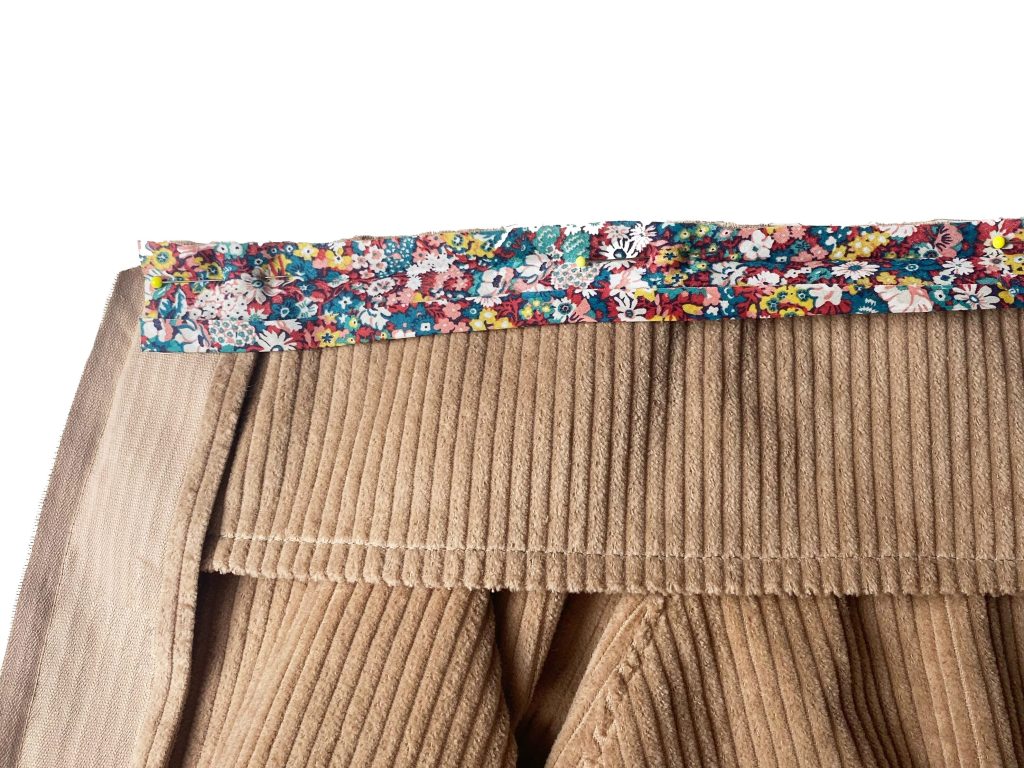
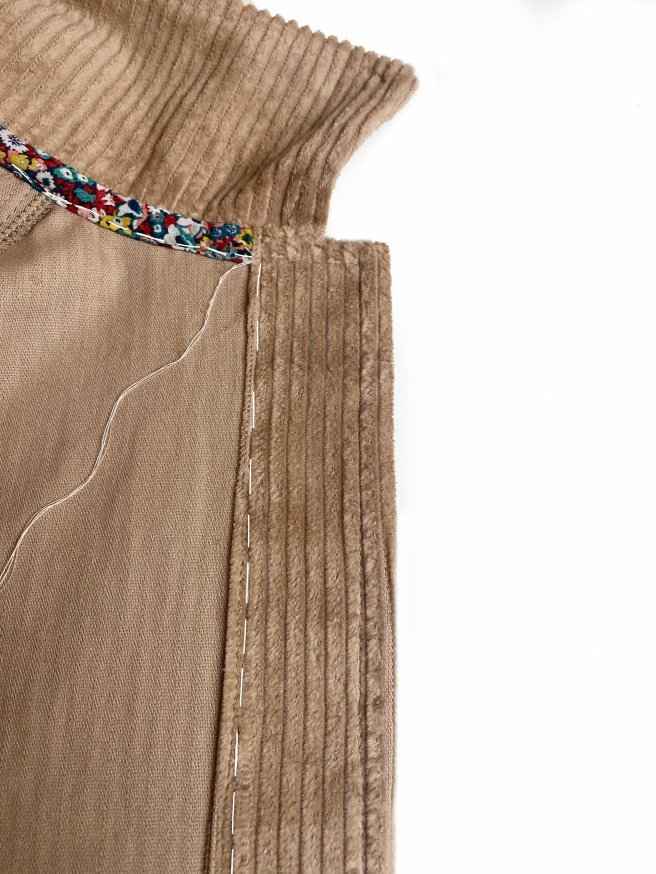
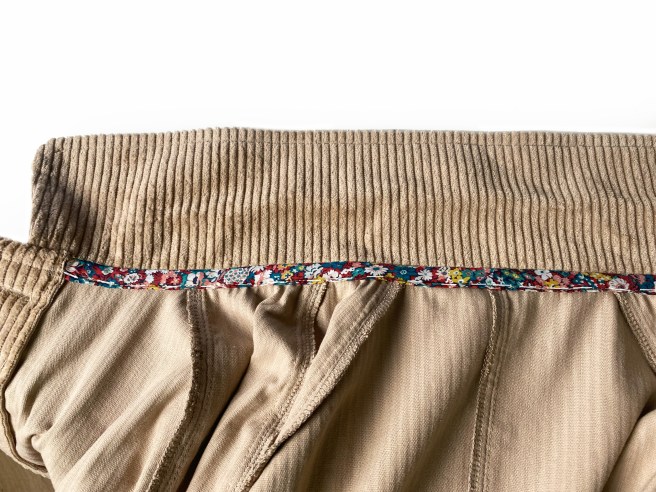
Daphne Pinafore dress a simple to make pinafore thats also a top. With lovely deep front pockets and two cheeky back pockets, a back slit opening (top has side slits), enhanced by lots of (optional) top stitching Daphne is both stylish and practical, designed to be worn with a Sewgirl Ingrid top underneath. Here is the back pattern info showing size guide, finished garment measurements and fabric requirements:
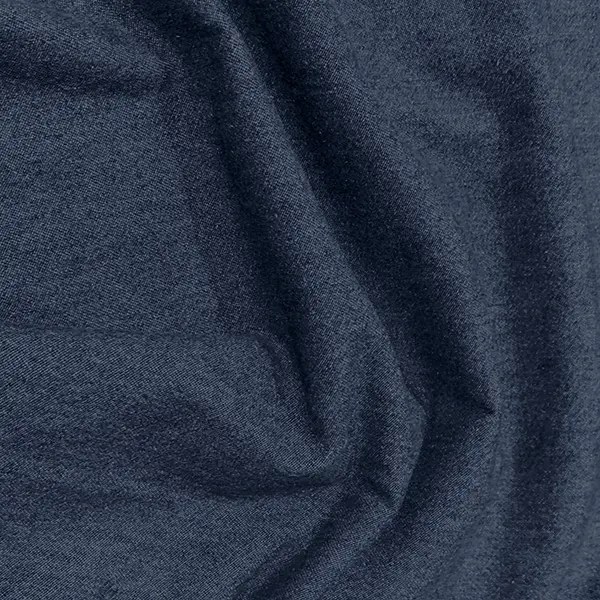
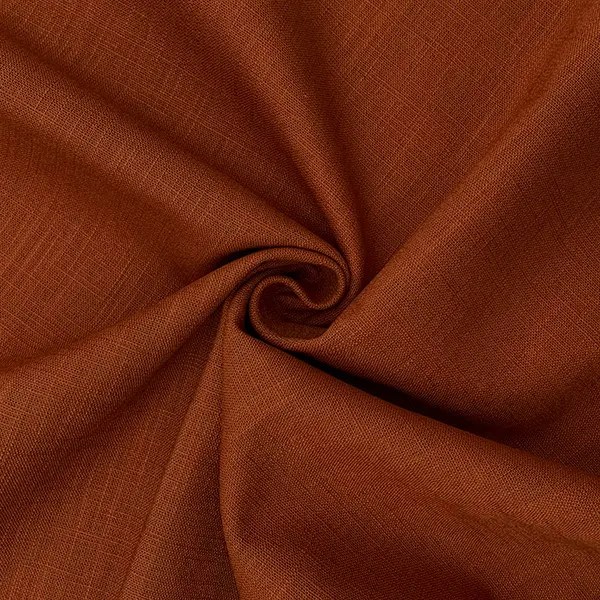
This is an easy pattern for all sizes from 8-30. The pattern is suitable for fabrics such as medium weight cotton, corduroy (4.5 or 8 whale), denim (8oz), linen and linen mixes, Best suited to fabrics with some structure, with a weight of approx 200-280gsm, however for summer you could make in a lightweight cotton print, woven check or striped fabric and it would make a lovely holiday garment.
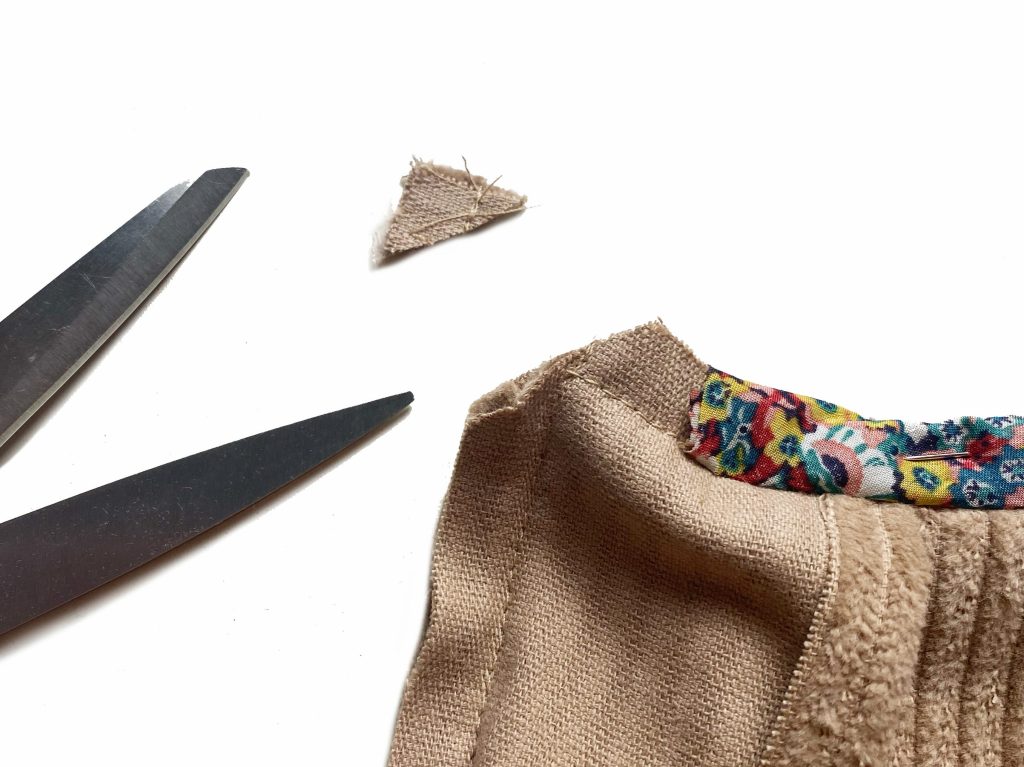
PATTERN ERRATUM: please note that with some early patterns, Daphne lower band (piece 4) appears to be approx 7cm (2 3/4″) too wide each side. Please check your pattern and either cut the top horizontal edge of this piece to match Bodice Front & Back lower horizontal edge, download the free Lower Band template here or contact me for a free posted template replacement.
Make for summer tops in light cotton prints or pinafore dress in linen and corduroy /denim for cooler weather.
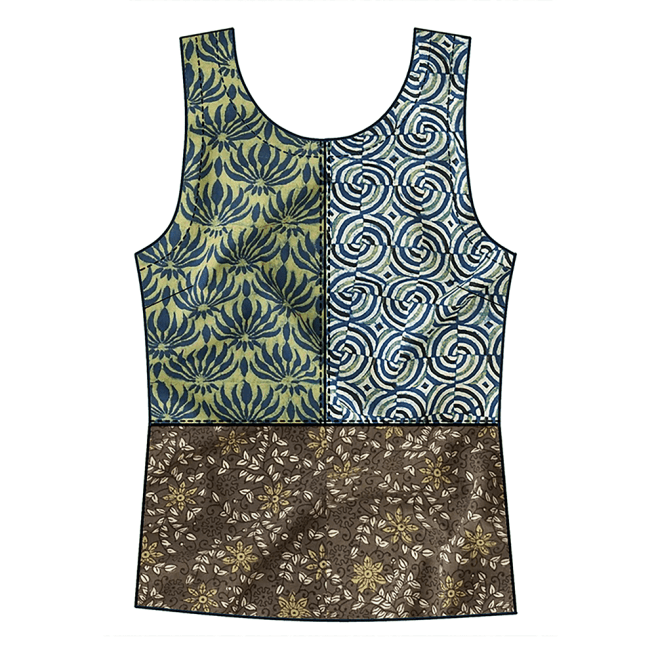
You need to supply some lightweight interfacing and thread with some basic equipment. There’s lots you can do with this pattern, from simple things like adding the back pocket to the front bodice, or mixing different fabric together to make a patchwork garment. A nice idea for holidays.
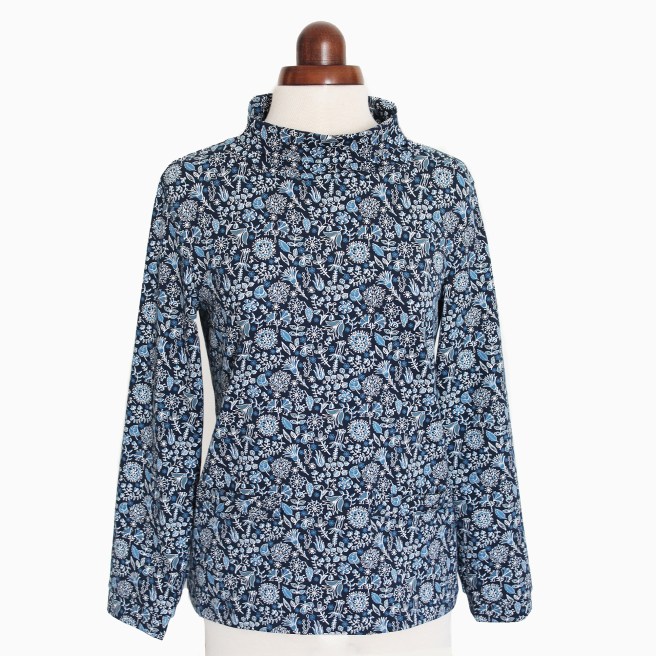
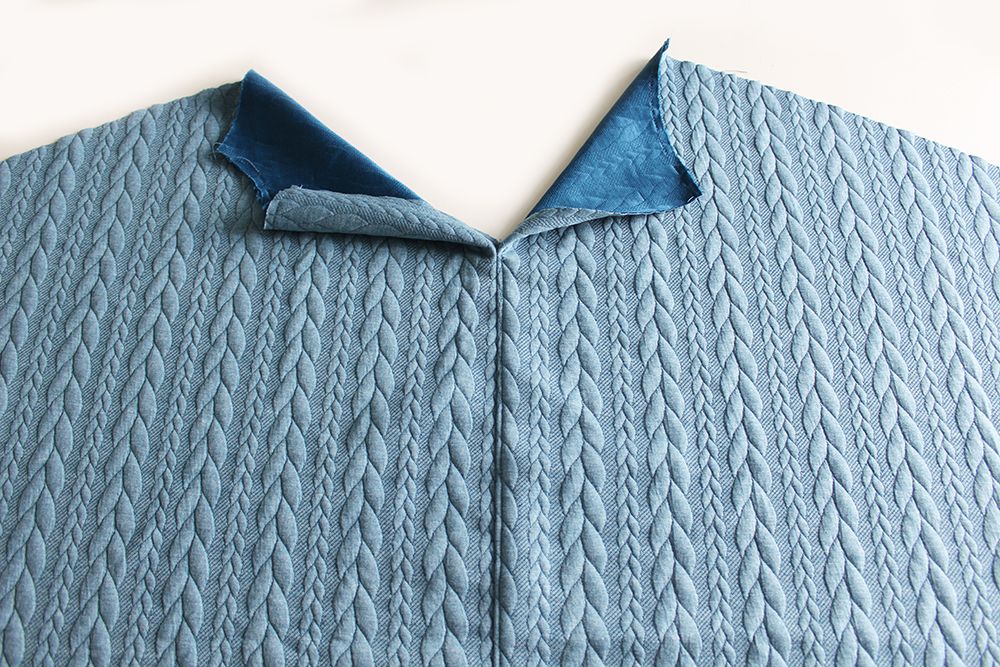
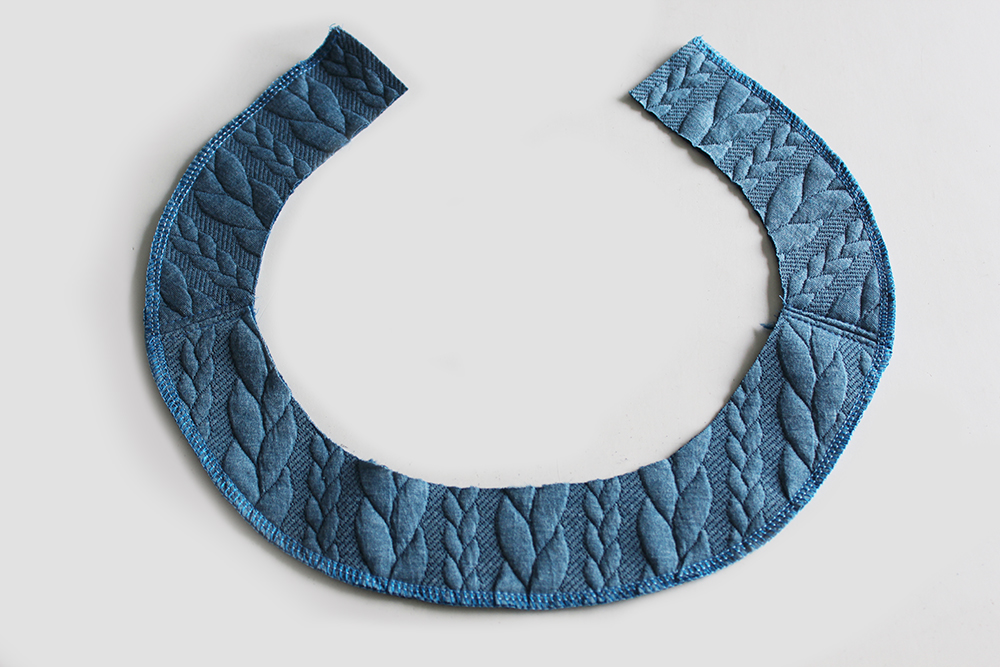
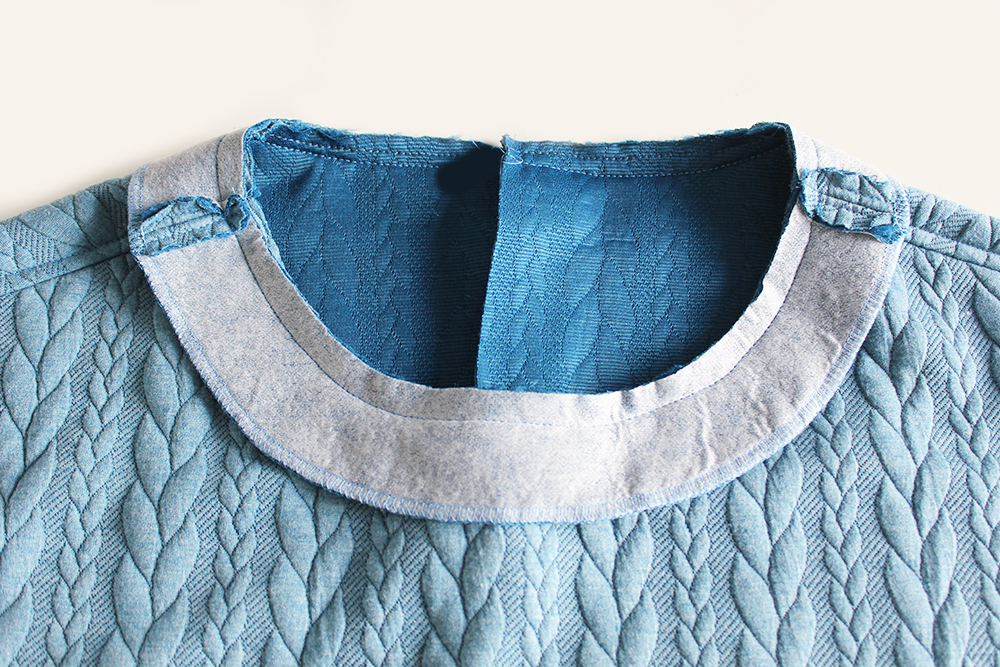
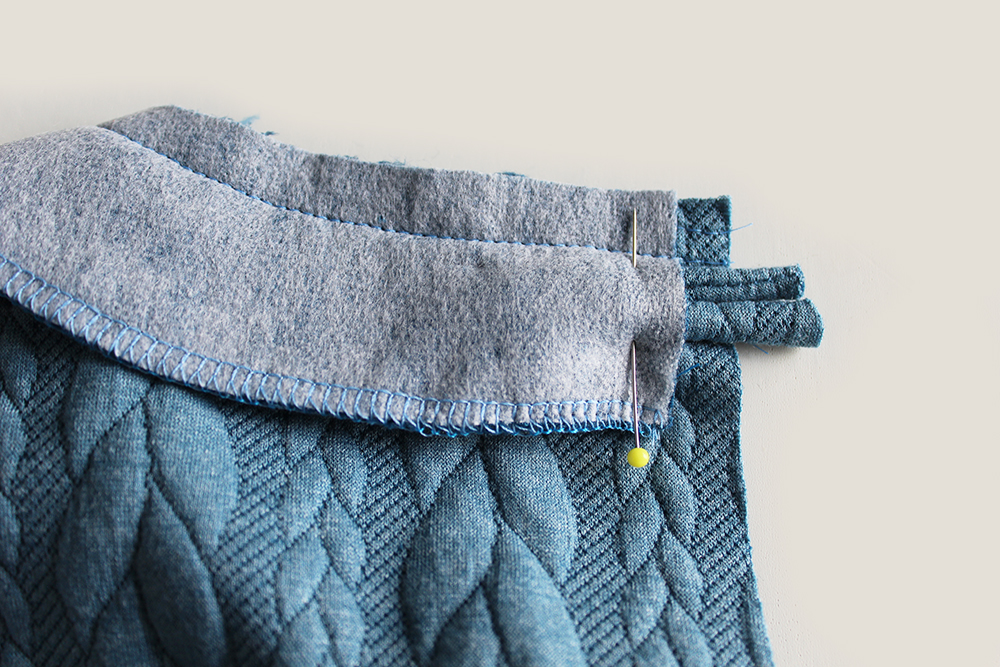
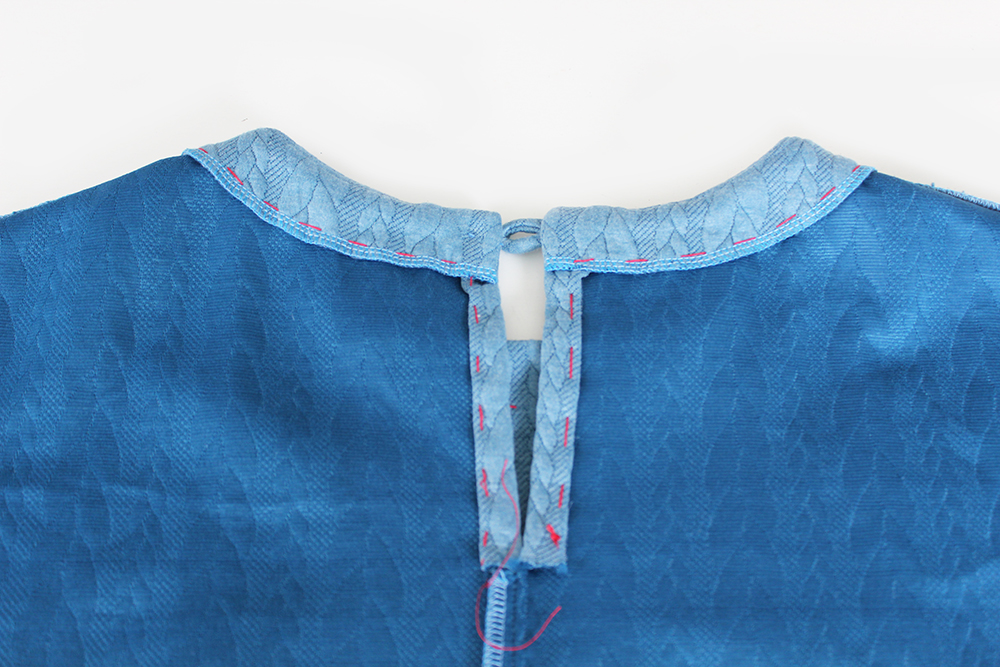
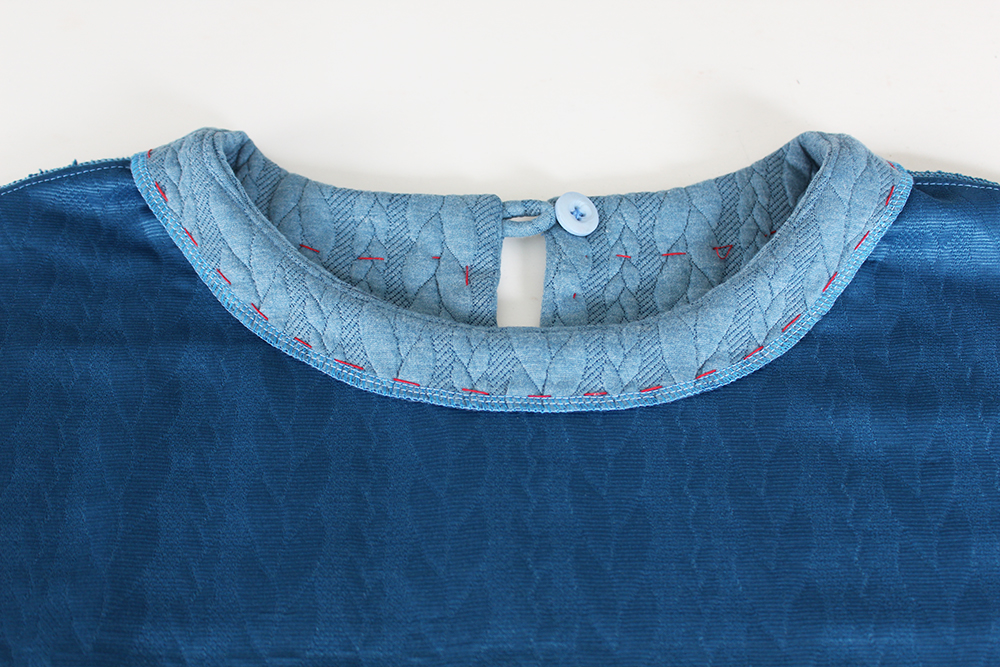
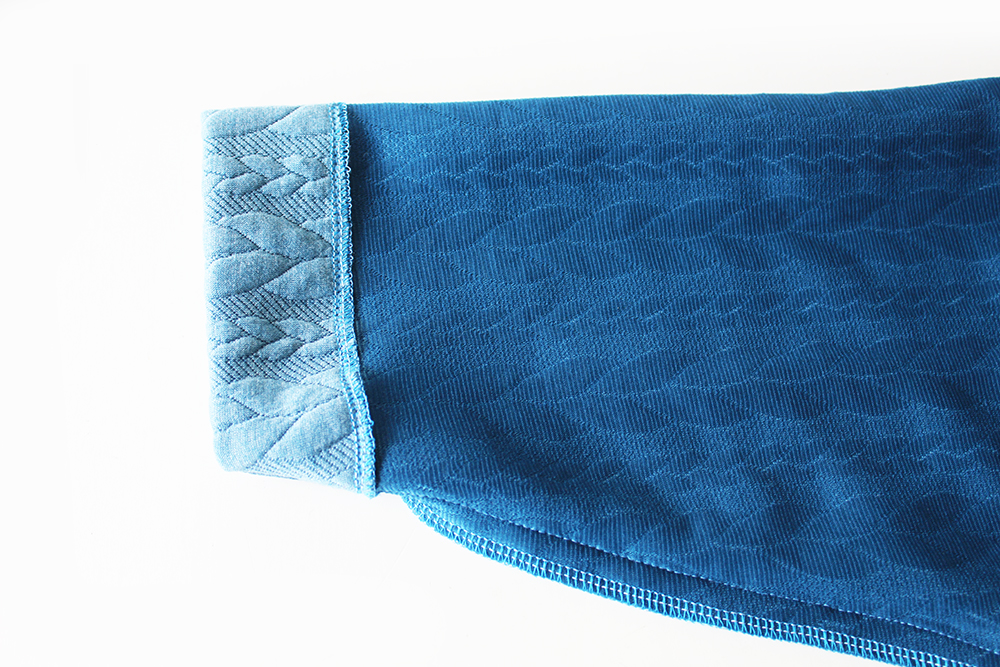
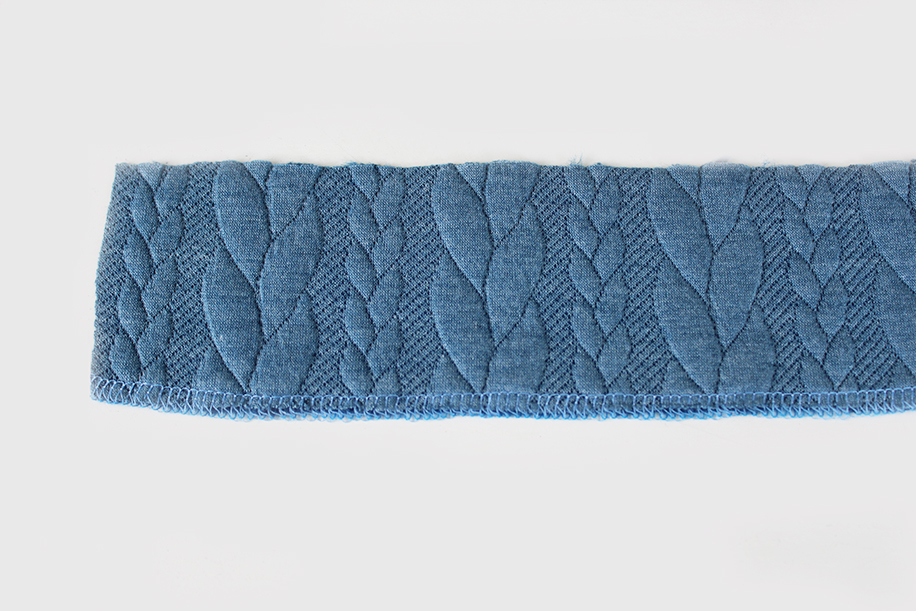
INGRID JERSEY TOP is a classic long sleeve with cuffs, roll neck top which can be made in stretch jersey, sweatshirt fabric, cable knit, or loop back fabric. Sizes 8-30. Level: Easy.
This top would be great worn underneath Daphne Pinafore dress or top.
Alternatively underneath a fab Mildred Pinafore dress.
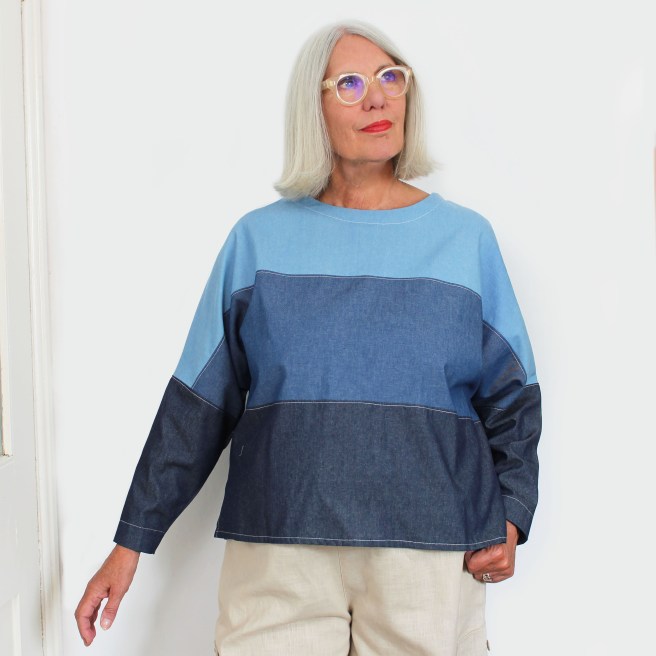
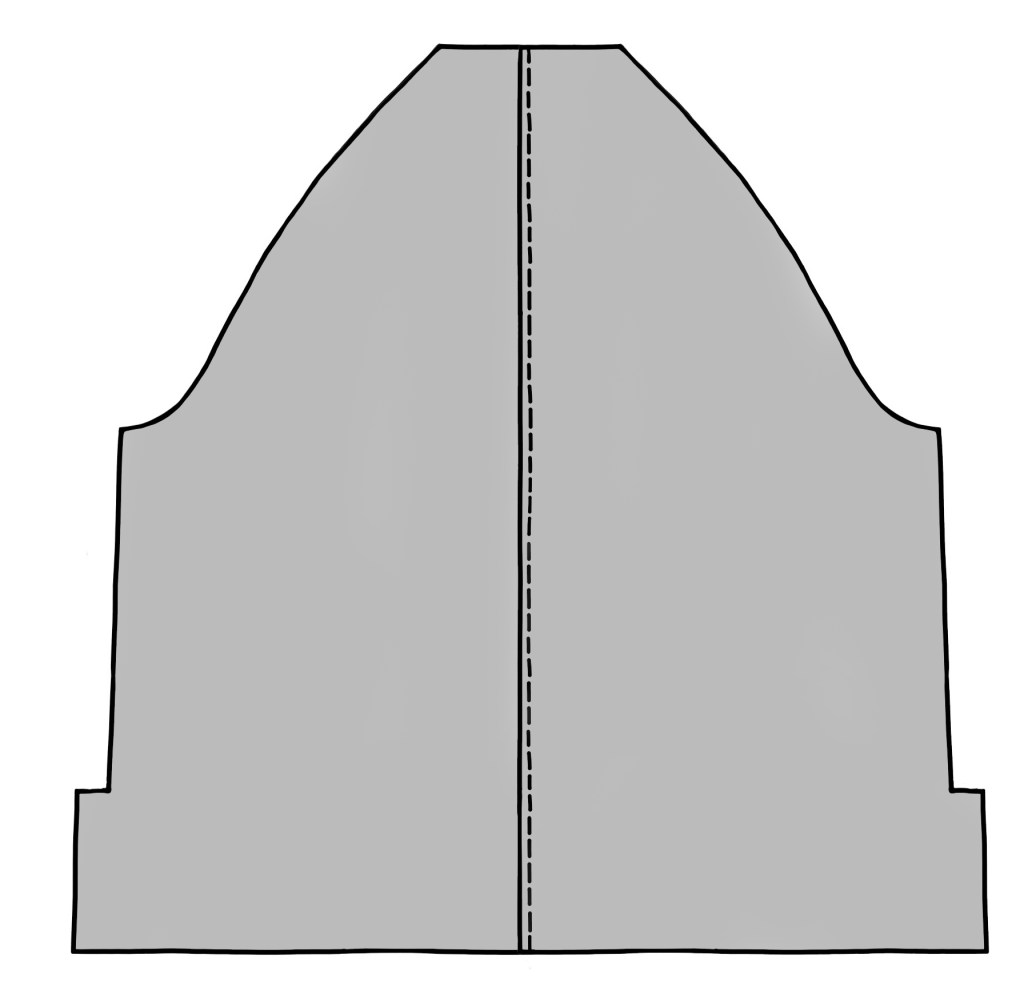
PETULA TOP is a super simple pattern that is SO versatile because it not only is easy to make but you can run it up in a variety of fabrics to suit all seasons.
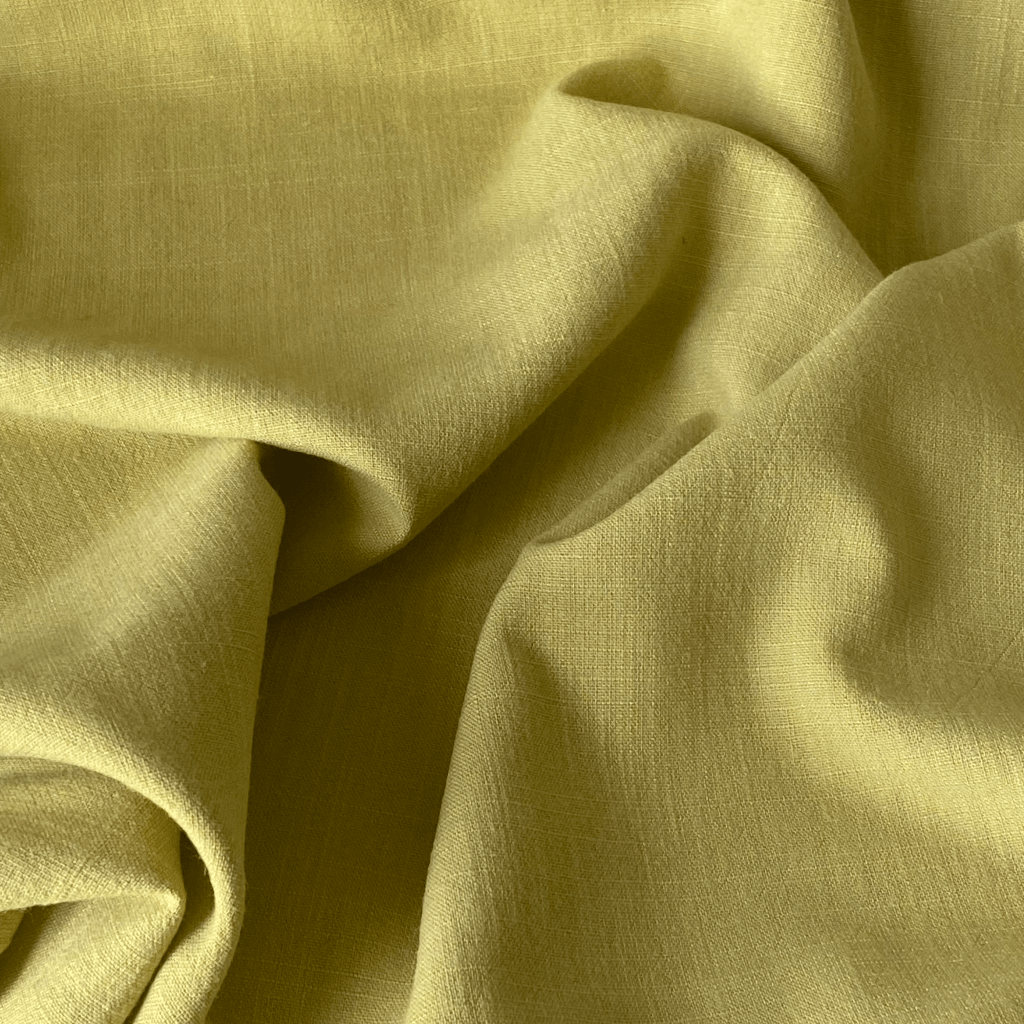
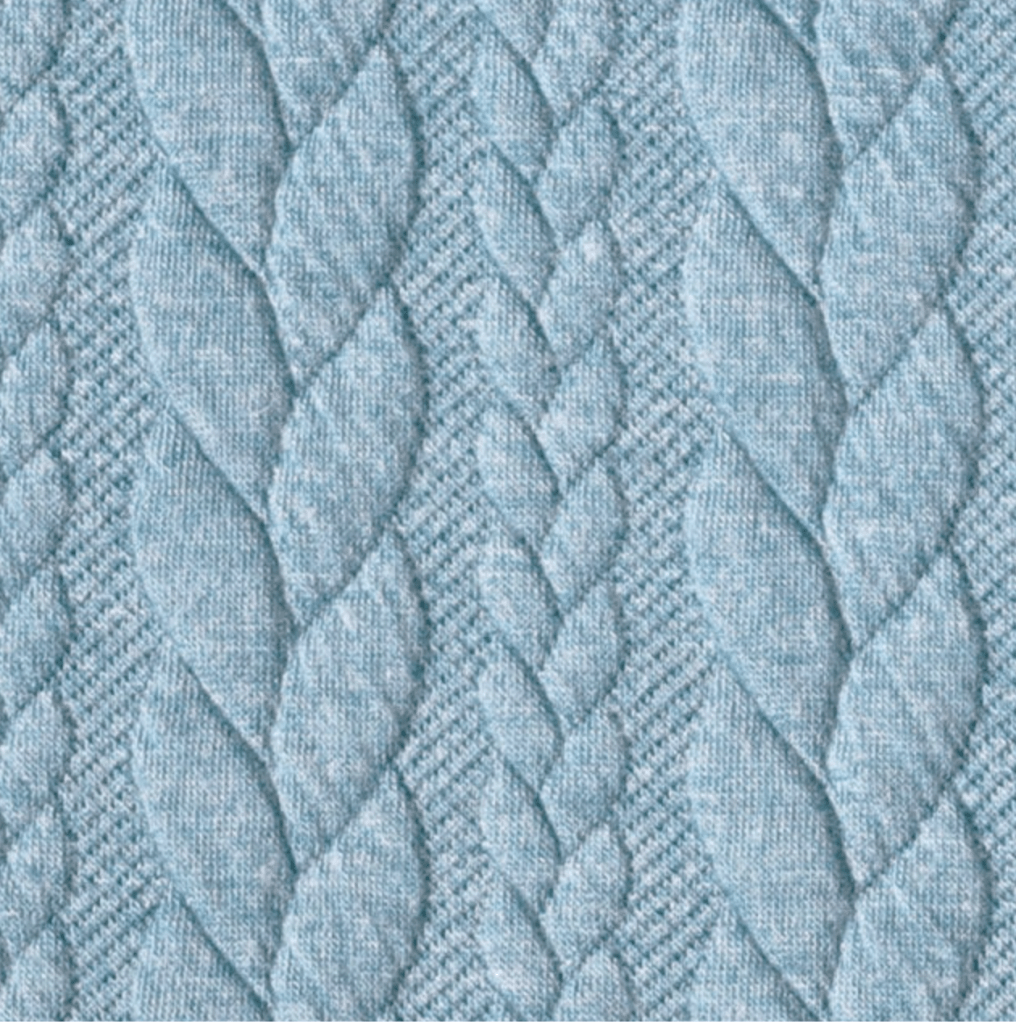
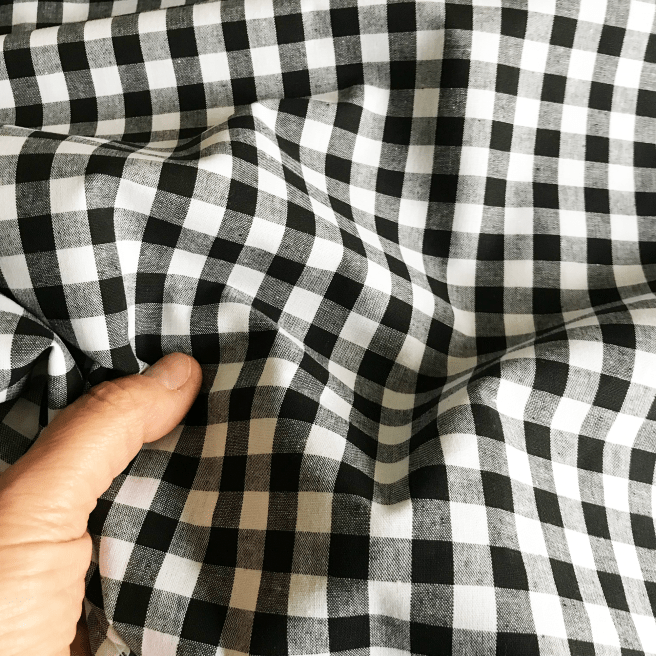
Make one for spring/summer in a linen viscose slub (available at Sewgirl-shop), cotton, viscose, lightweight linen, cotton, broderie anglais or double gauze, then in Autumn /Winter make one in cable knits, or sweatshirting . It would also be nice to make a sleeveless version in Autumn and wear a long sleeve shirt or teeshirt underneath or even in slinky velvet for a party top.
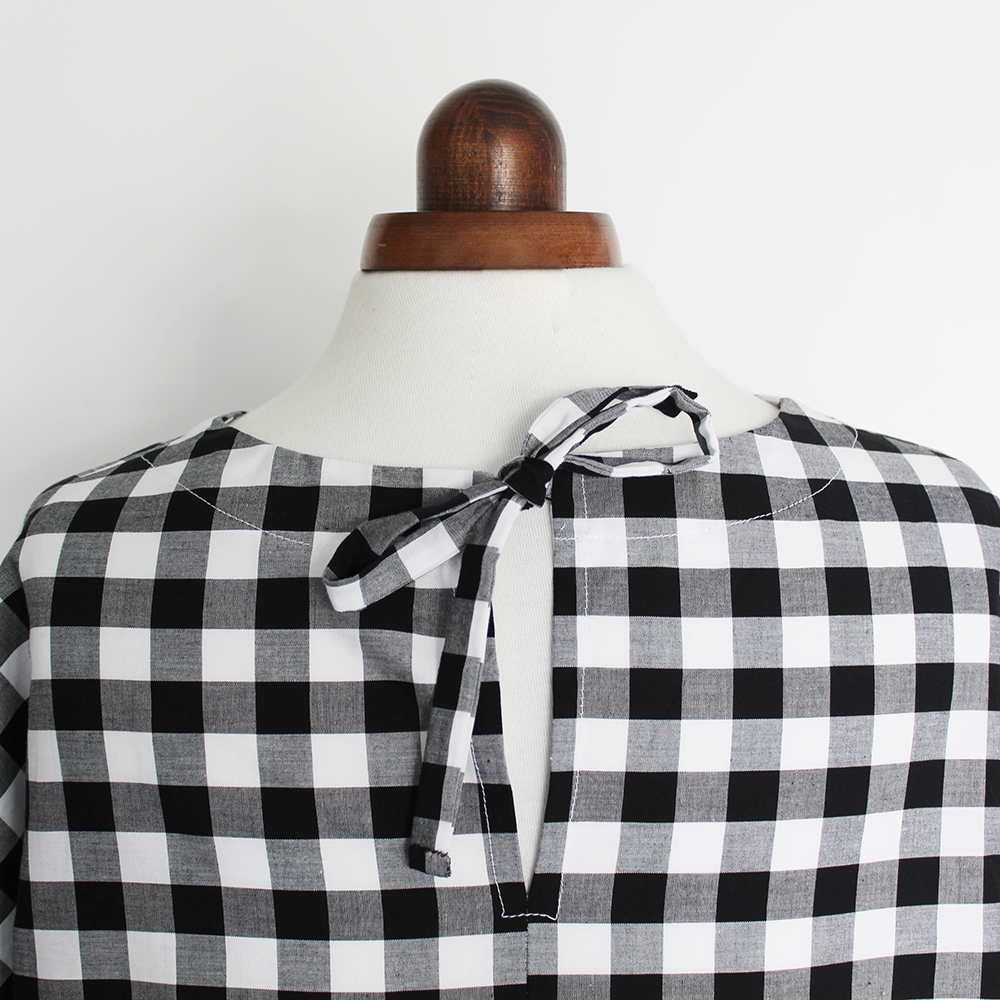
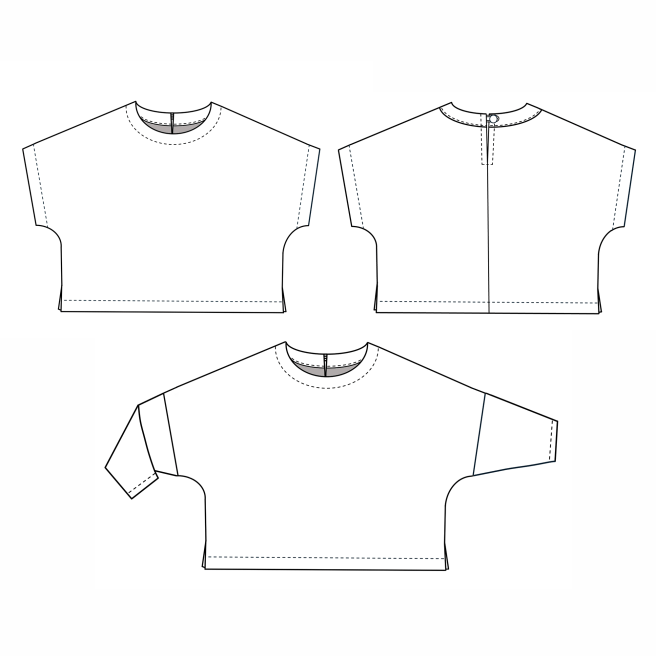
Petula top is a boxy shape with a round neck, a back neck opening which can be fastened with either loop and button or ties.
Shoulders are sloped giving it a chic silohette with a slightly cropped length. The hemline and short sleeves have facings to make it hang well, with a small vent opening at each lower side hem. The long sleeve version has a ‘batwing’ style silhouette.
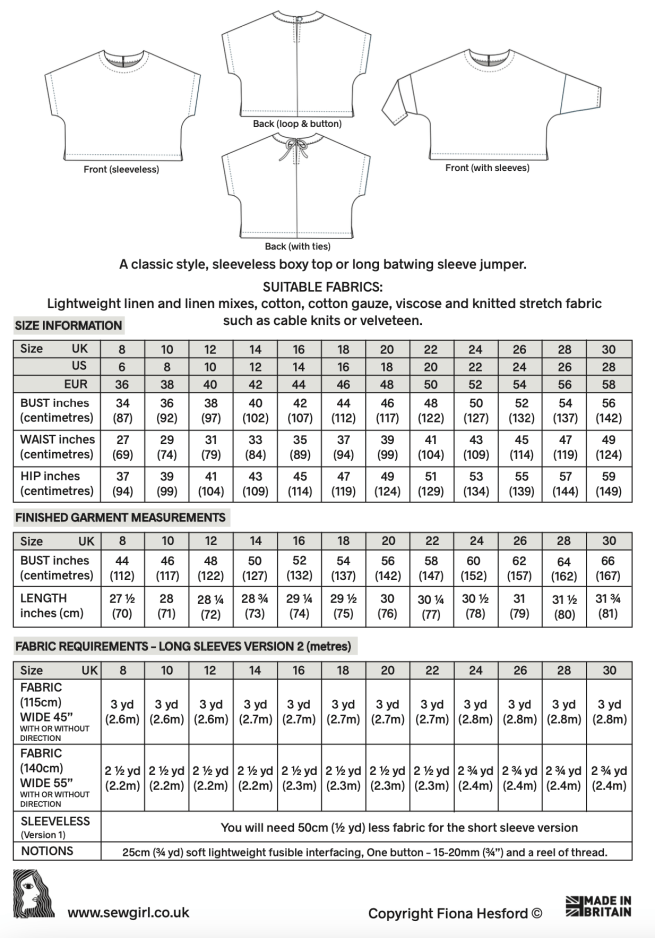
Petula Top is available in multiple sizes from 8 to 30., an easy to sew pattern, suitable for beginners. This blog gives you an overview about how the top is made. Full step by step instructions are included with the pattern as well as large format multi sized templates on sturdy paper.
PATTERN ADD-ONS- The pattern also comes with two hack add-on instructions about how to colourblock or stripe the fabric before cutting out.
Here are the details showing the size guide and fabric requirements.
LINEN/VISCOSE SLUB
CABLE KNIT
COTTON GINGHAM
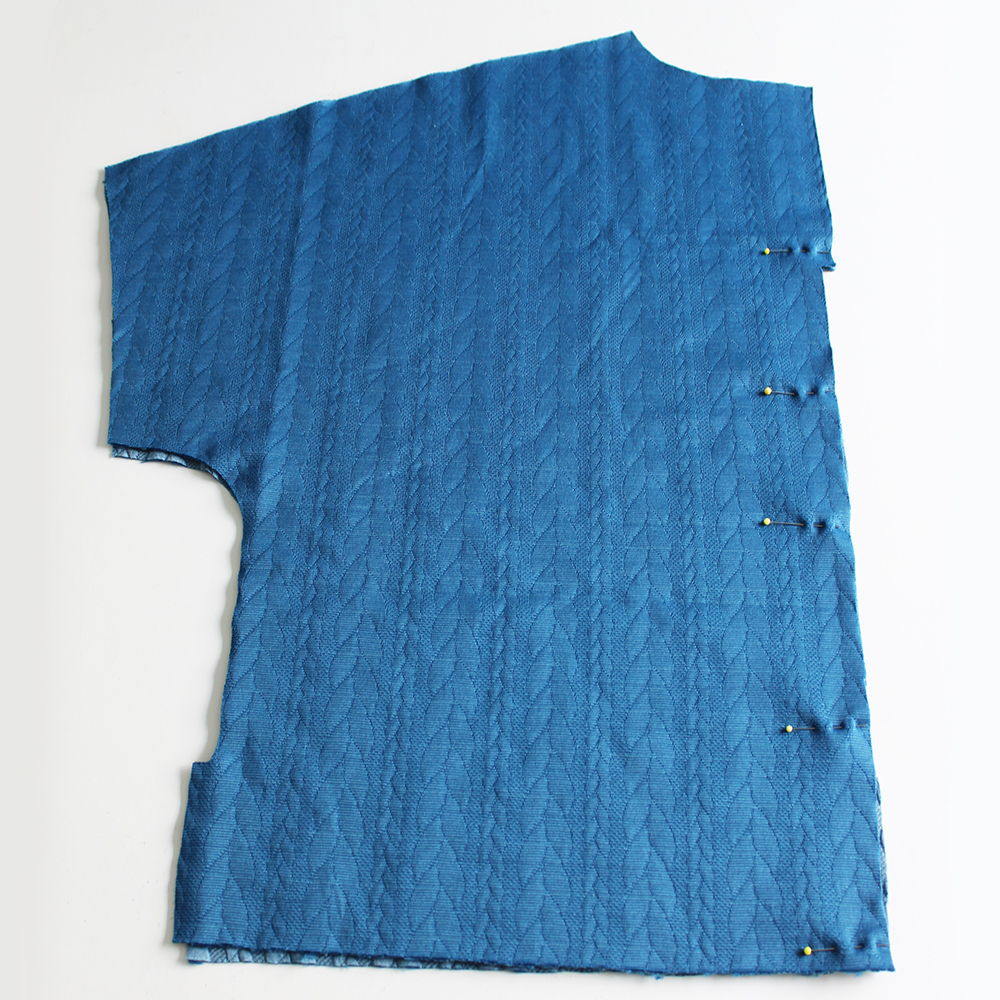
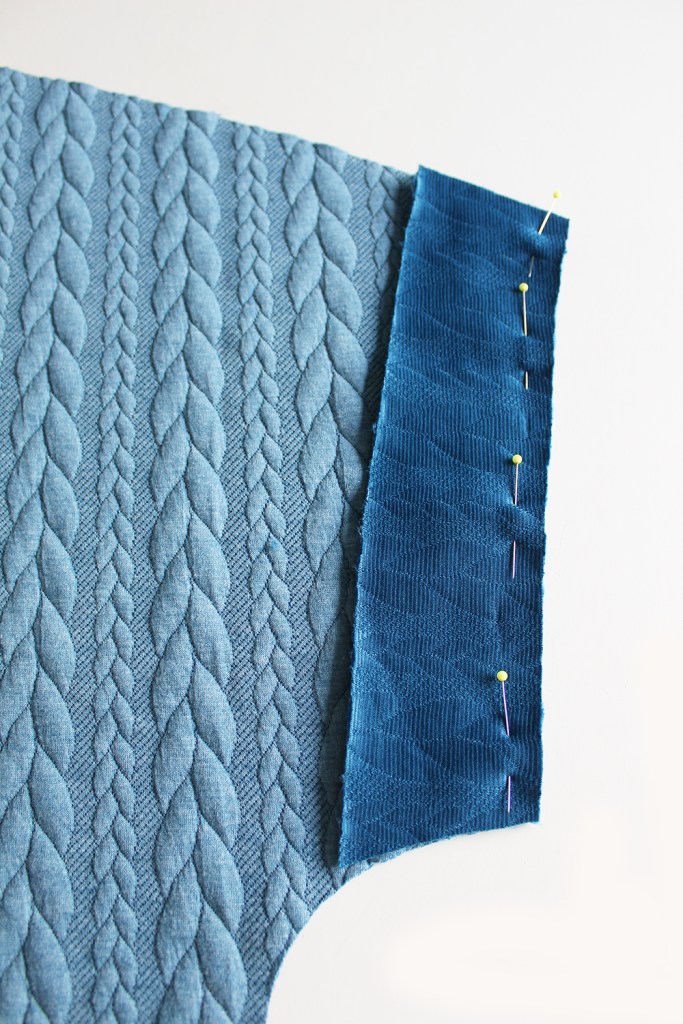
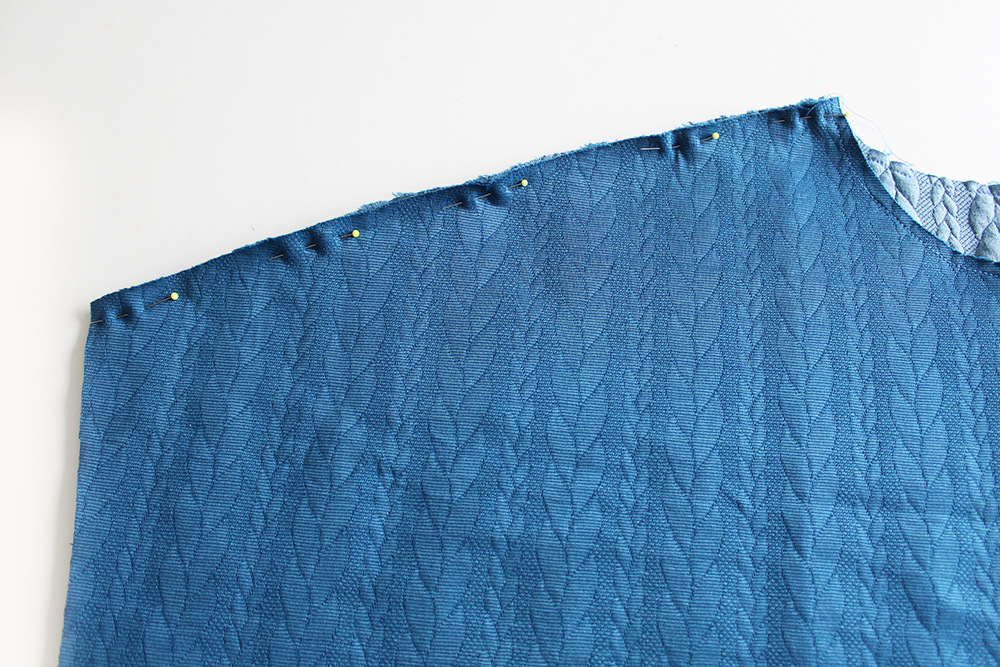
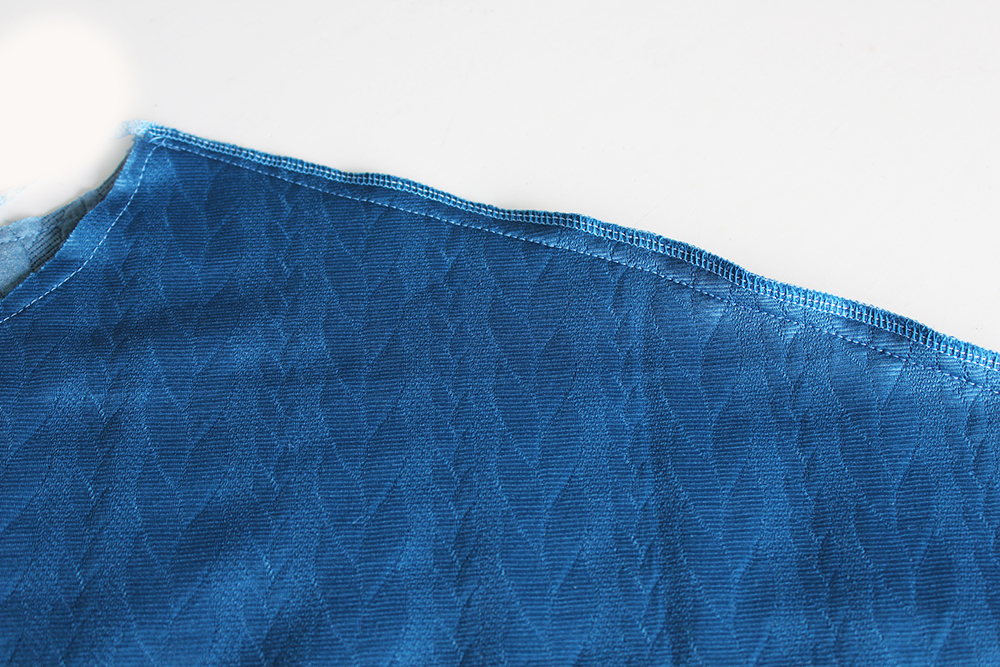
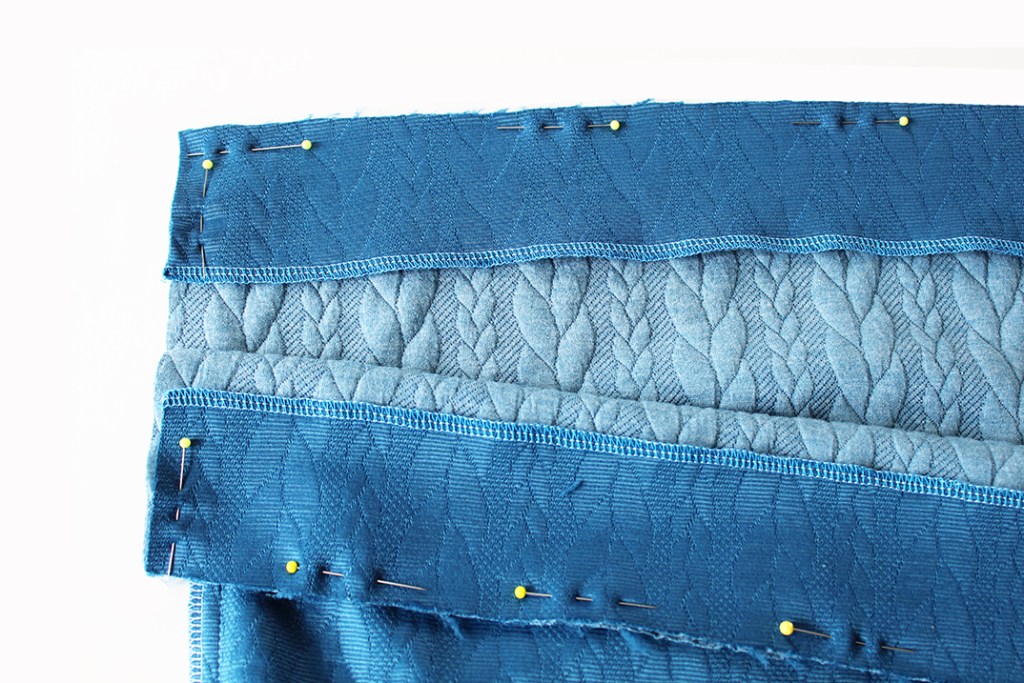
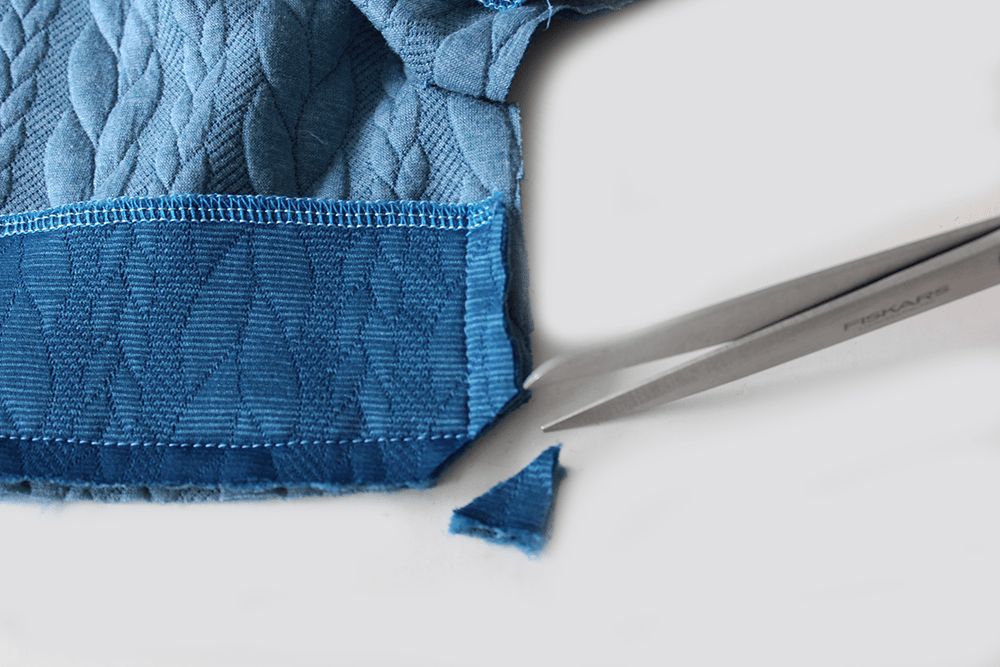
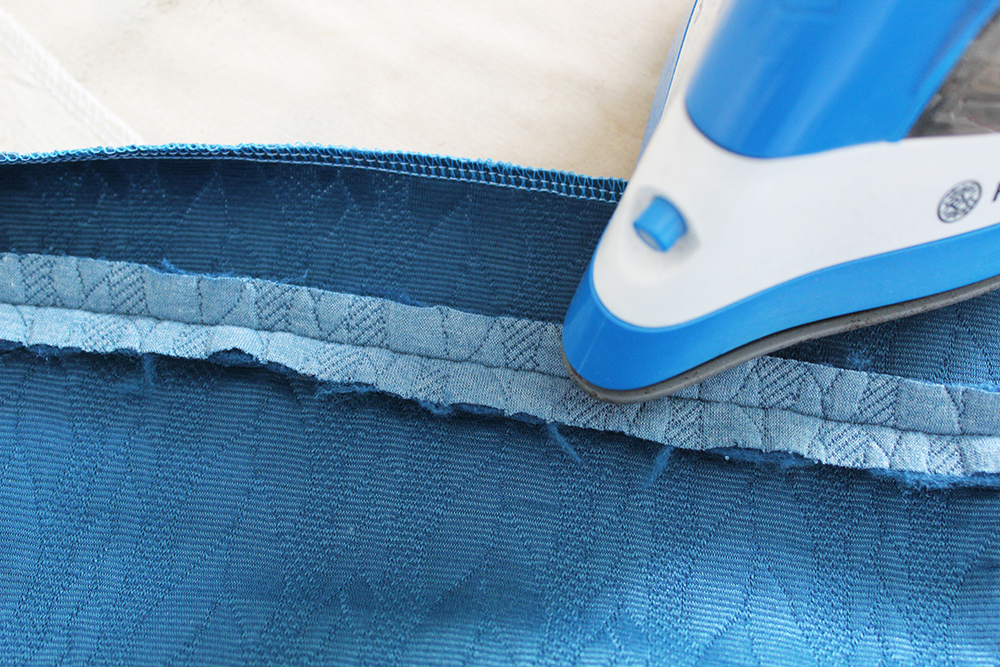
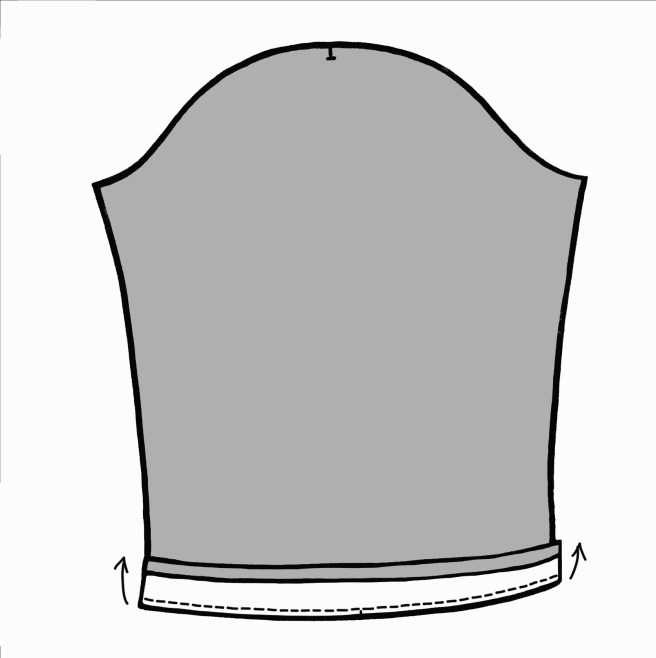
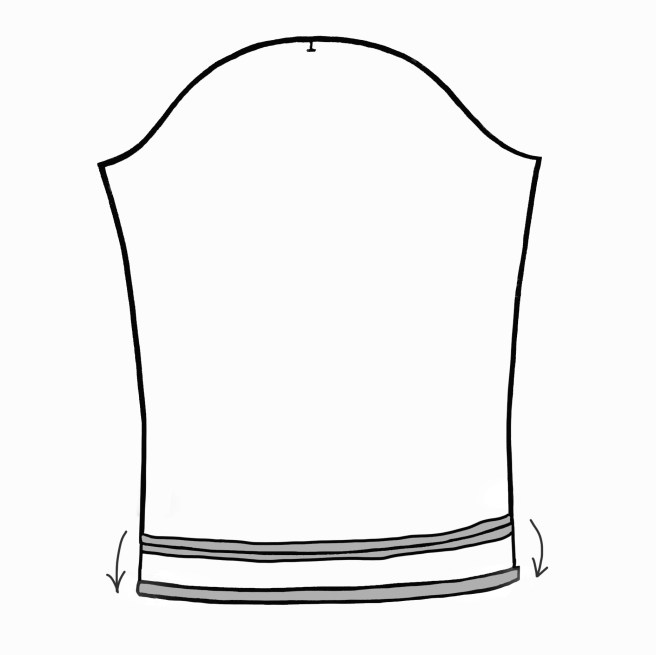
Here are some of the stages of making the Petula top. The pattern contains more in depth illustrations and instructions
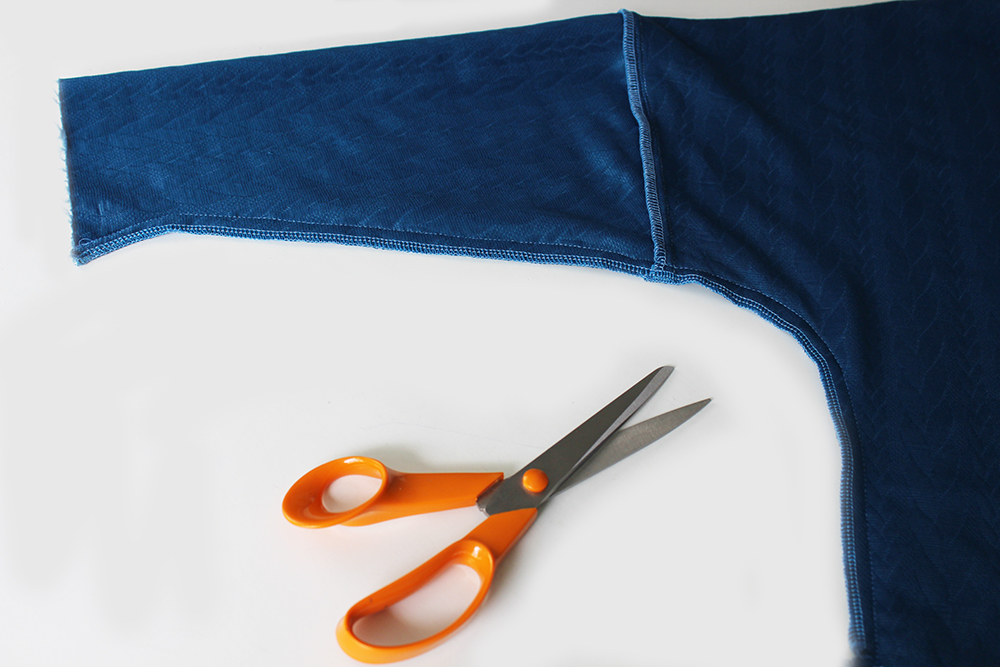
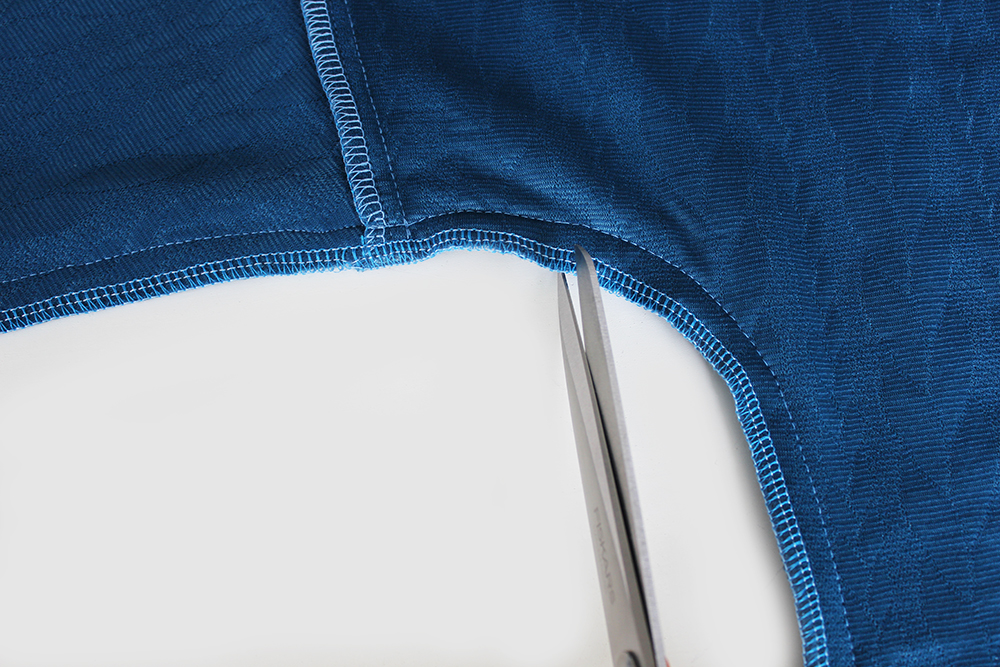
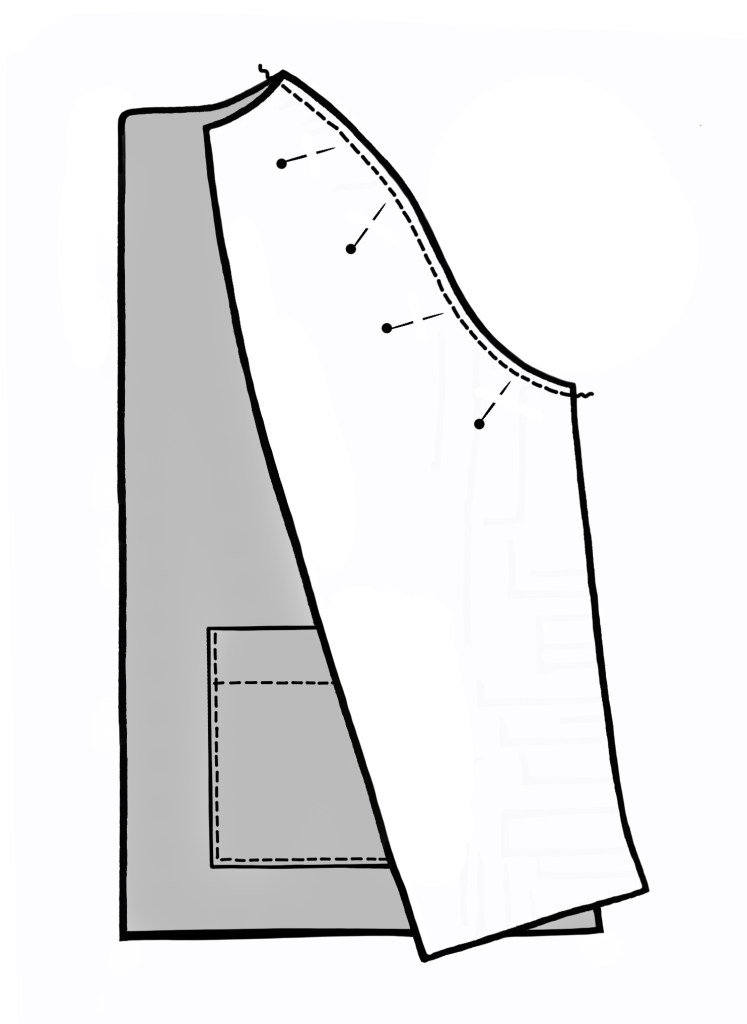
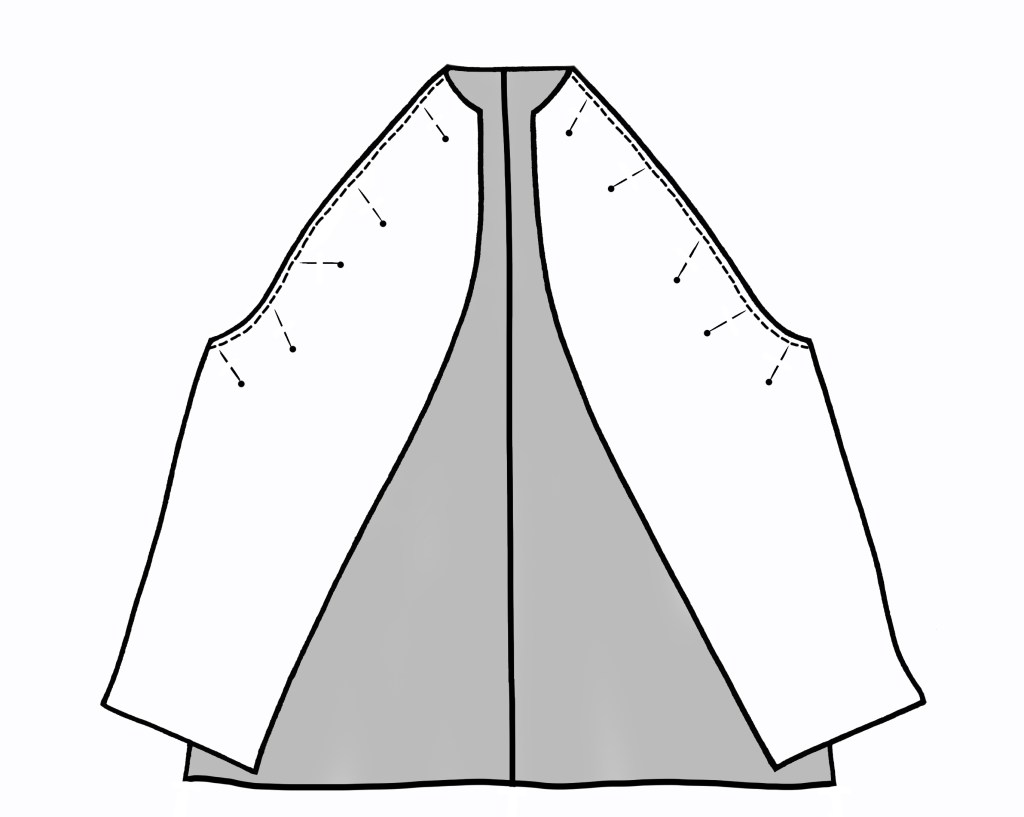
Sew the back pieces together.Topstitch.Attach the Sleeve facings (short sleeve version only).Pin the Front to Back at the shoulder edges.Sew. Finish the raw edges.Sew together the Front and Back Facing pieces.Press. Topstitch.Pin the Facing to the neck edge.Stop 1cm in from the centre back vertical edge, insert the loop or tie. Fold facing over. Hand tack facing.Attach the sleeve. Pin the Front to Back. Sew.Nick the underarm seam allowance curved section. Fold back Sleeve cuff (long sleeve version only).Lower hem facing. Finish one edge.Pin to the Front/back lower edge. Sew.Nick the corner seam allowance.Press the seam allowance open.Fold the Facing to the wrong side. Pin.Hand tack all around.
All images are subject to copyright. Please ask permission if you would like to use any of the text and images on this page.
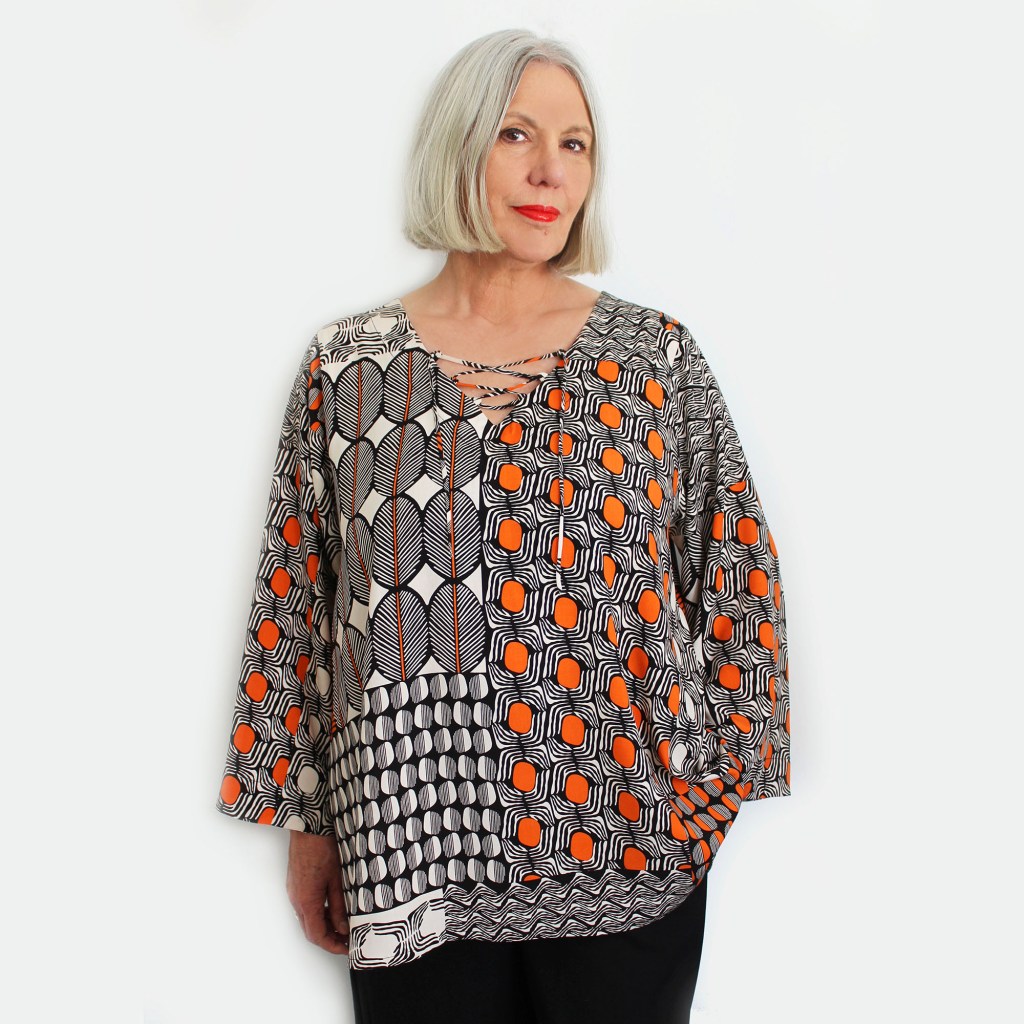
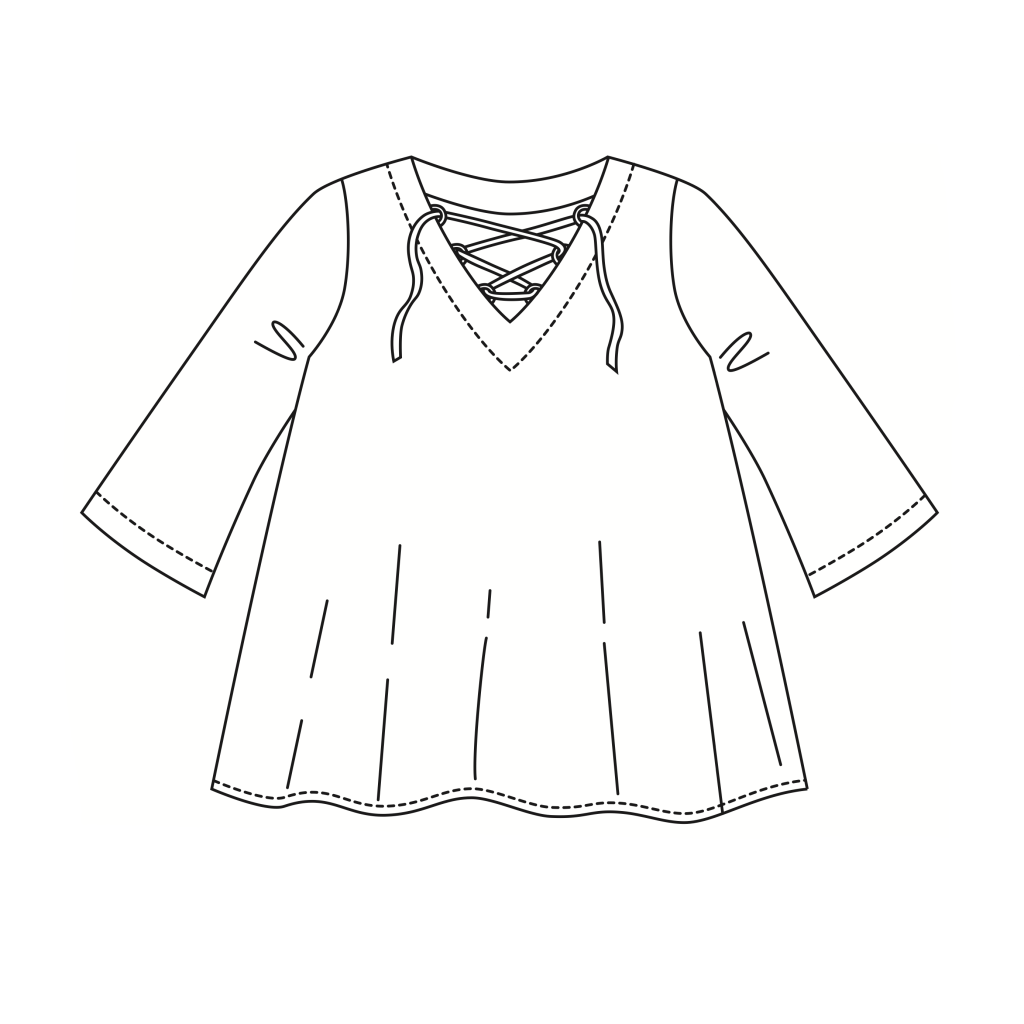
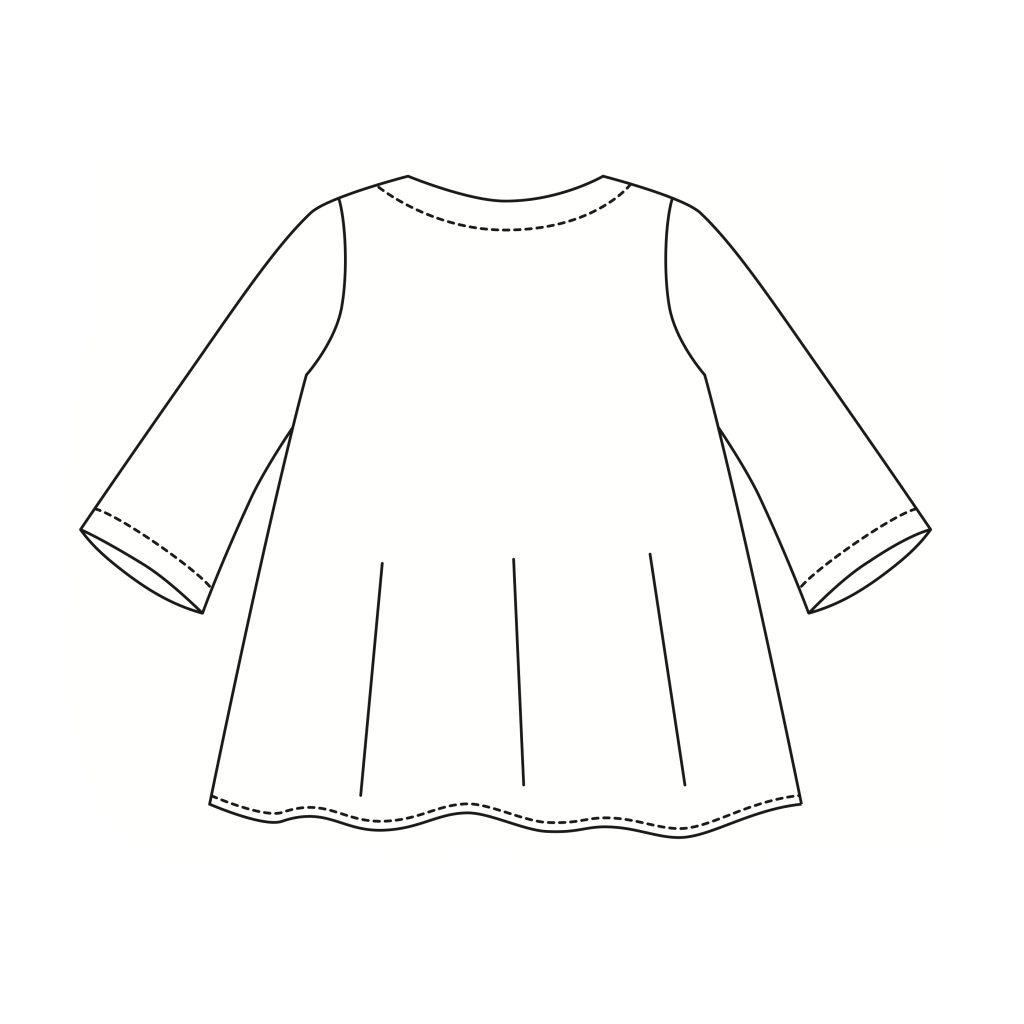
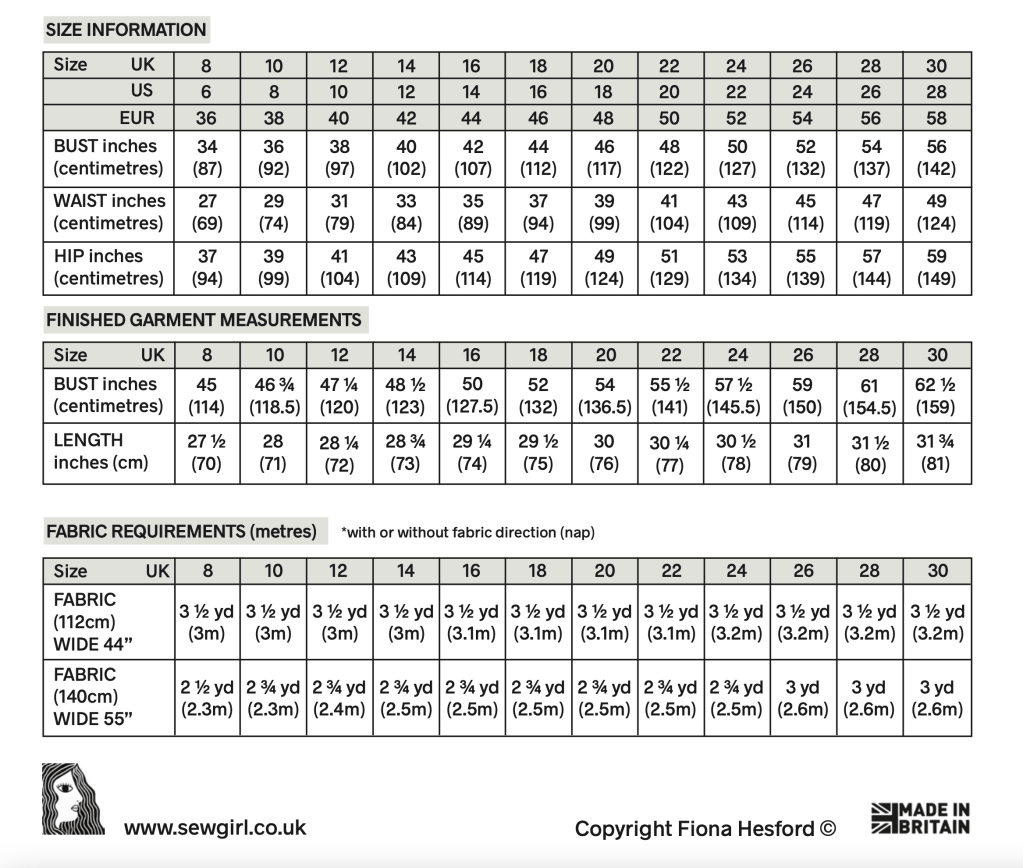
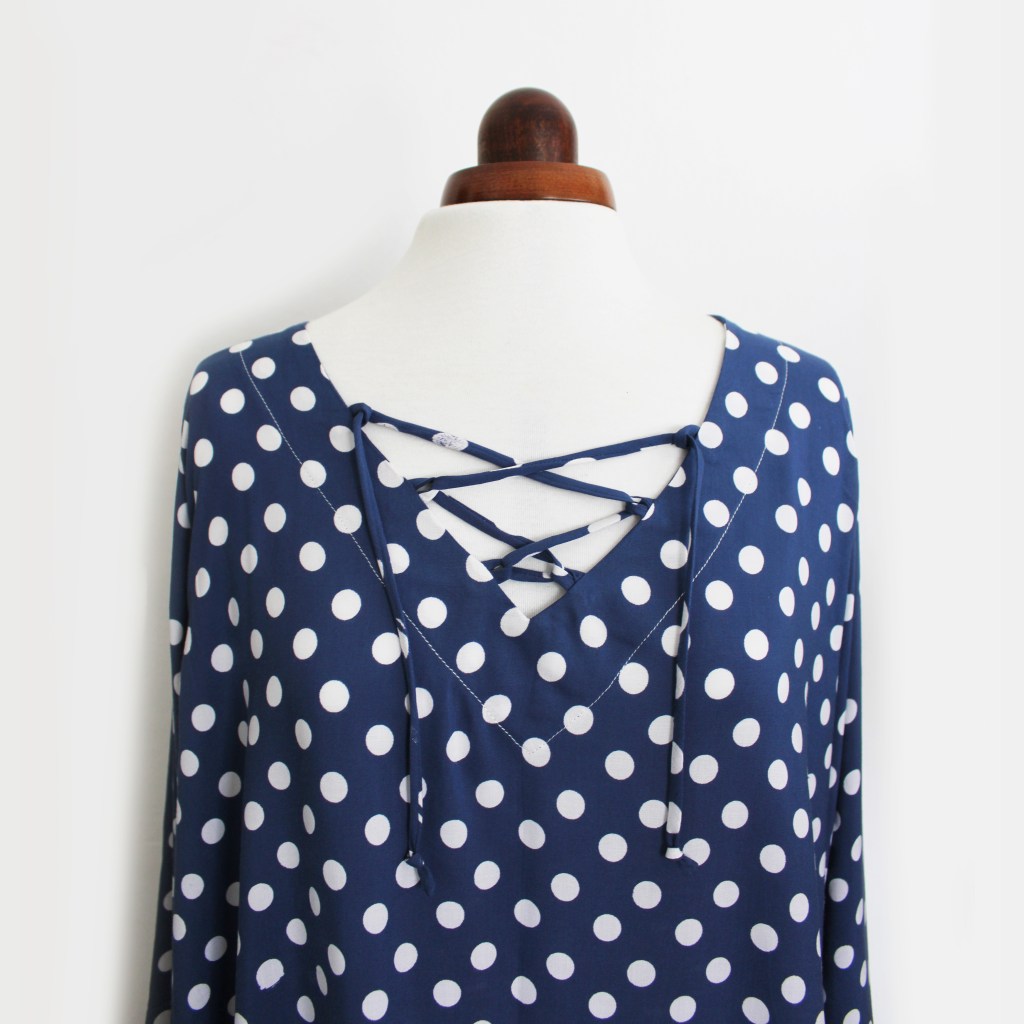
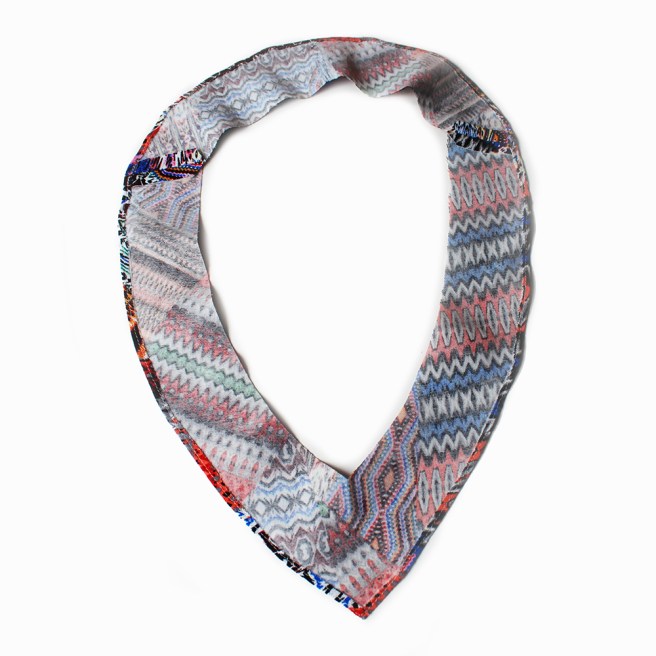
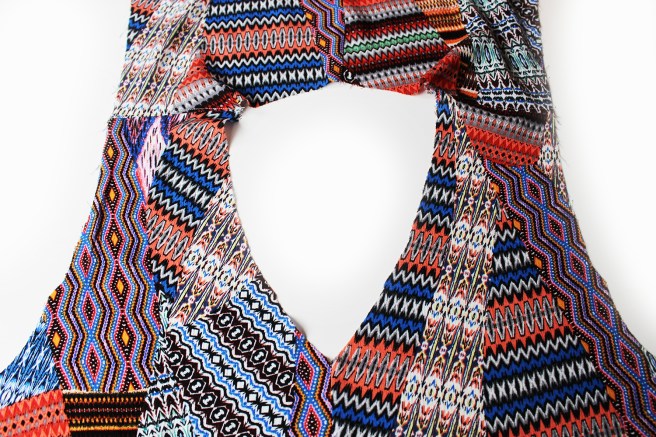
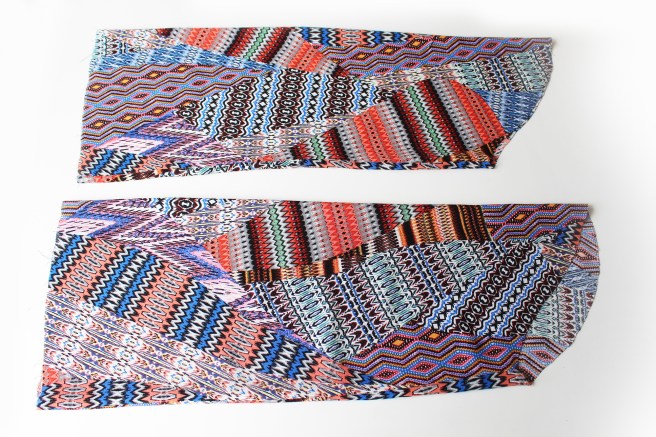
Nina top sewing pattern to make a long trapeze A-line shape, kaftan style top with a lace up V-neck detail and fluted sleeves. Suitable for viscose fabric, Tencel, lightweight linen or any fabric with good drape.
The top above has been made in a lovely 130gsm viscose fabric by Sewmesunshine
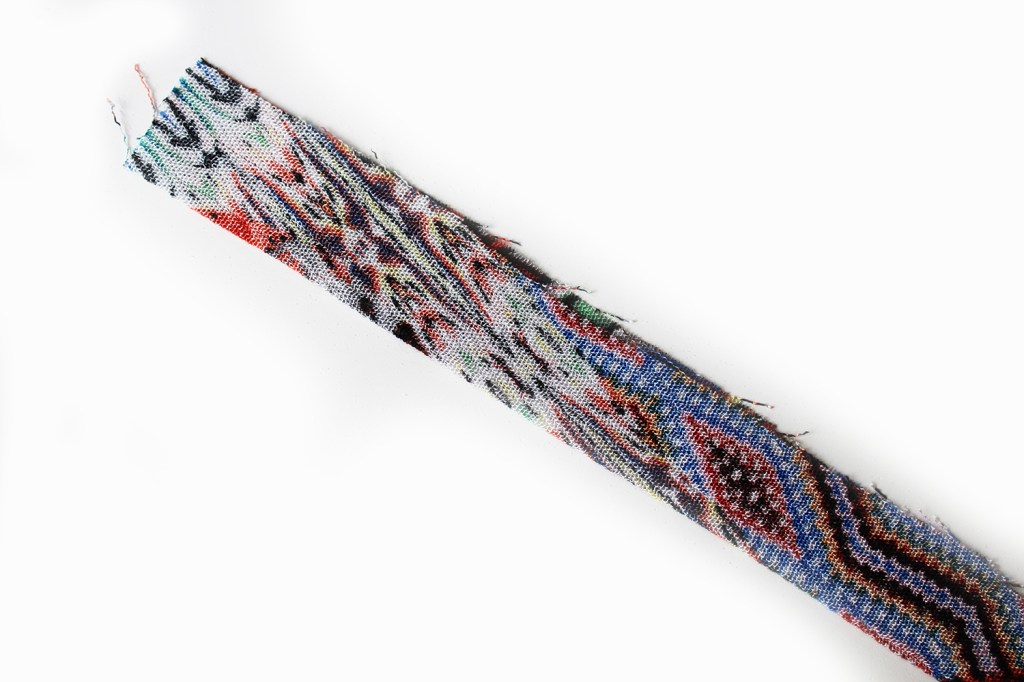
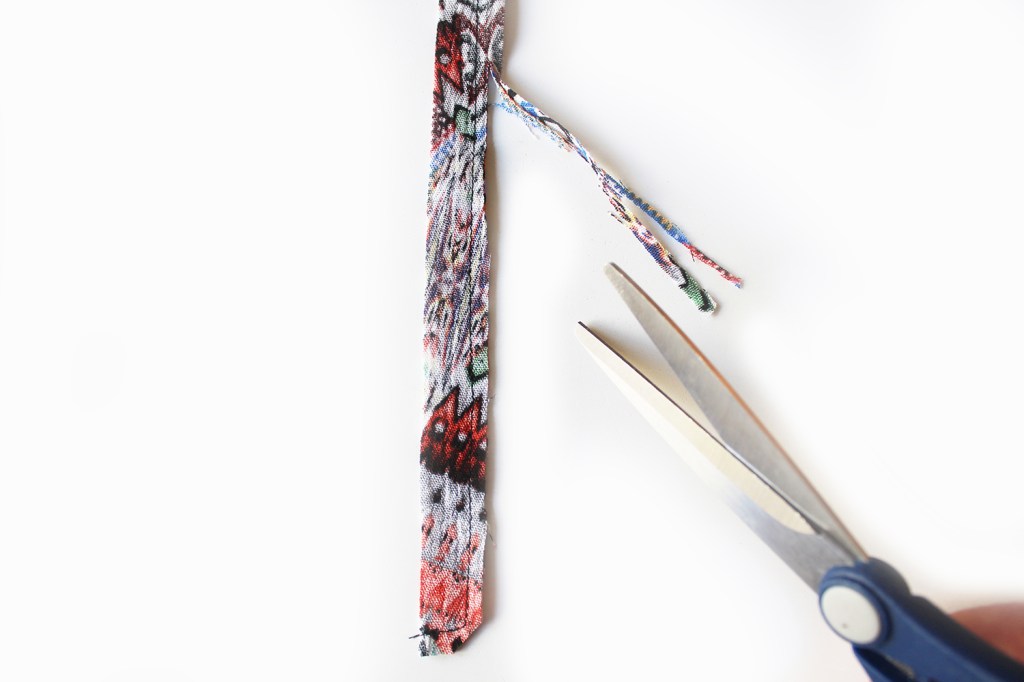
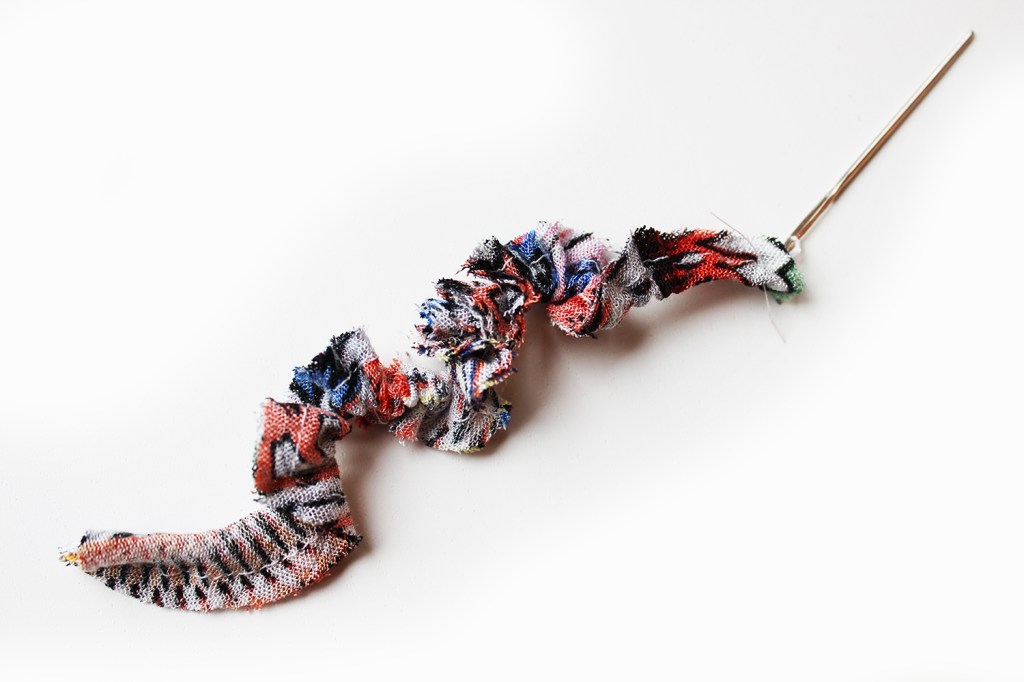
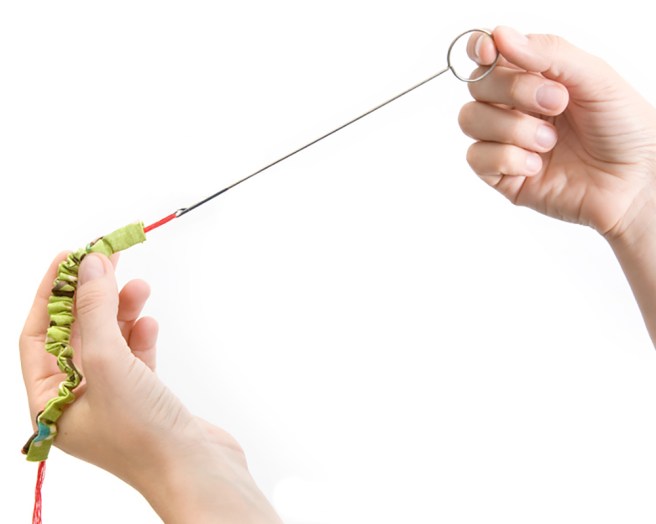
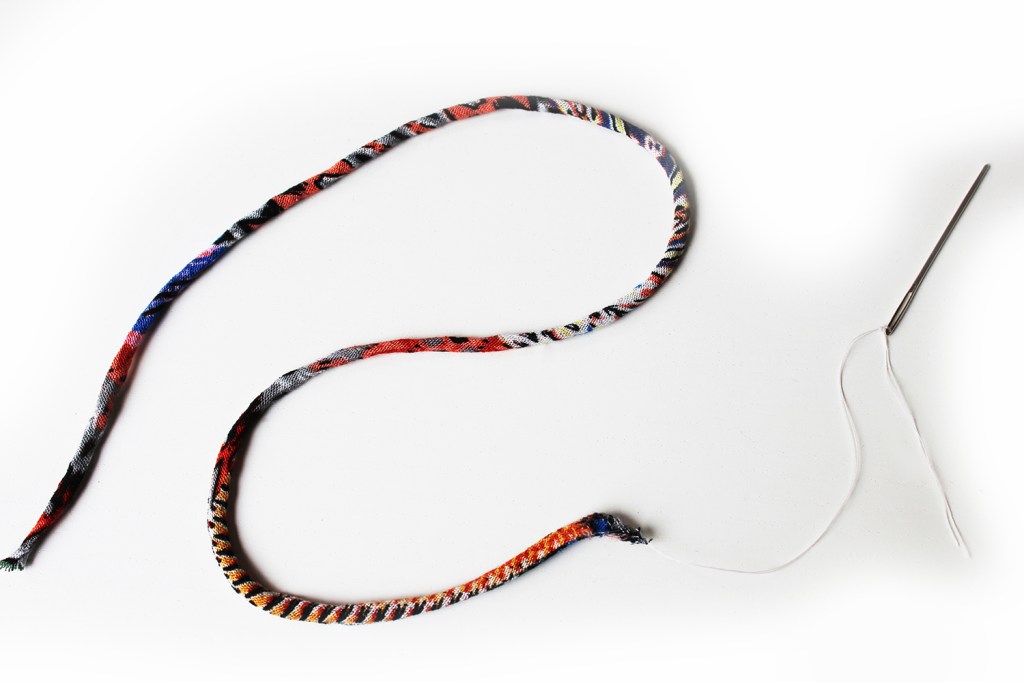
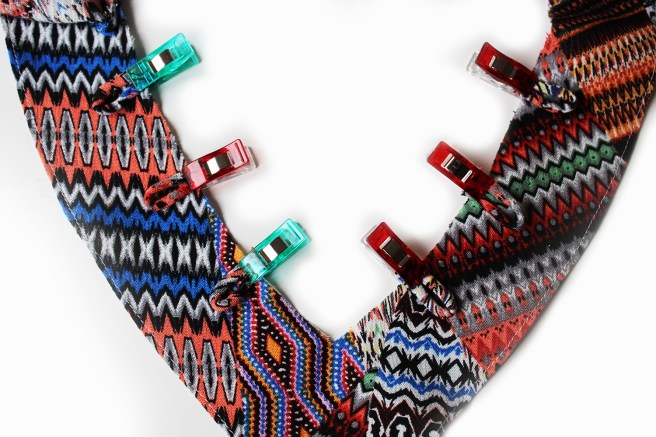
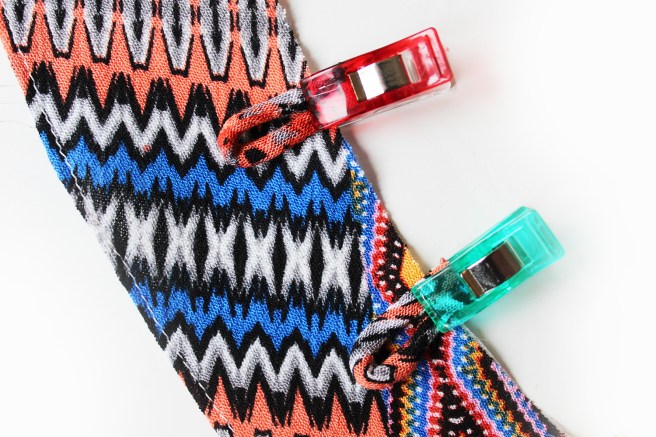
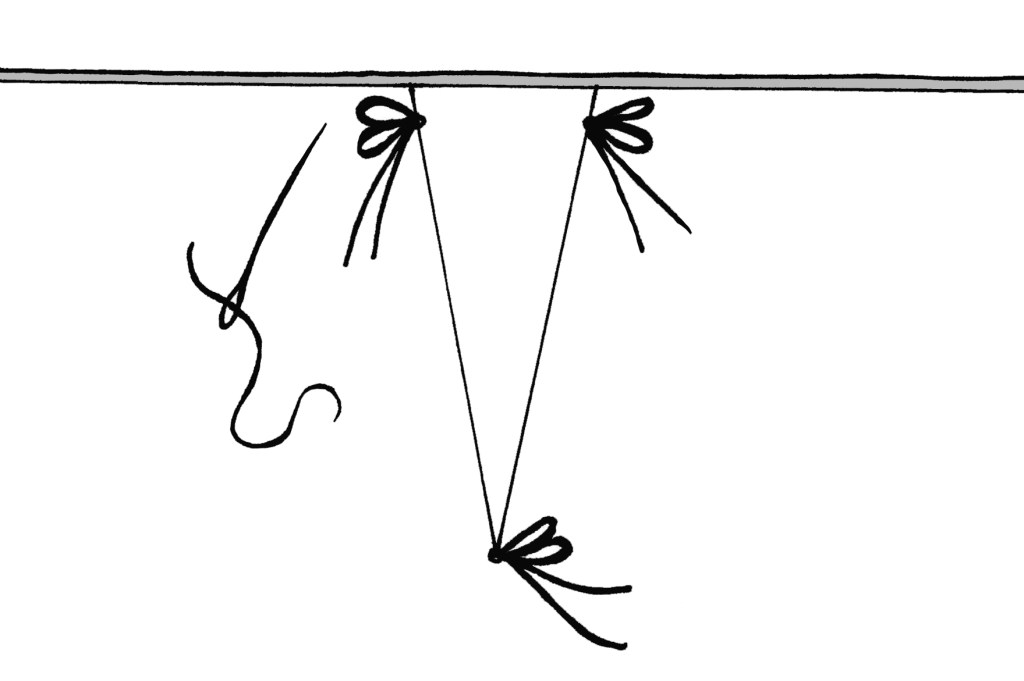
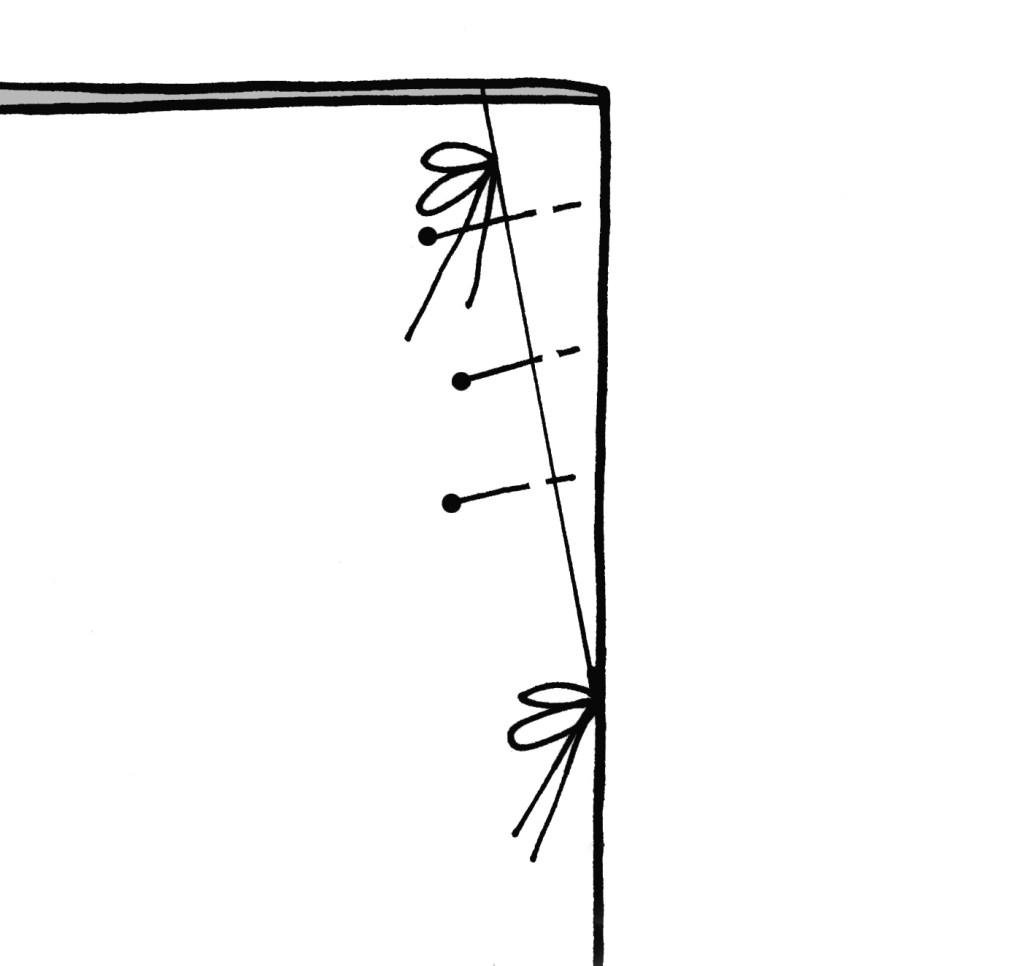
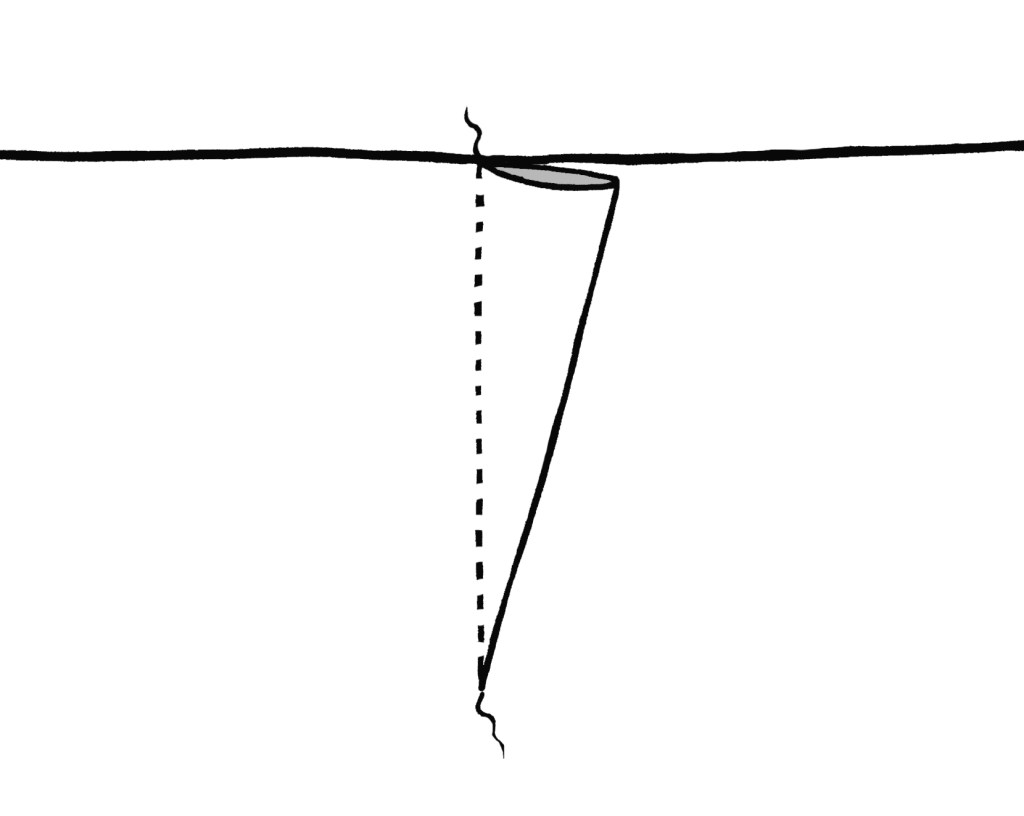
Fold the Tie/Loop Tab pieces in half aligning the long raw edges. Sew. Leave a long thread end at one end. Trim the seam allowance to 5mm (1/4″).Tie the long thread end on to a needle and pass through the tube. Pull the Tie/Loop inside out. Alternatively, use a loop turner tool.
A loop turner tool.
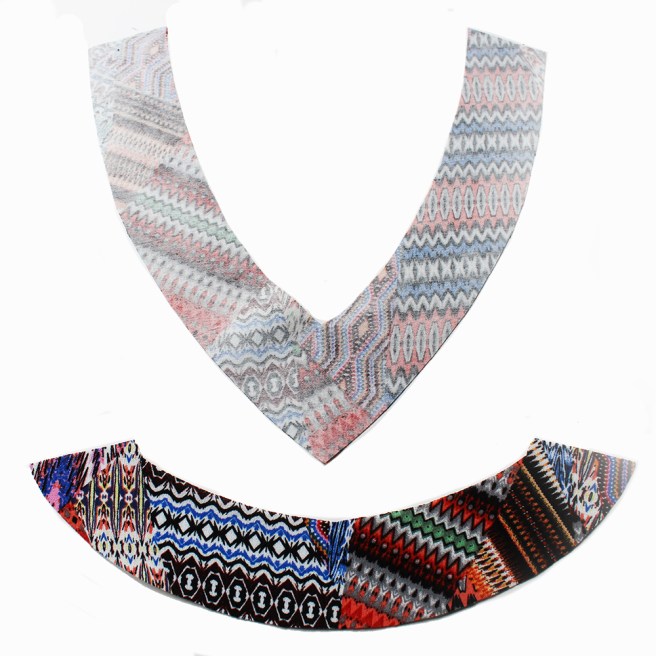
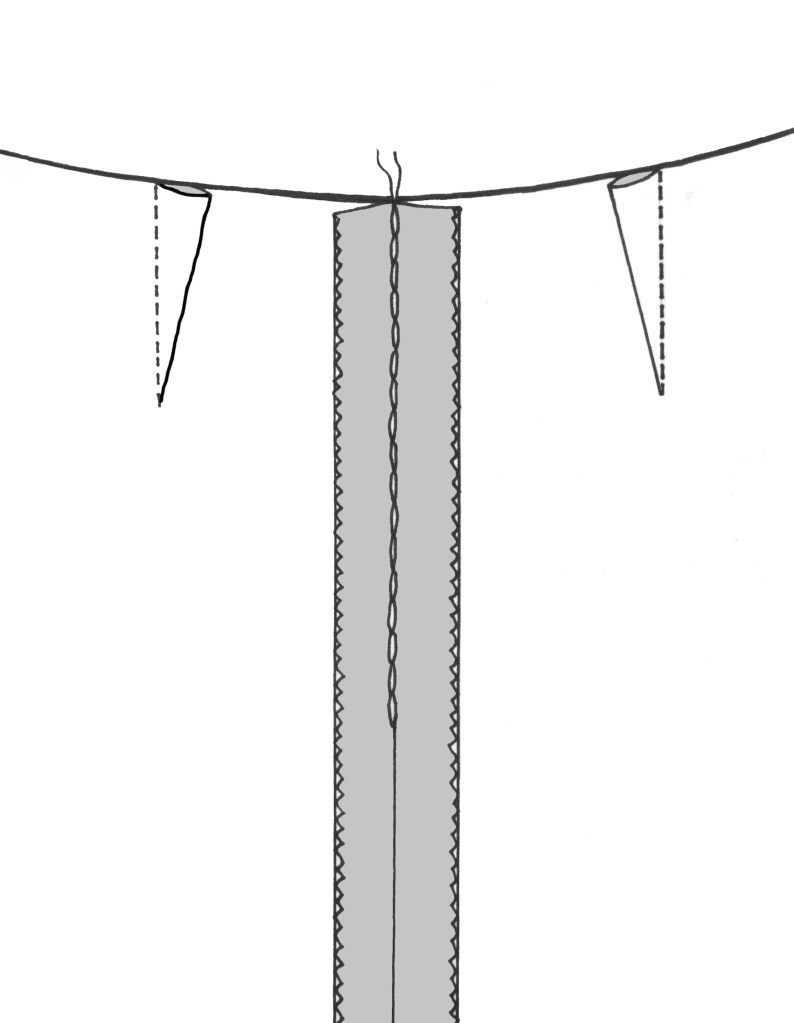
The Loop Tab is shorter with open ends. The Shoestring Tie is closed at each end with an opening in the centre for turning.
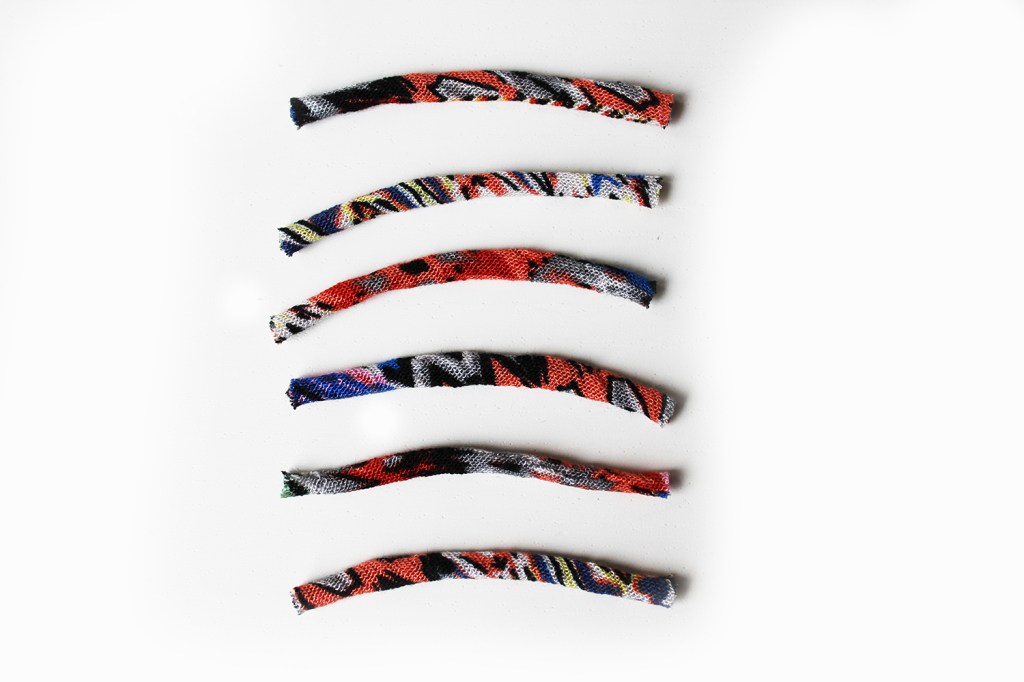
The Loop Tab piece is cut into six pieces measuring 5cm long (2″).
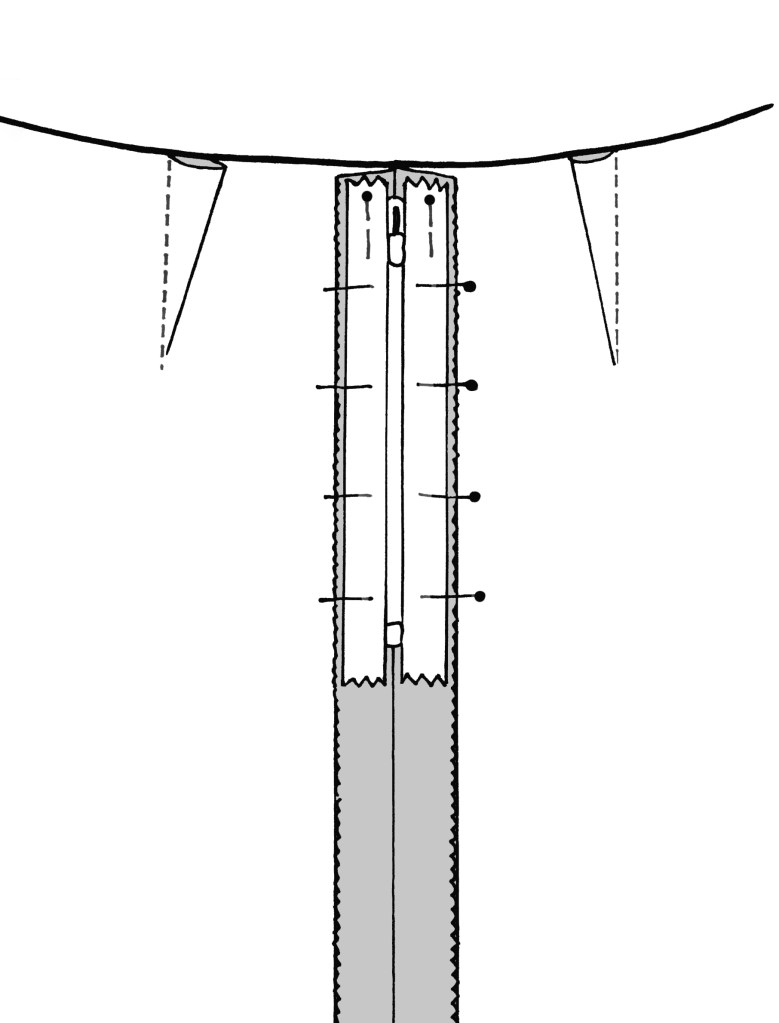
Loop Tabs are pegged to the Neck Facing Front at each Tab position as marked on the template. You can use small pieces of quilting tape to stick them temporarily if you prefer.
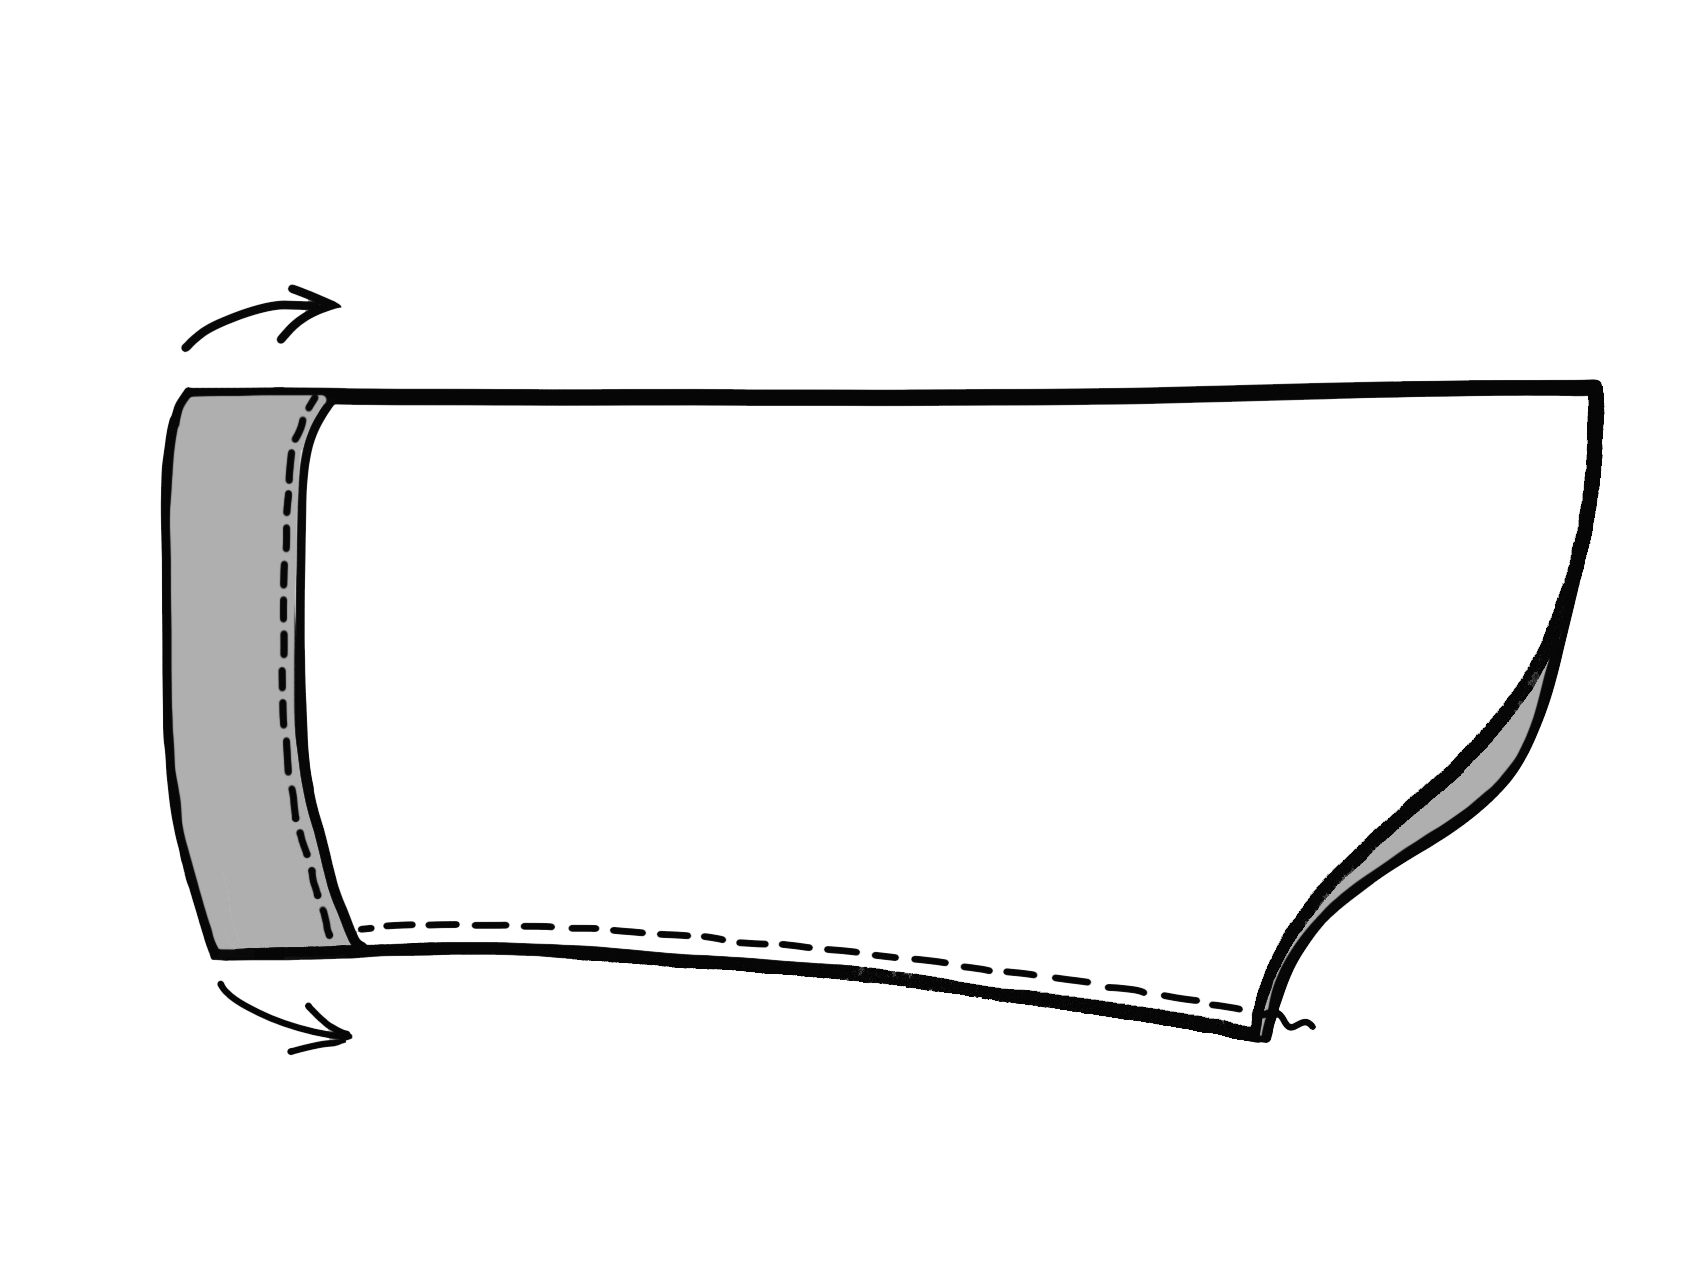
The Front and Back Facing pieces are stitched together at the short edges. The outer Facing edge is folded under approx 5mm (1/4″).
Join the Front to Back at the shoulder edges. Press the seam allowance towards the Back. Topstitch.
Pin the facing to the Front/Back piece. hand tack all around. Sew.
Press the Facing upwards. Understitch.
Fold the Facing to the reverse side. Pin. Sew all around the outer folded edge.
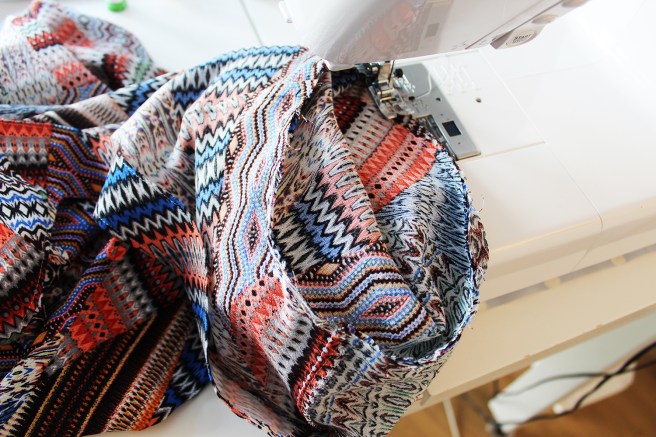
Sleeves
Attach the Sleeve Cuff Facing to the Sleeve lower edge. Press away from the Sleeve. Fold up a small 1cm (3/8″) hem at the Cuff facing edge.
Sew the Sleeves together at the long raw side edges.
Fold over the Cuff facing to the wrong side. Press. Pin. Sew.
Insert the Sleeve head to the armhole. Match up the Back section to the Back. Pin all around. Hand tack. Sew. Press.
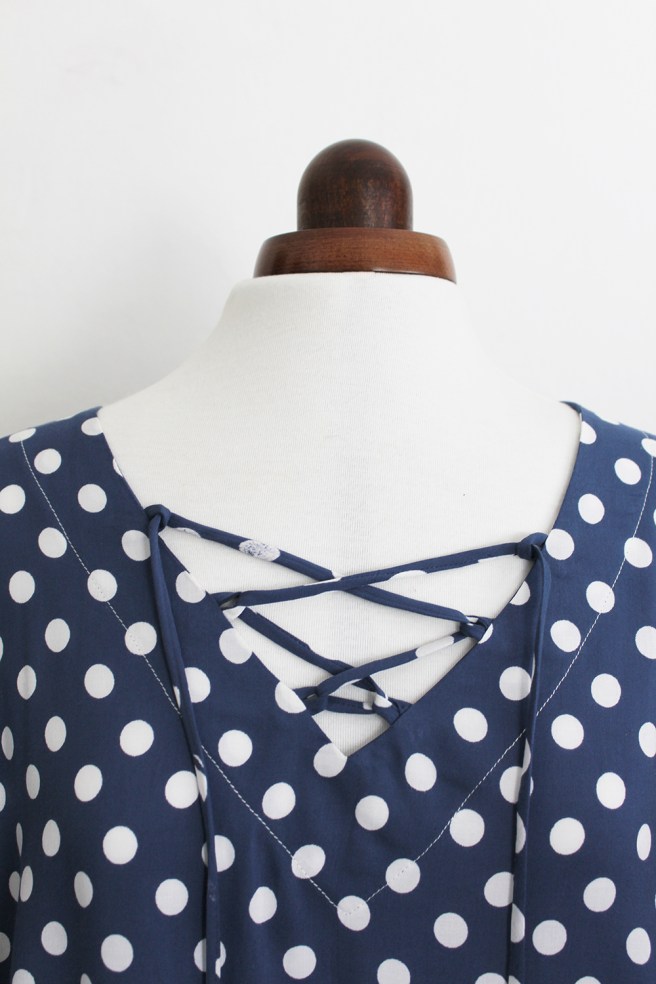
Insert the lacing. Tie a knot on the Tie ends.
Ta dah!
All images and text are subjest to copyright. Fiona Hesford 2025.
Please ask prior permission if you wish to use any of the content of this blogpost.
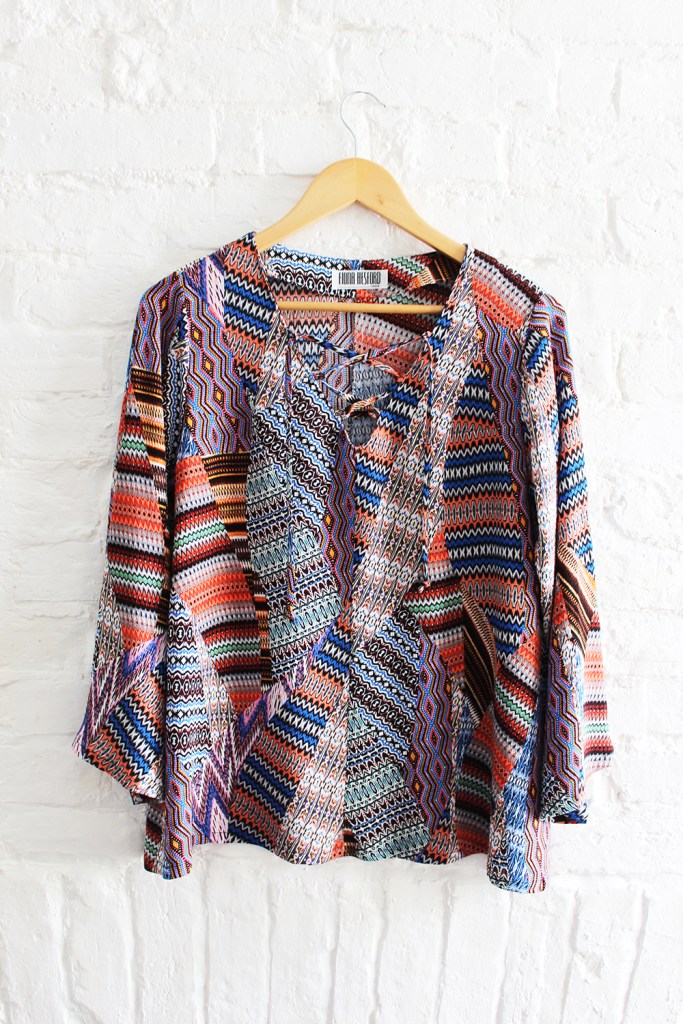
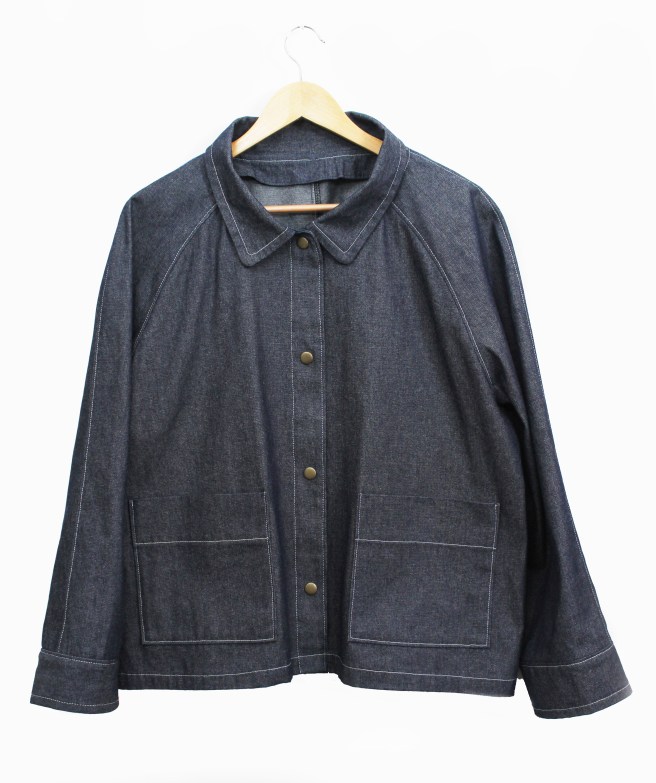
JOSIE JACKET pattern by Sewgirl- a lovely addition to any wardrobe. Chic and stylish, team up with skirts (Cecily or Dotty) or trousers (Elsie or Nora) for a timeless style and comfortable fit. Boxy in shape, with easy to insert raglan style sleeves, collar, cuffs and two large patch pockets. The jacket is fastened up by four buttons (as top image) or alternatively snap press studs (lower image).
Small (UK 8-10), Medium (UK 12-14), Large (16-18), XL (20-22) and 2XL (24-26).
Suitable fabrics to make Josie are 4.5 whale cord, 8oz denim, cotton canvas, or any medium weight cotton fabric.
You can see with this picture that I’ve used a piece of Liberty fabric to make the bias binding for the neck seam raw edge. I’ve also made a double line of stitching around the pockets and with the denim version, stitched a single line with contrast thread instead. I used a standard sewing thread in an off white colour. Sometimes I like to use two ends of thread together for extra stitch definition, by putting a second reel on the feeder, a topstitch thread could be used but I prefer a more subtle line of stitching.
Josie Jacket measurements and info..
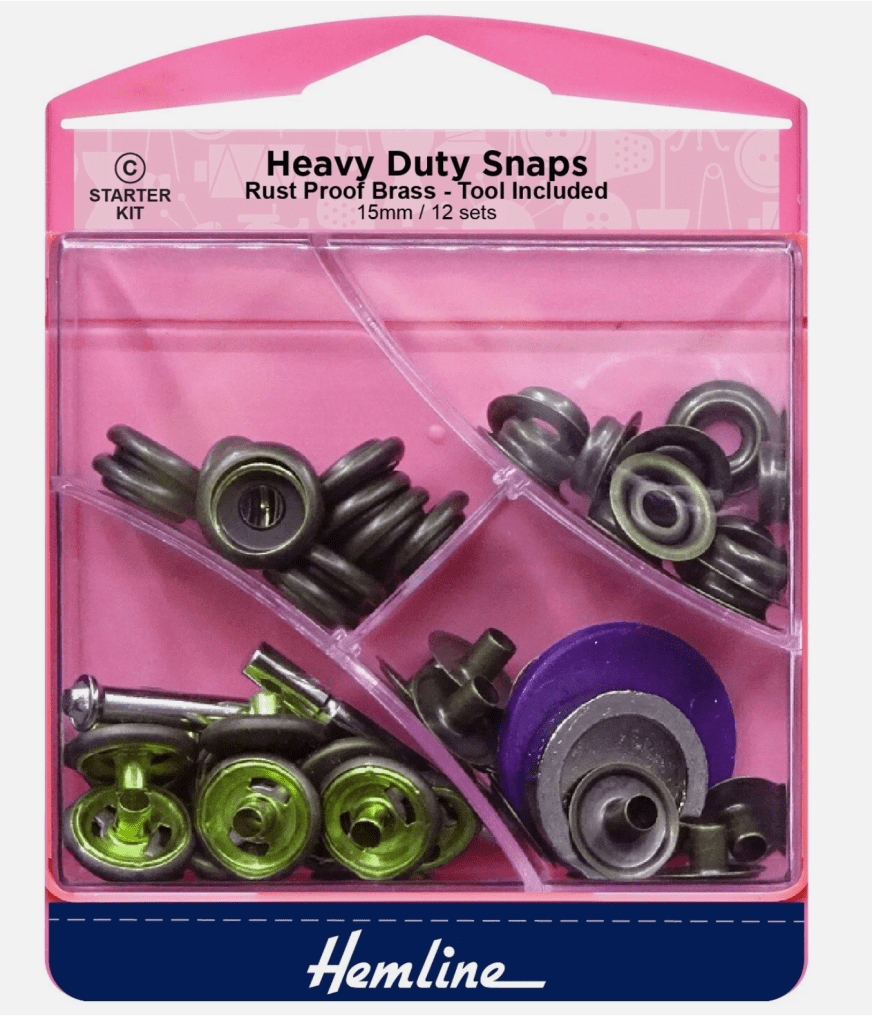
Instead of using buttons, I made the denim jacket version with these heavy duty snaps. They come with a tool, all you need is a hammer and one pack makes 12 sets, enough for 4 jackets!
HOW TO MAKE JOSIE JACKET
Here are abridged step by steps about making Josie. The pattern includes a fully illustrated booklet with more in-depth instructions and glossary. Seam allowance is 1cm (3/8″).
All pattern pieces have notches which should be transferred to the pattern after cutting out. Buttonhole positions should be marked on the Front with some tailor tack stitches or an invisible marker pen.
POCKETS
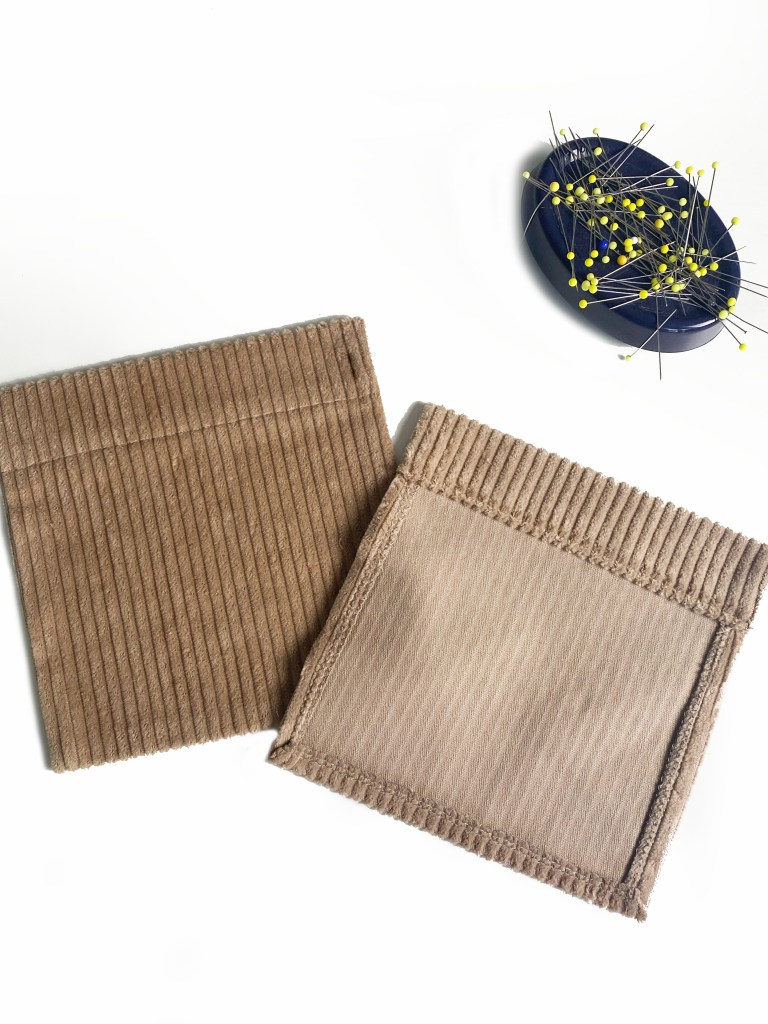
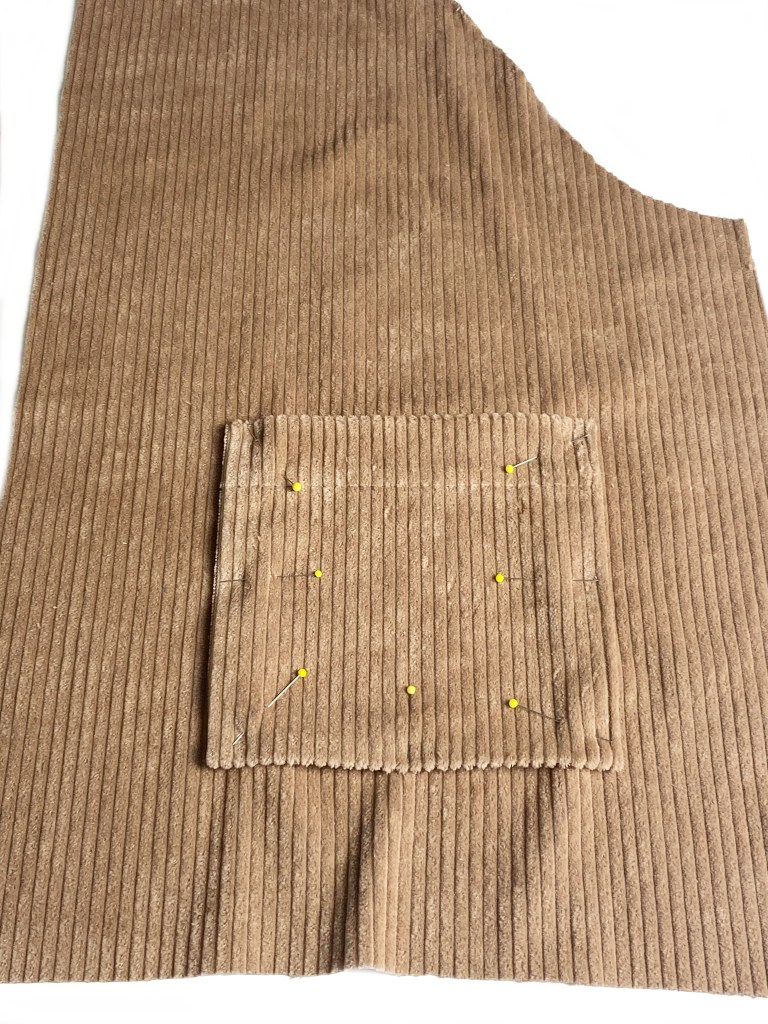
First make up the pockets. Pin to the Jacket front pieces and stitch in place. The pattern templates show you where to place them.
Click image to open
JOINING THE BACK PIECES
Sew together the Back pieces, finish the seam allowance raw edges then press to one side. Topstitch.
ATTACHING THE SLEEVES
Join the Front Sleeve to the Front on each side.
Join the Back Sleeve to the Back on each side.
Join the Front to Back at the Sleeve top edge.
JOINING THE FRONT TO BACK& SIDE SLITS
Join the Back Sleeve to the Back on each side.
Sew the Front to Back leave the seam open below the notches. This is for the side slits.
Turn under a small hem at each side slit edge. Sew all around.
COLLAR
Staystitch around the neck edge. It prevents it stretching.
Make the Collar.
Pin the Collar to the back neck right sides together. Hand or machine tack.
FACING
Fold over 1cm on opposite long edges of the Facing pieces. Pin to the Front. The Facing is shorter at the lower edge so don’t worry! – this is to accommodate the hem. Sew.down the long outer edge and across the lower short edge.
Attach the Binding to the Neck seam raw edges. Clip the seam allowance corners each side.
Turn the Facing to the wrong side, pushing out the corners from the inside with a poking tool. Turn under the hem at the lower edge. Hand Tack. Sew all around. Remove tacking.
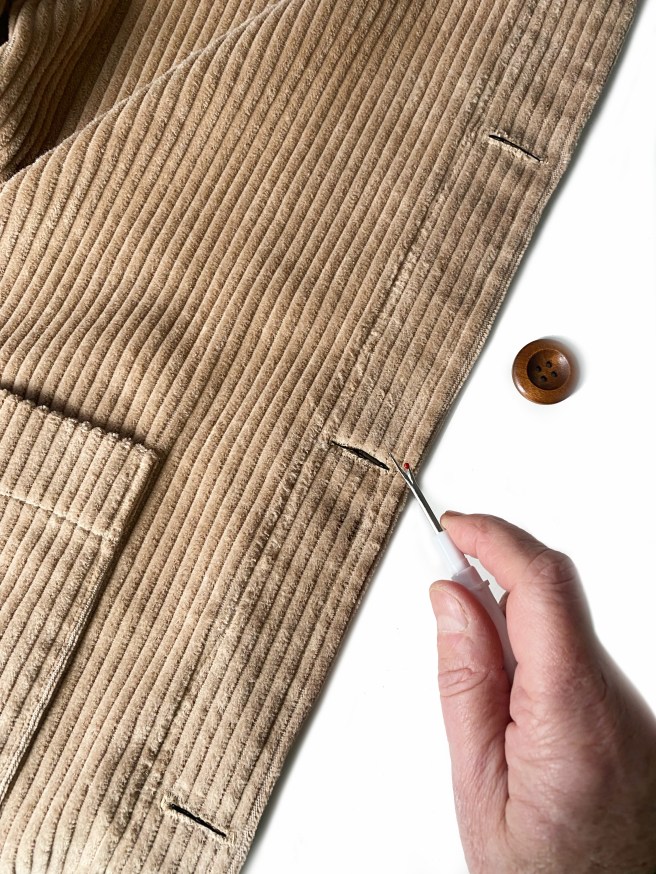
BUTTONHOLES
Make the buttonholes in the marked positions or use snap fasteners as shown below in the denim version. Sew on buttons if you have made buttonholes.
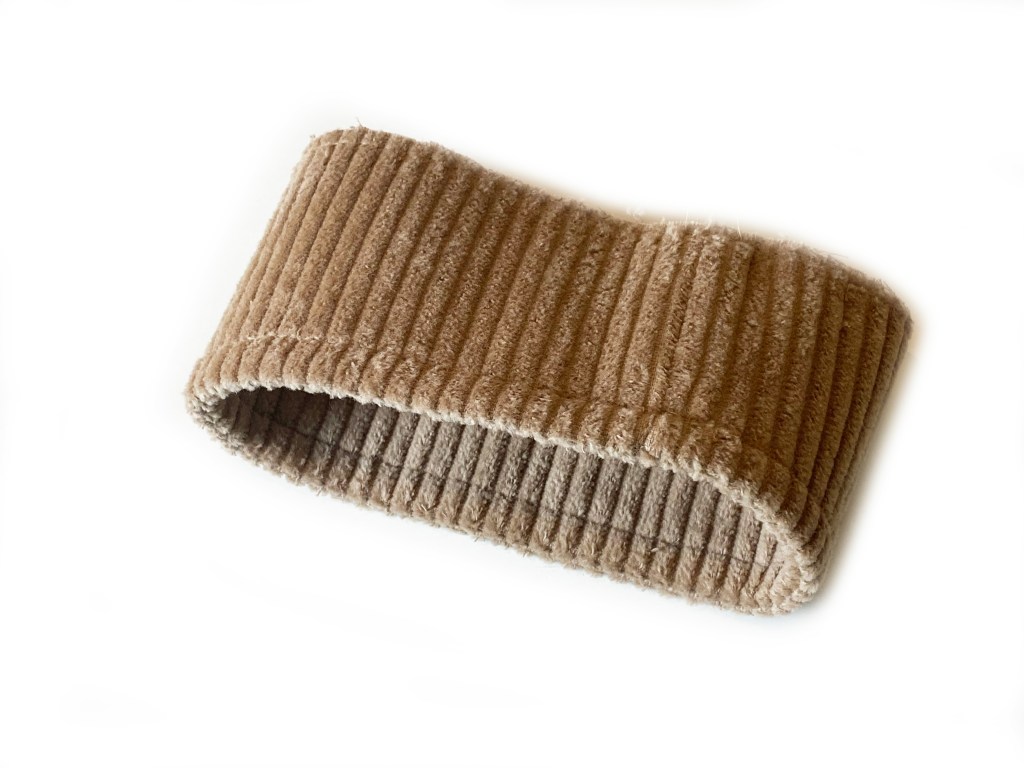
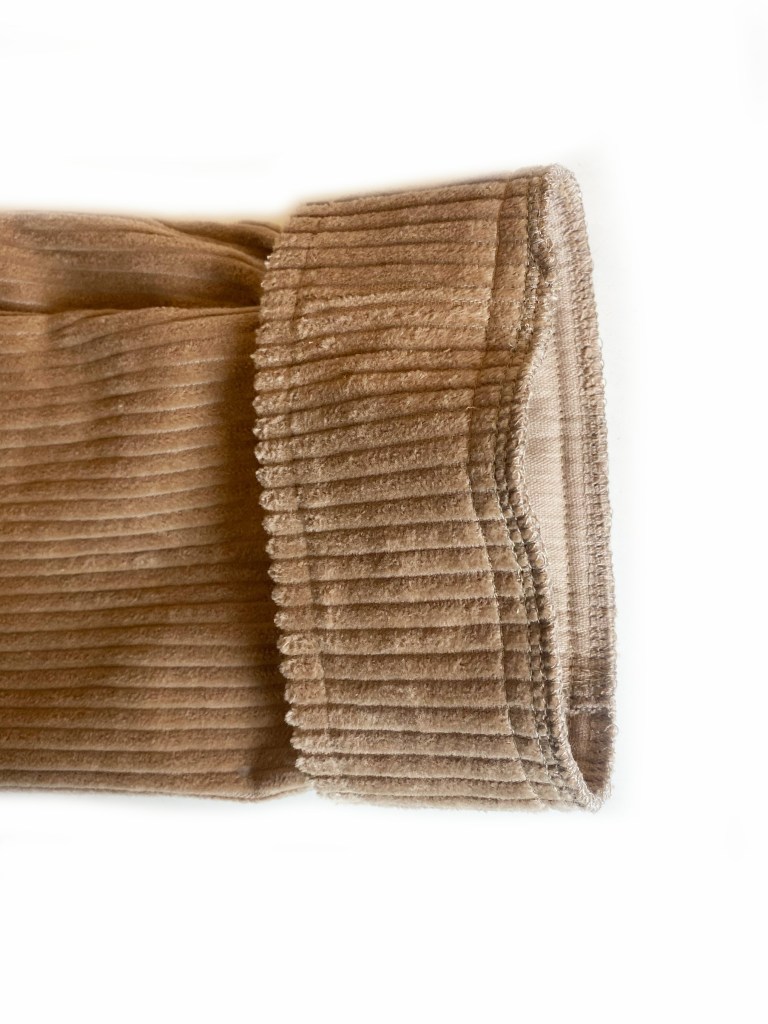
CUFFS
JOIN THE CUFF PIECES LONG EDGESJOIN THE CUFF SIDE EDGESFOLD THE CUFF SO THE WRONG SIDES ARE TOGETHER. TOPSTITCH 1CM (3/8″) AWAY FROM THE FOLDED EDGE ALL AROUNDATTACH THE CUFF TO THE SLEEVE EDGEIT HELPS TO REMOVE THE MACHINE TABLE TO INSERT THE CUFF
Press the cuff away from the Sleeve and topstitch.
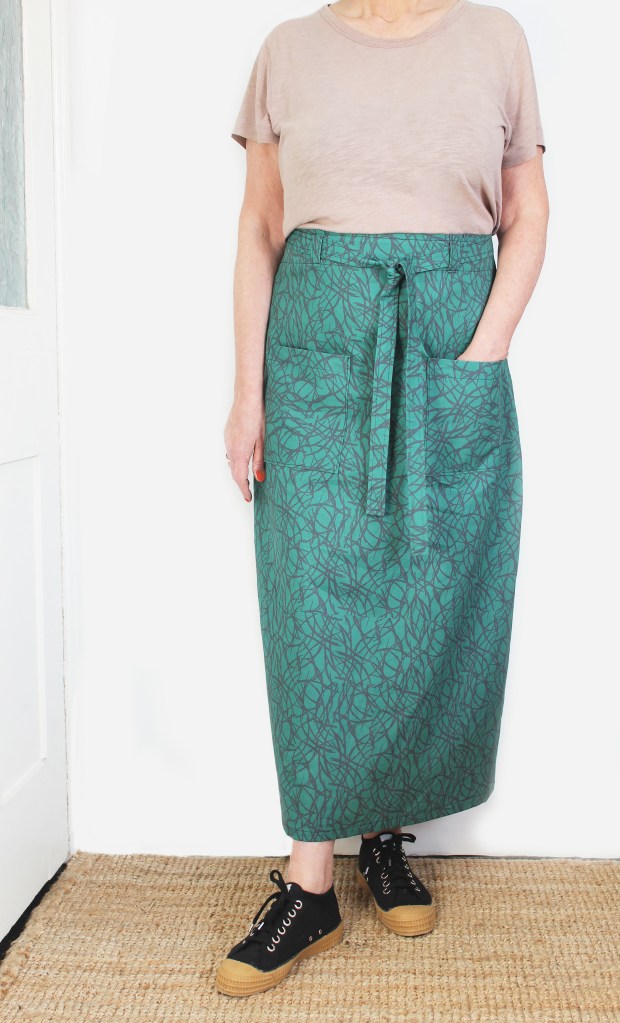
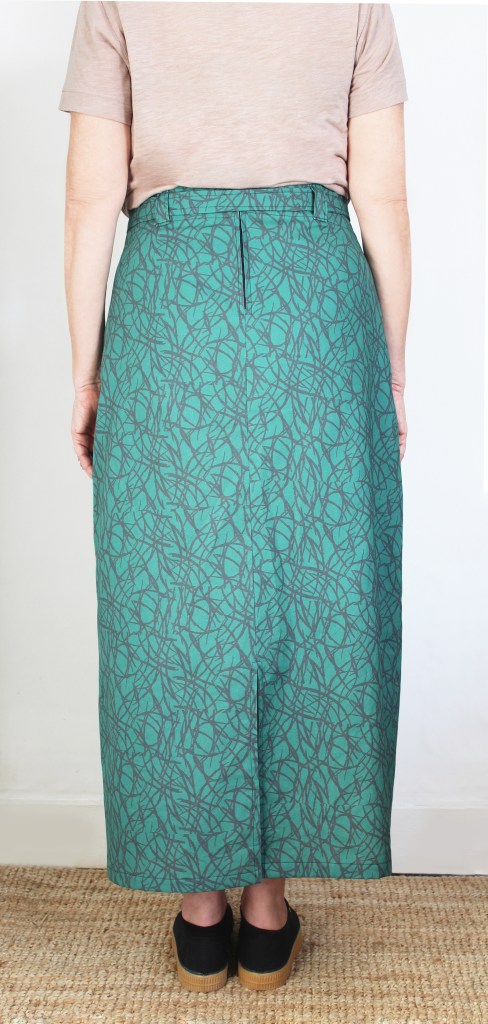
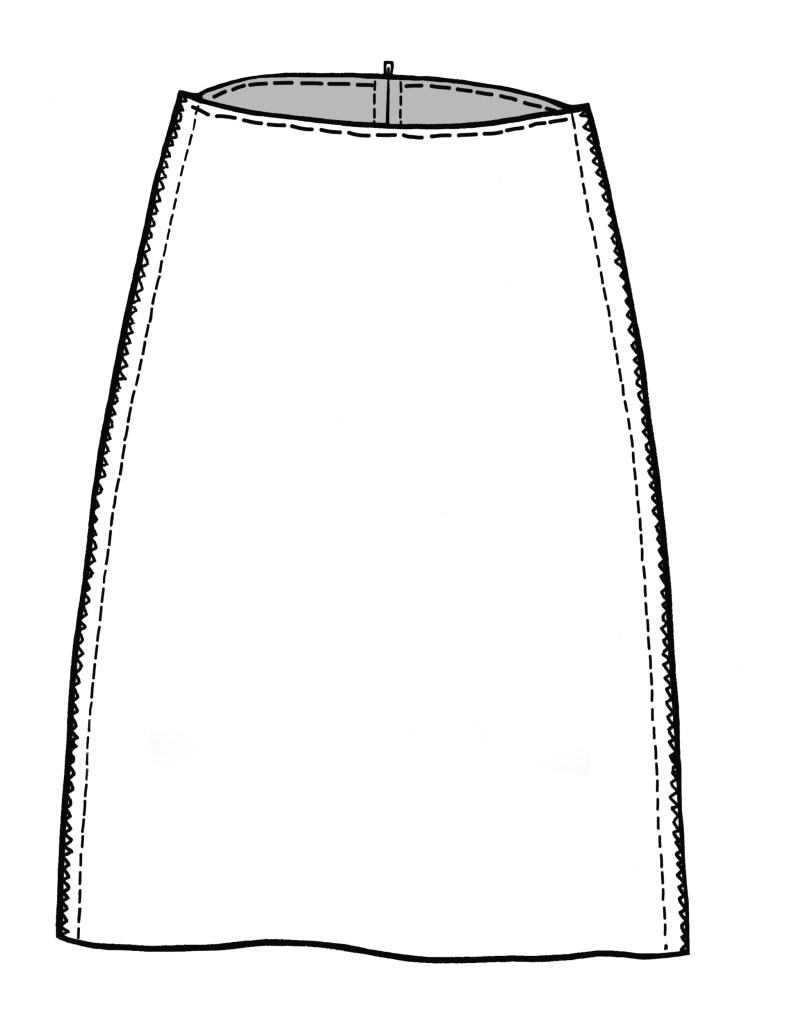
DOTTY LONG SKIRT – a new skirt pattern by Sewgirl, perfect for holidays and comfortable for everyday wear – a lovely addition to any wardrobe with its timeless, elegant style and flattering slimline silhouette. I love wearing this skirt with sandals or trainers in Spring/Summer and ankle boots in the Fall. Its a simple sew but one that I’m sure, like me, you will want to make again and again.
Oh and don’t be put off by the zip!- this one is easy peasy. Once mastered this easy ‘centered’ method, you will never sew a different kind of zip again. And with one in the centre back seam, it allows you to adjust at the side seams so that it fits you like a glove. An optional tie belt covers any tums – and having a facing at the top means theres no uncomfortable waistband (I’m not a big fan).
*length can be adjusted using the lengthen lines on the template.
Dotty Long Skirt is available in all sizes from UK 8-22 for size information, finished garment details and fabric requirements please check out the chart below.
Suitable fabrics to make Dotty are 6-8oz denim, medium weight cotton fabric and corduroy or woven jacquards.
HOW TO MAKE DOTTY LONG SKIRT
Here are abridged step by steps about making Dotty skirt. The pattern includes a fully illustrated booklet with more in-depth instructions and glossary. Seam allowance is 1.5cm (5/8″).
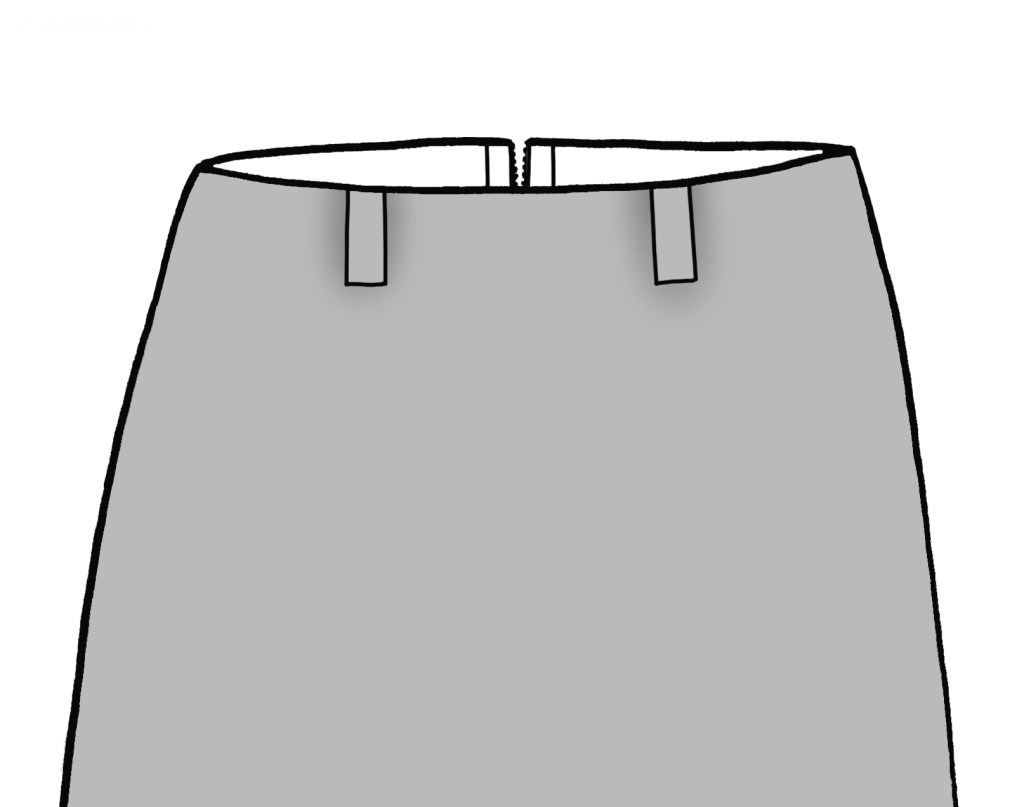
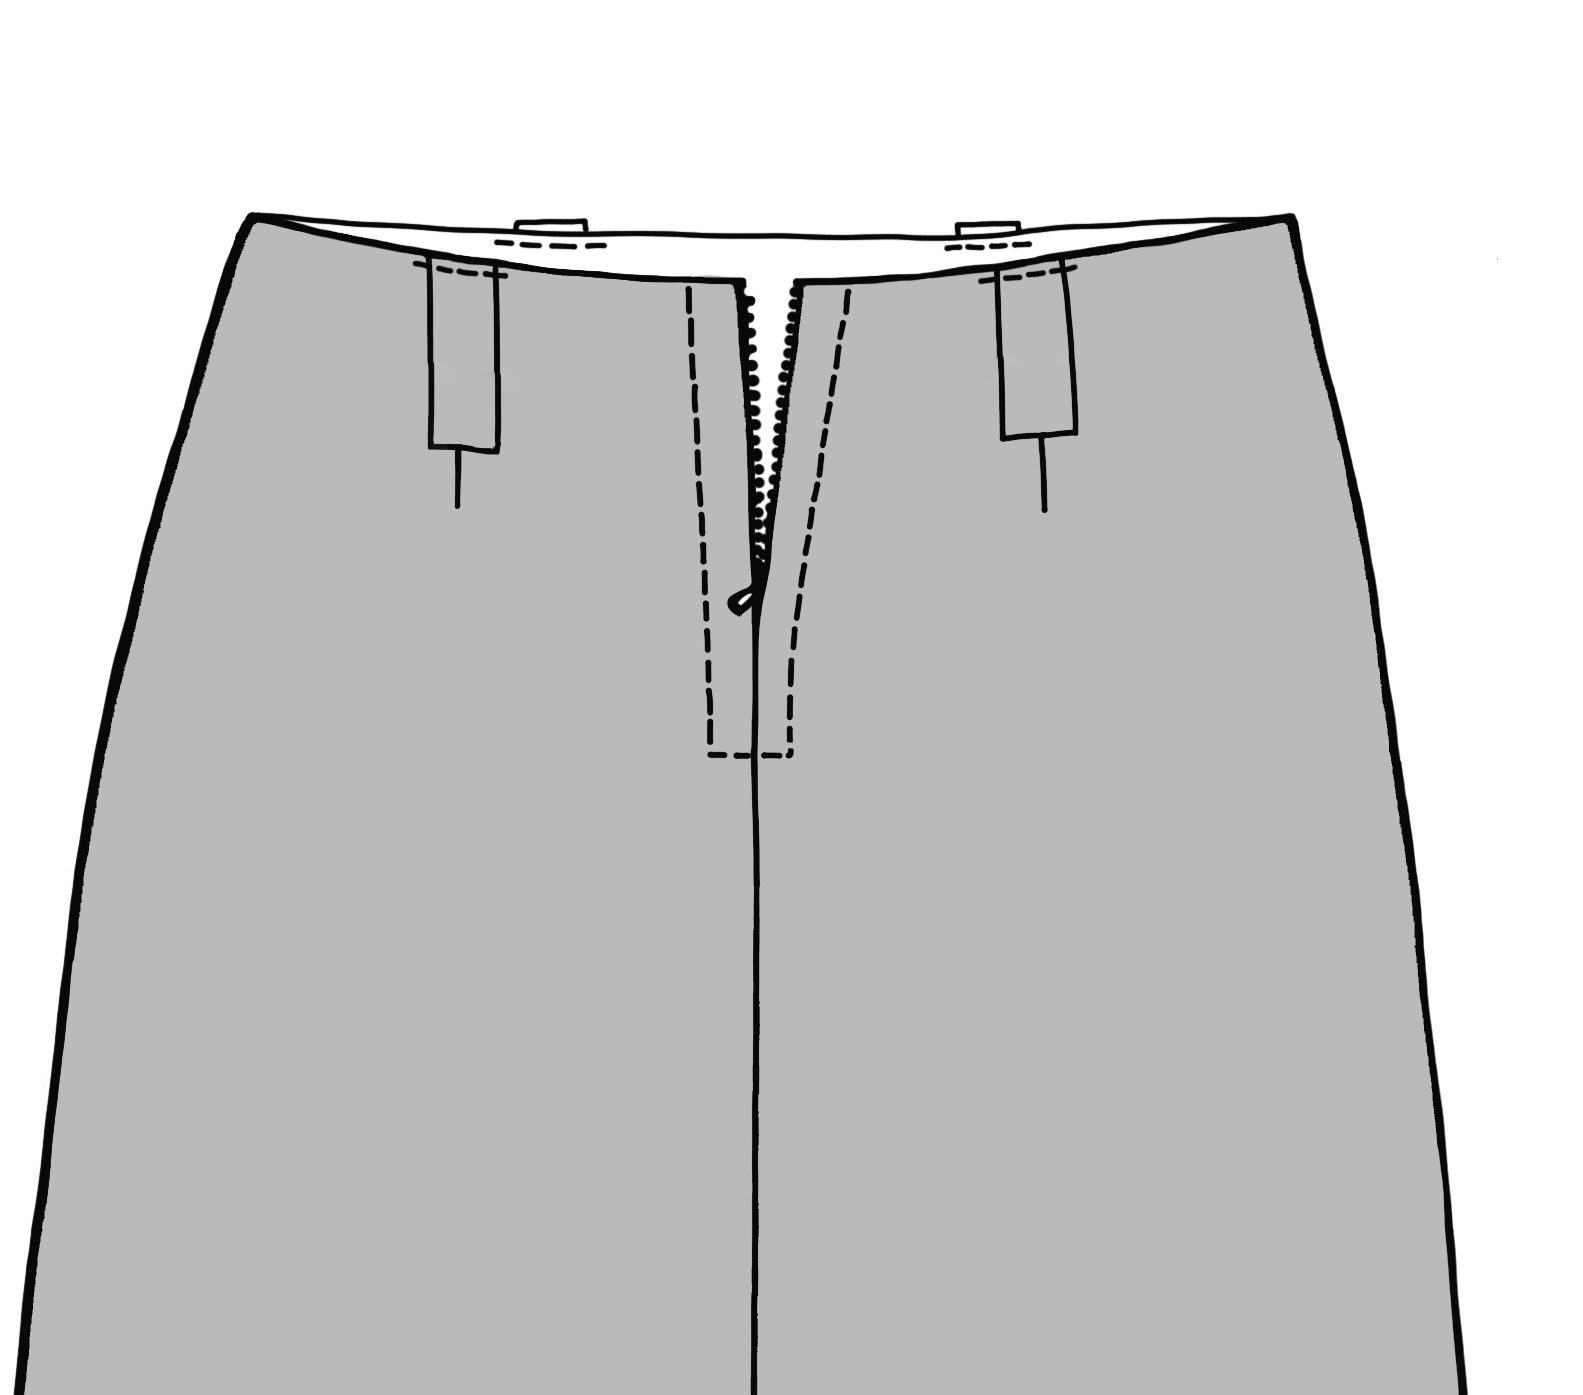
All pattern pieces have notches which should be transferred to the pattern after cutting out. The zip, tabs, and side slit positions should be marked on the Front with notches or an invisible marker pen.
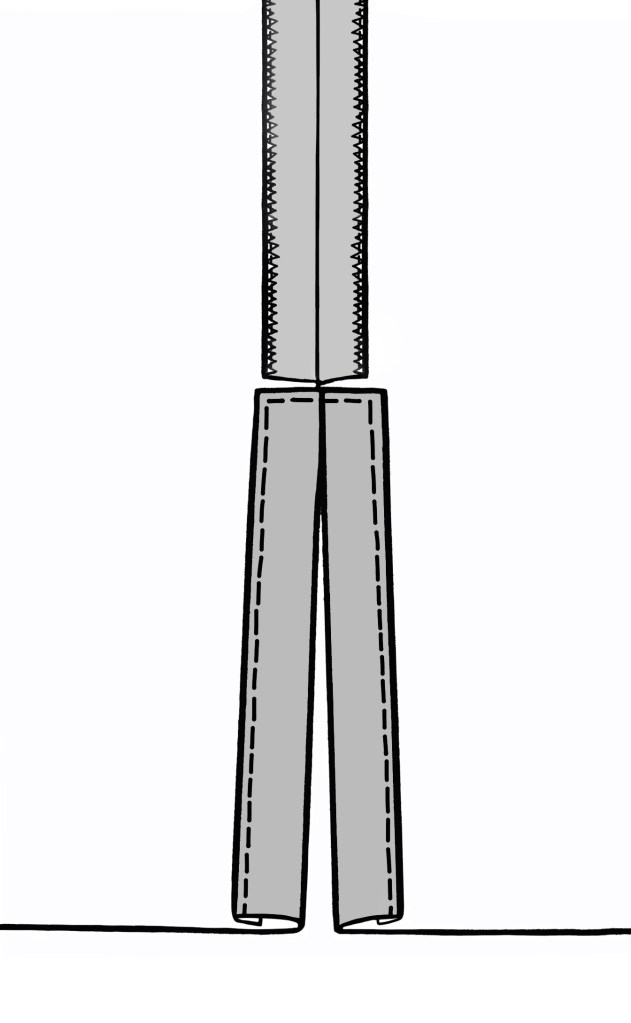
Finish all vertical raw edges to Front and Back pieces before sewing.
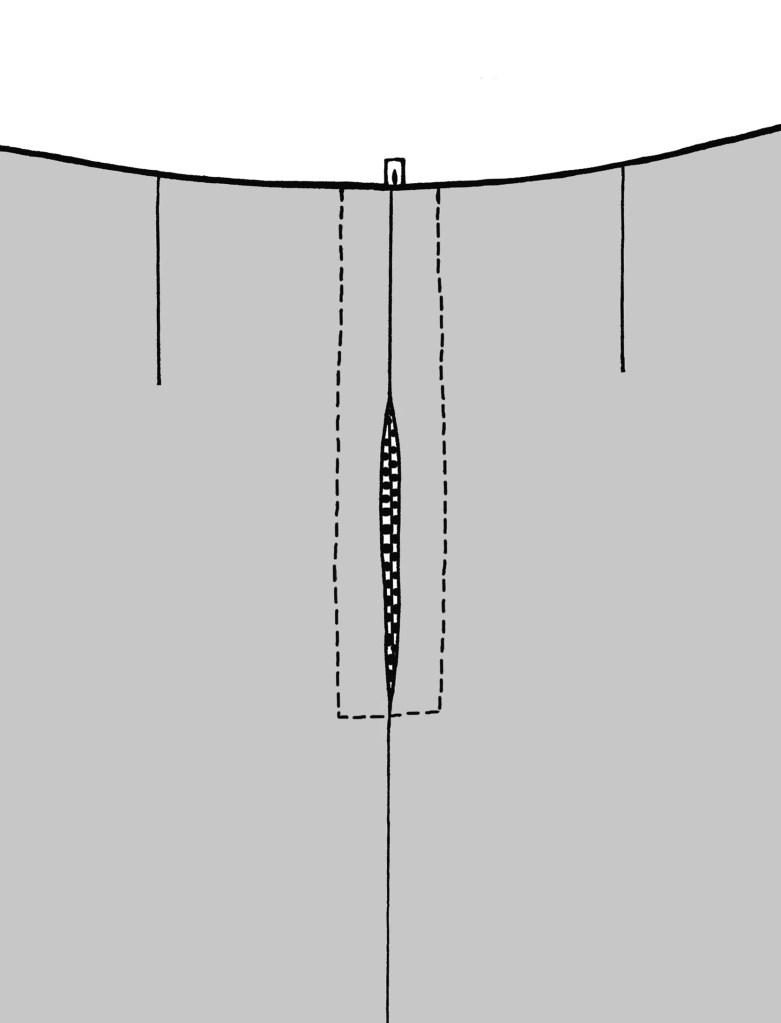
DARTS
Make tailors tacksFold the dartStitch the dartPress the dart flat and tie the thread ends.
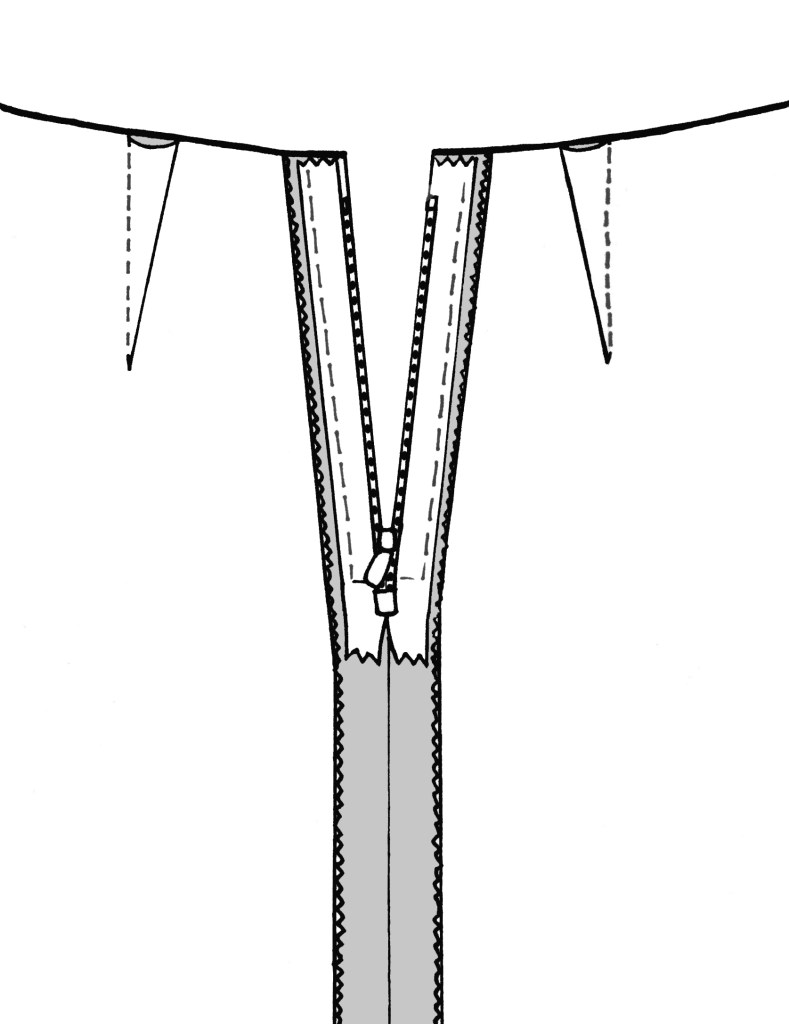
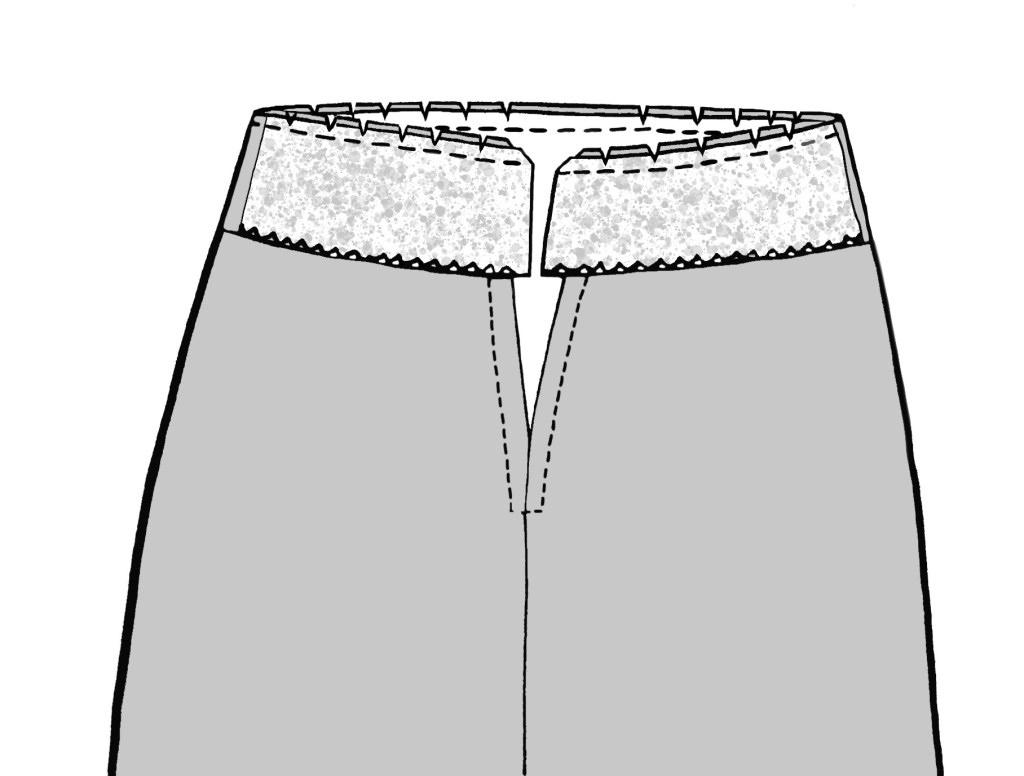
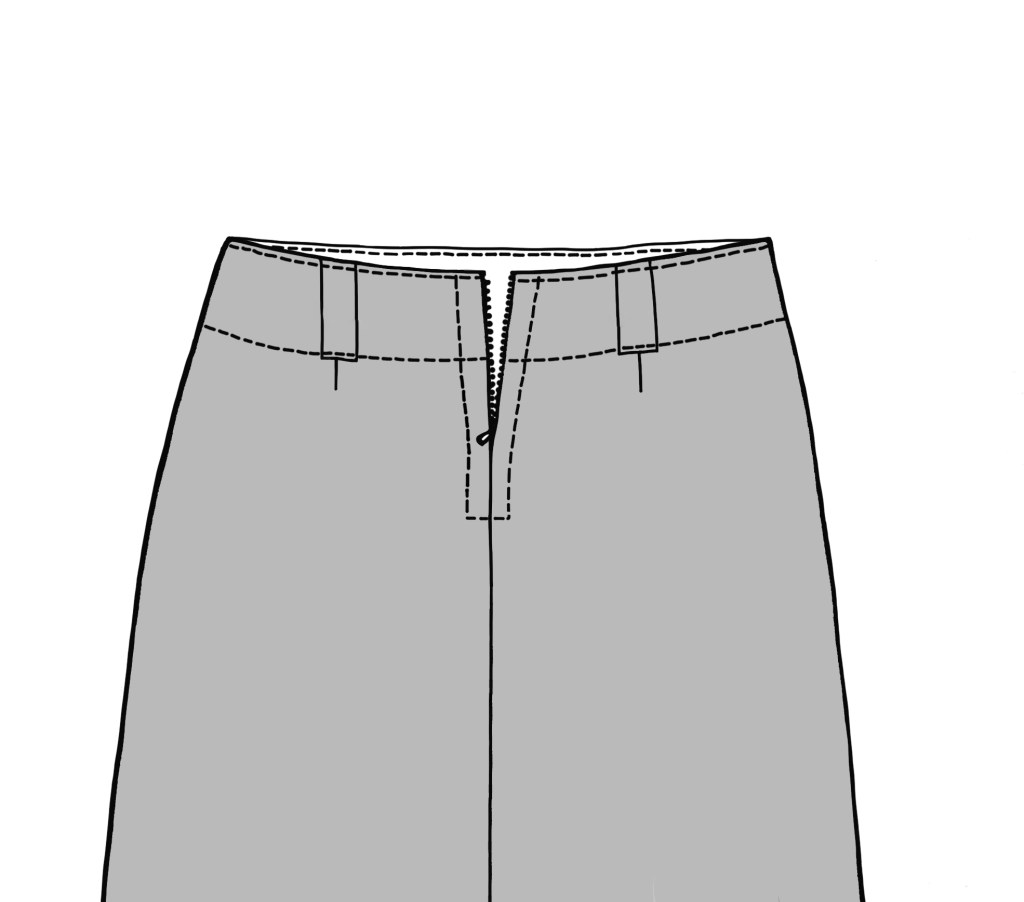
ZIP INSERTION (CENTRE BACK)
Sew the centre back seamPlace the zip face down to the back of the seamStitch all around using a zip footOpen the seam with a stitch unpickZip all done!
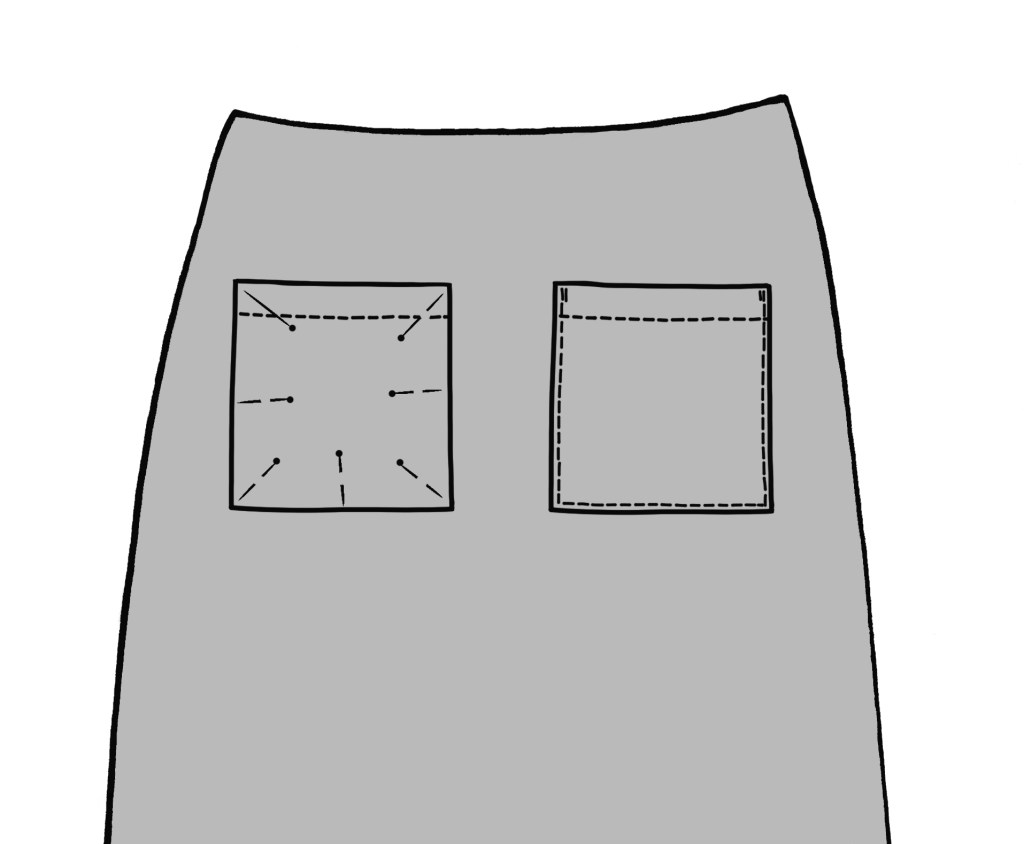
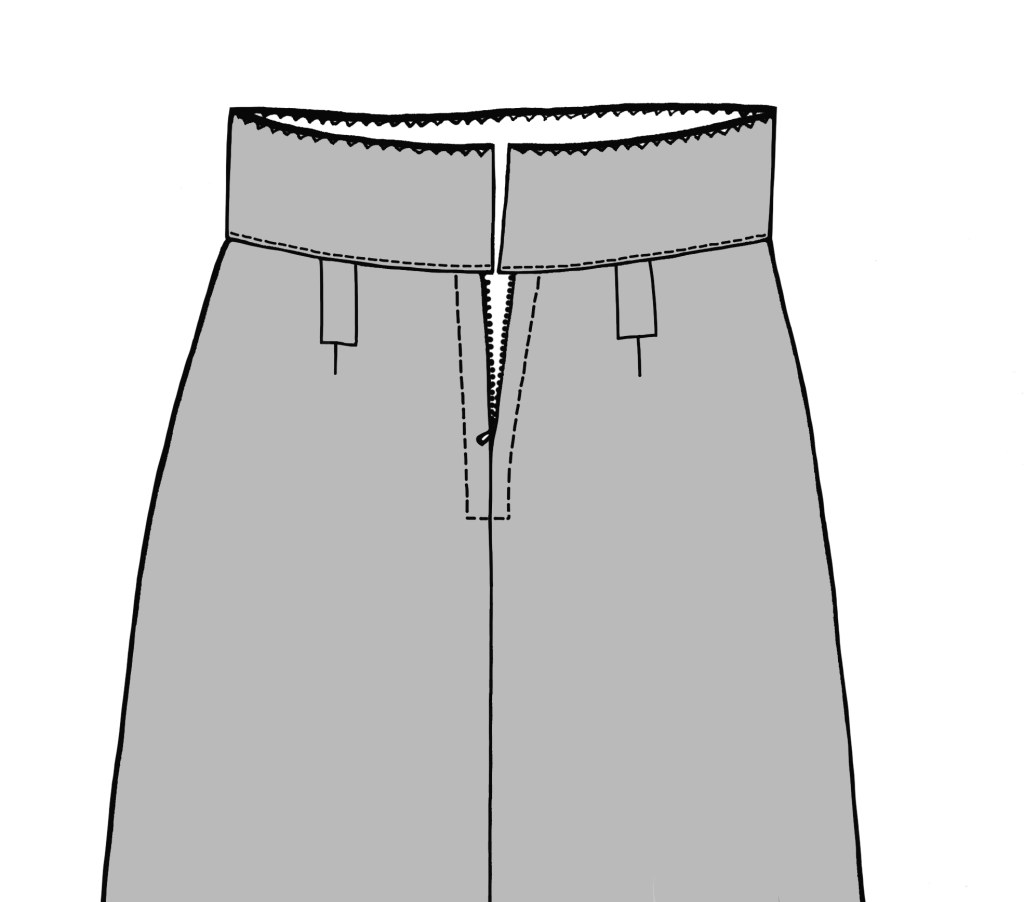
POCKETS (FRONT)
Make the pockets then pin to the Front in position as shown on the template.
Sew the Front to Back at the side seams. Press the seam allowances open.
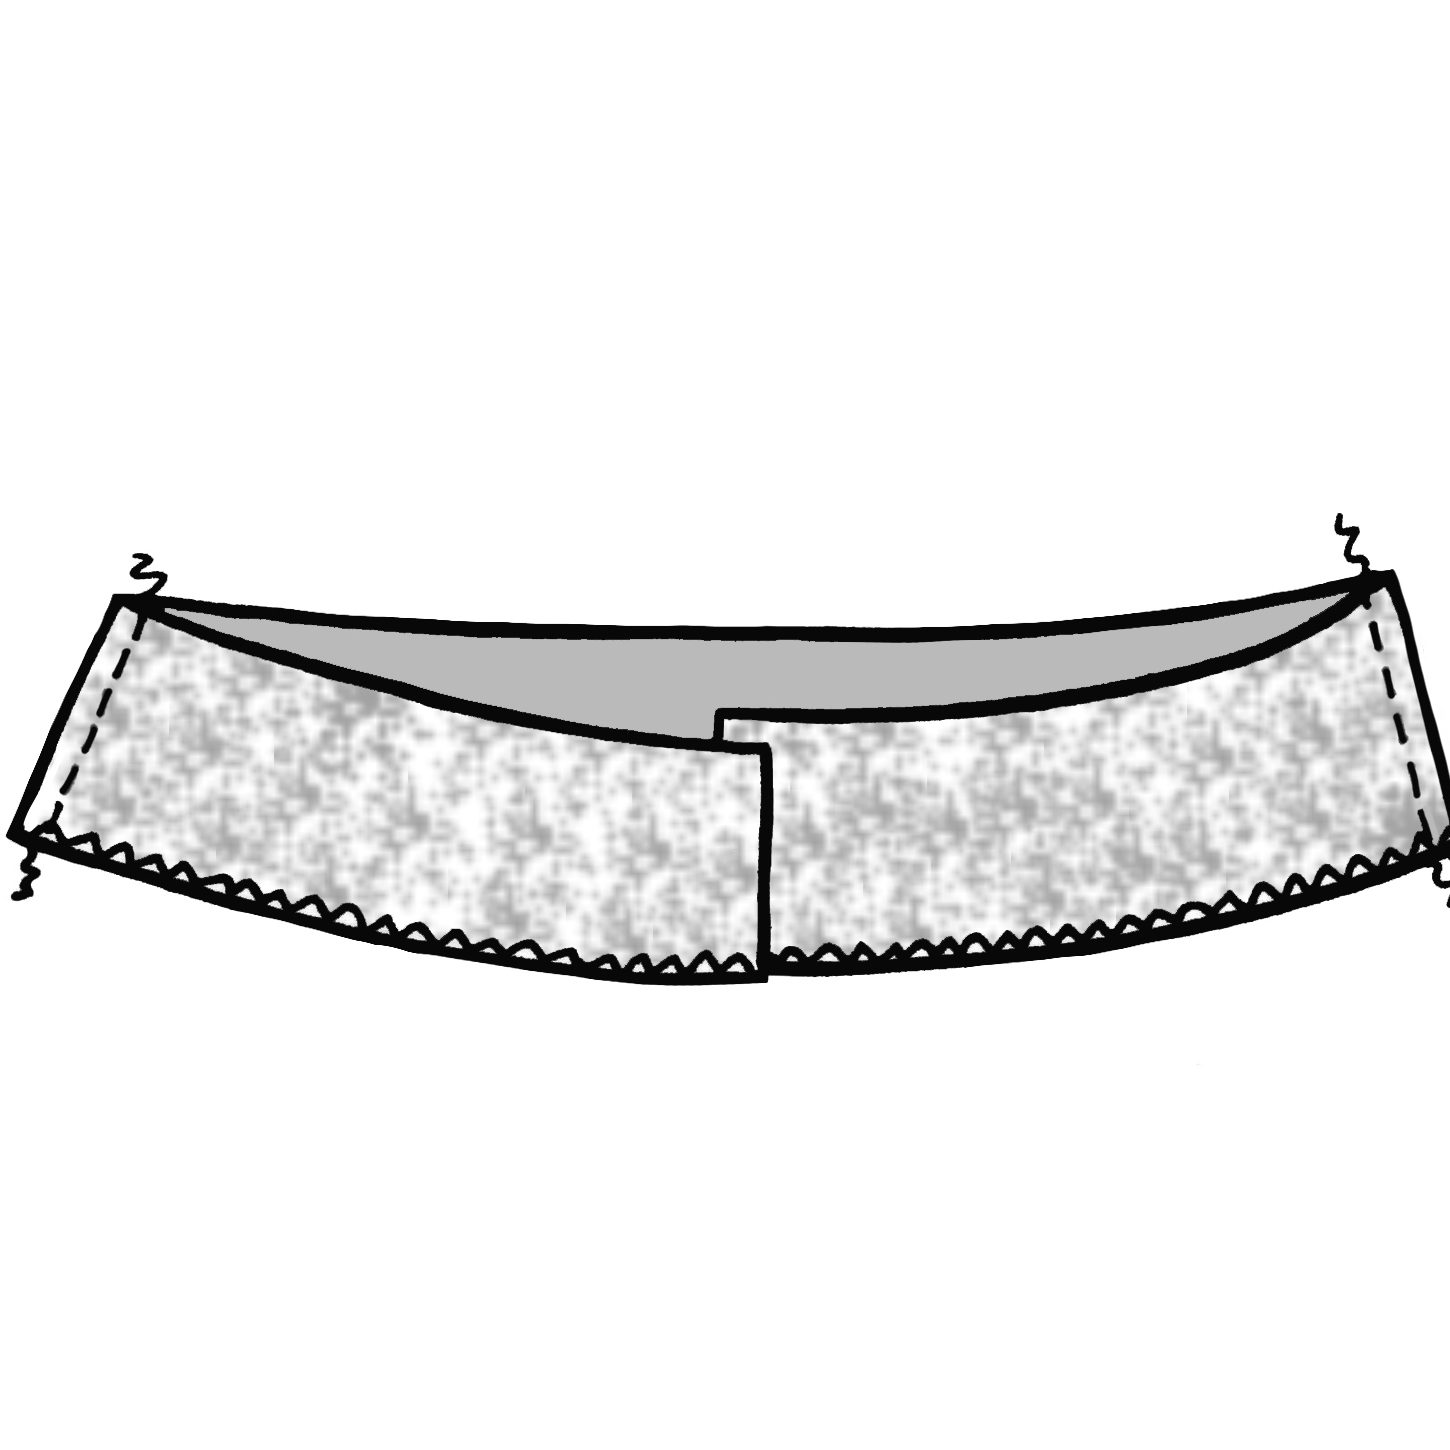
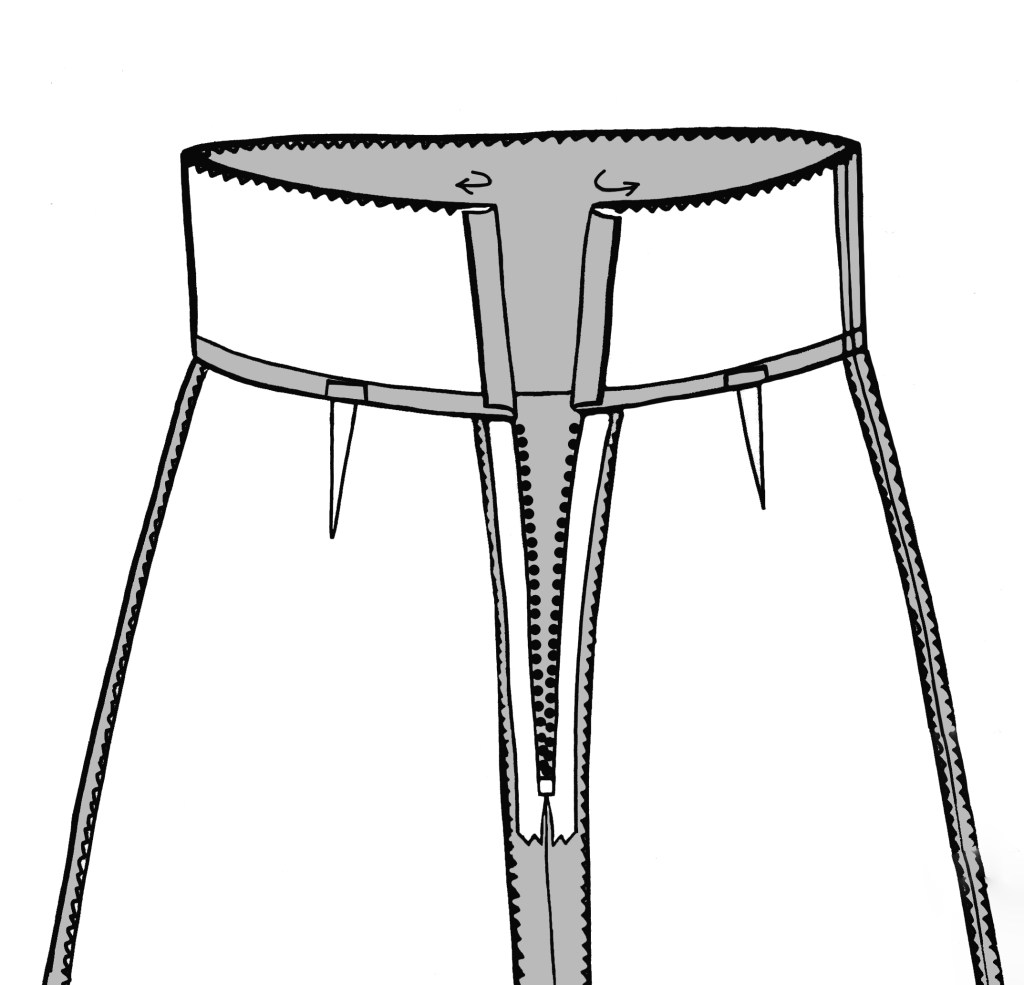
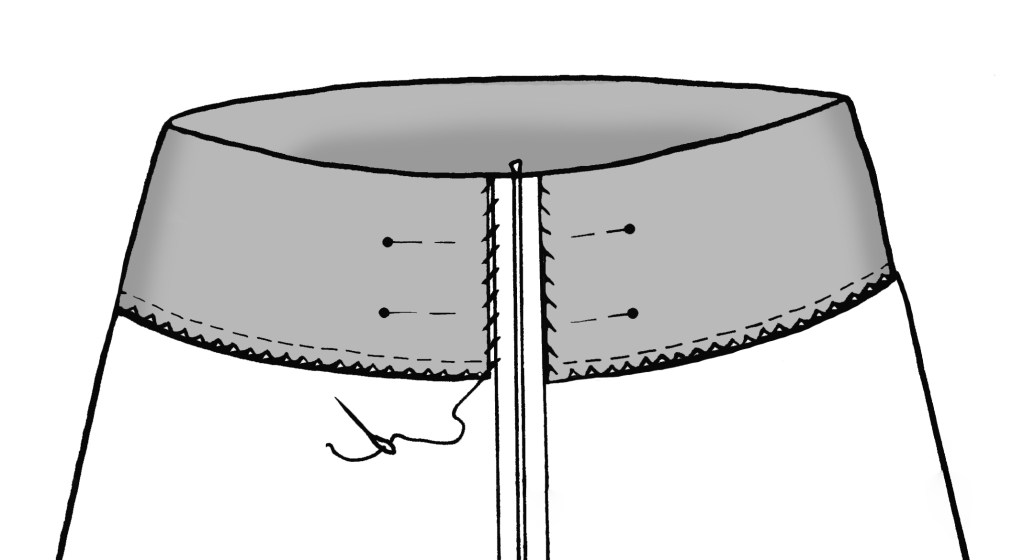
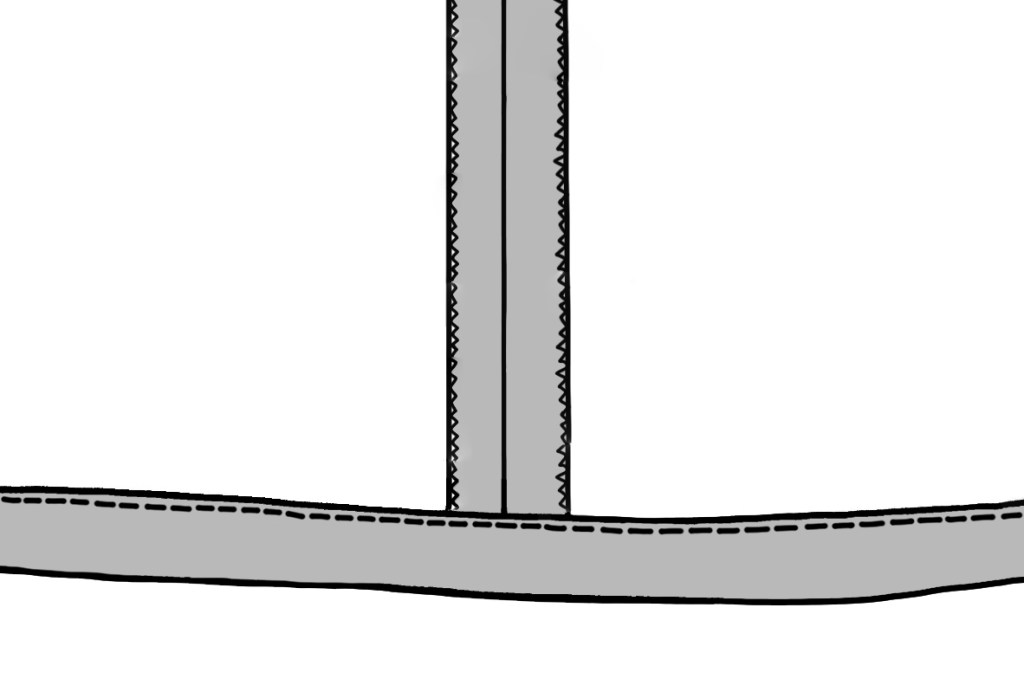
FACINGS
Make the Tabs following the instructions in the booklet.
Attach the tabs at the raw top skirt edge.Repeat for the Back. machine tack to secure them.Sew together the Facings at the short side edgesPin the Facing to the Skirt op edge. Allow 1.5cm (5/8″0 to overhang at each far side.Press the Facing away from the Skirt. Understitch all around.Fold under the short edge of the Facing. Fold the Facing over and press. Pin the Facing in position all around. Hand stitch the Facing short edge. Sew the facing around the outer edge, securing the Tabs on the right side.
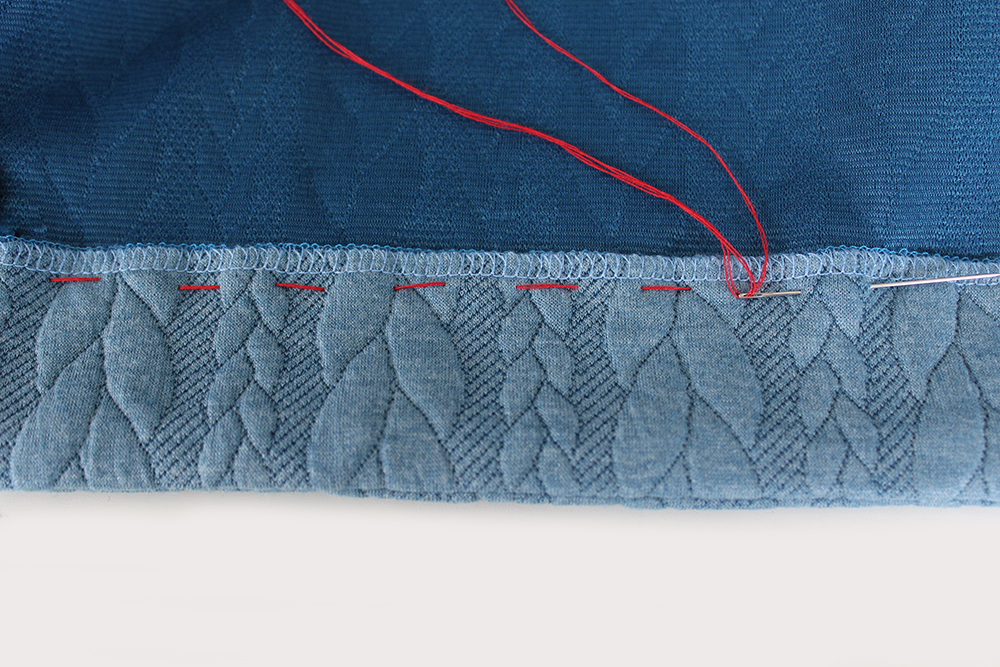
HEMMING
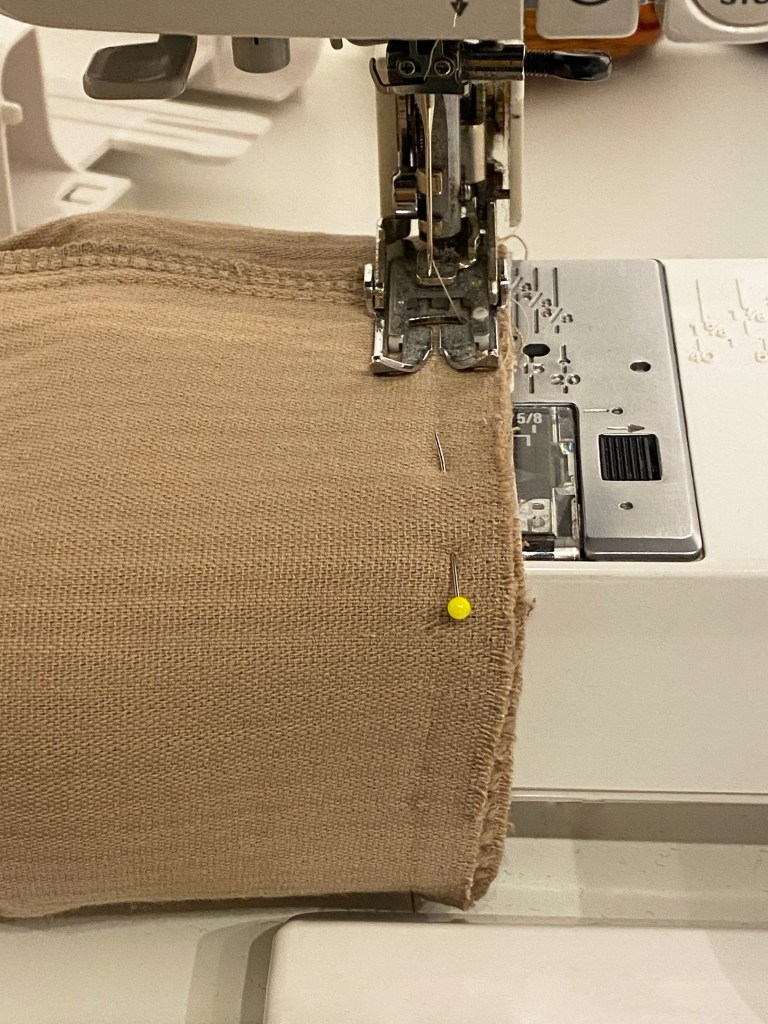
Hem the Side slit. Hem the lower edge all around.
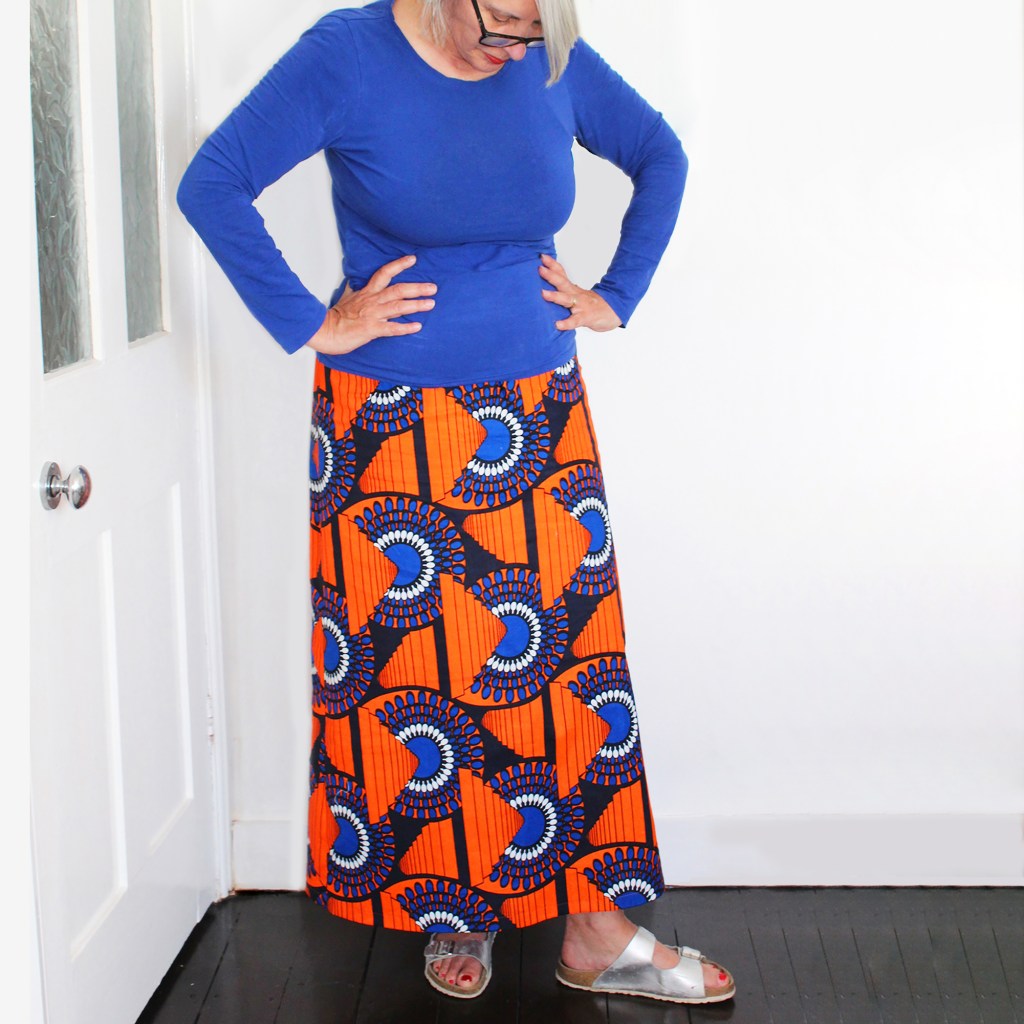
Dotty skirt without pockets in African fabric, worn with sandals.
Dotty skirt worn at Field Day Festival in Hackney, London. Get on down!
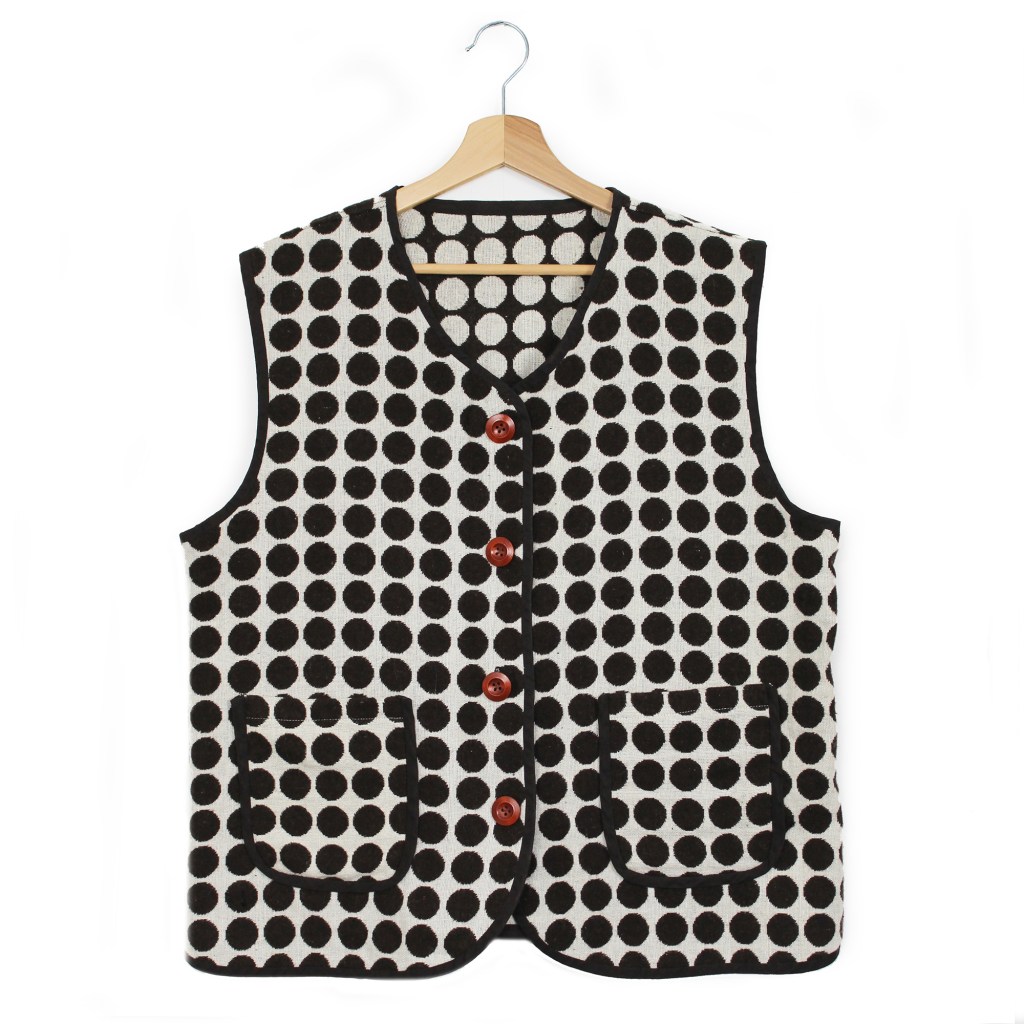
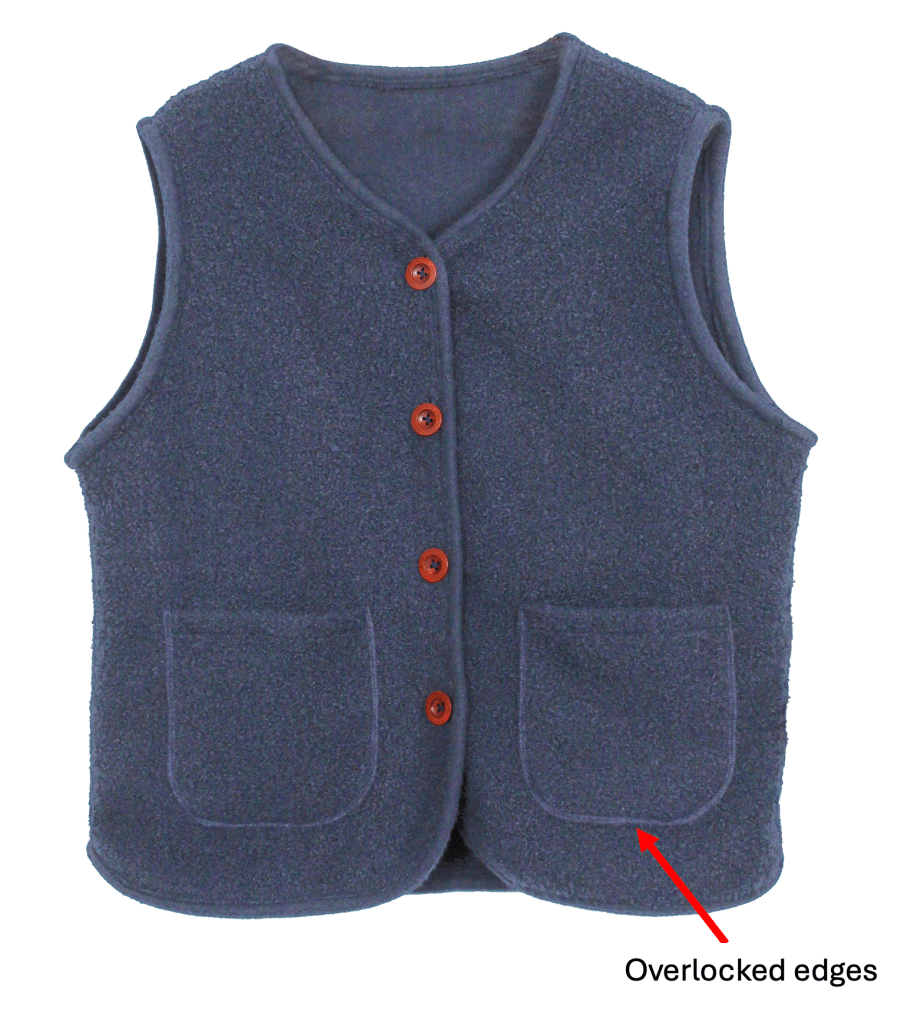
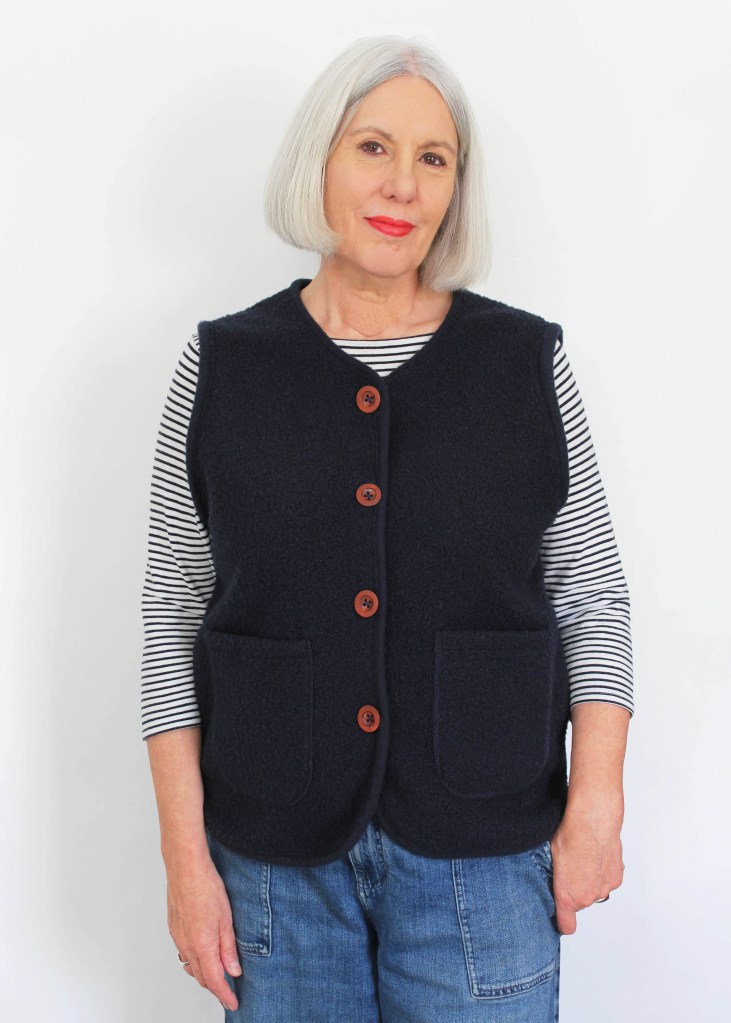
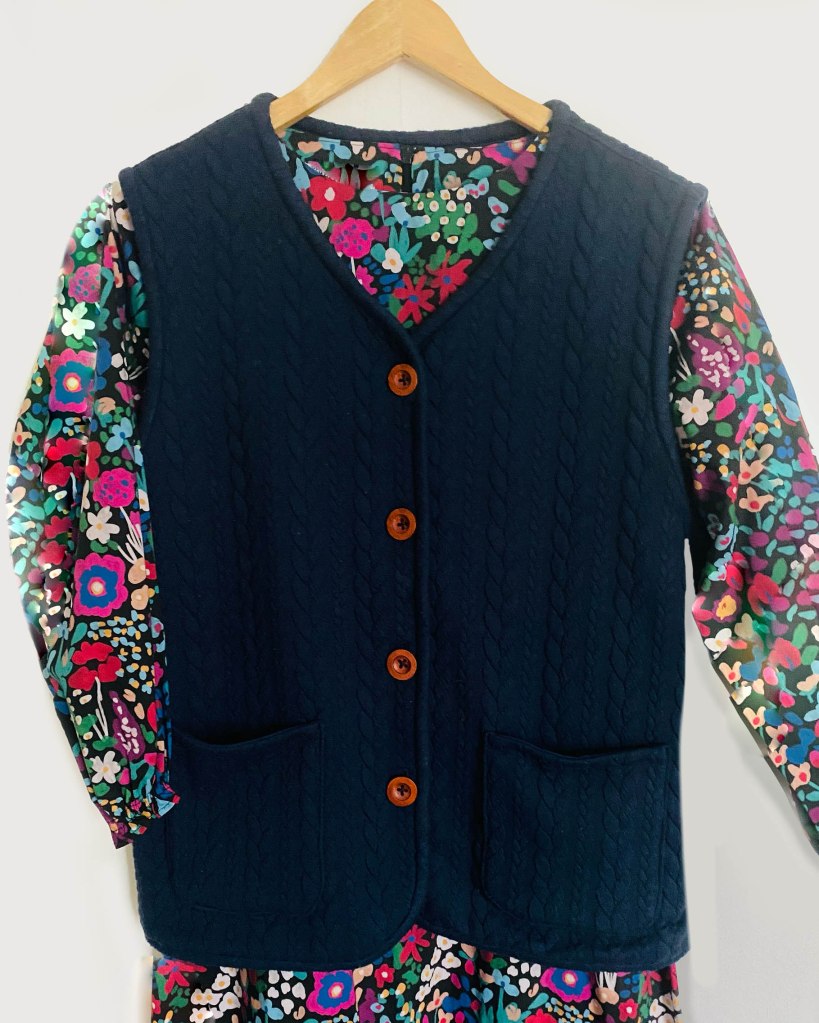
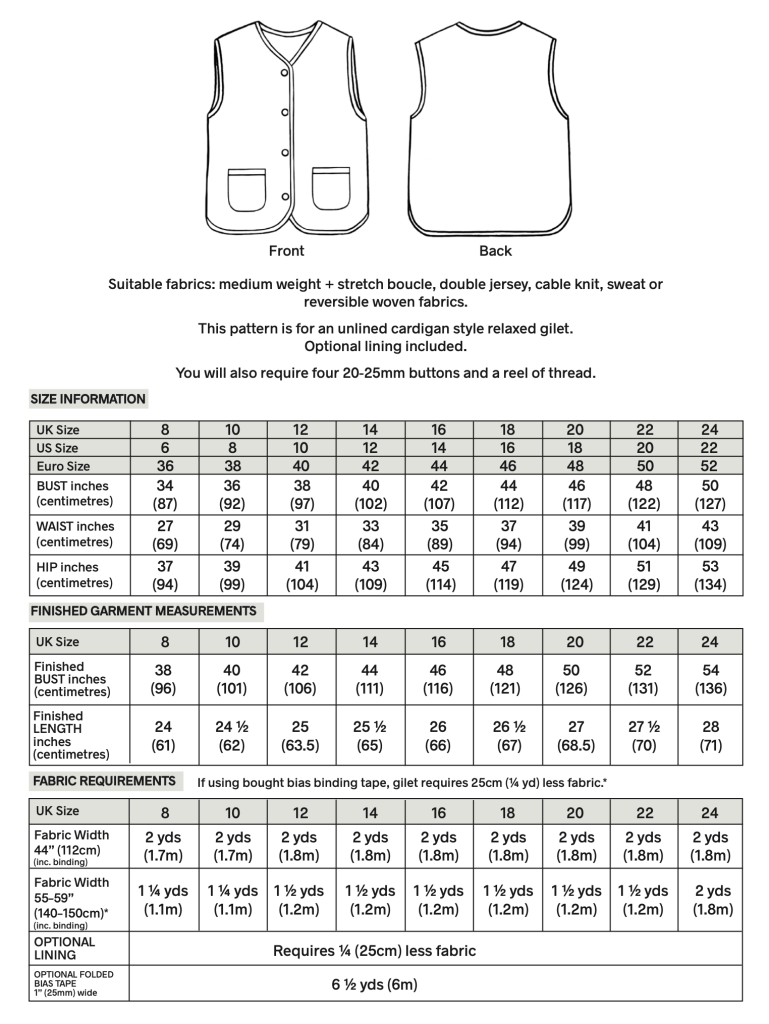
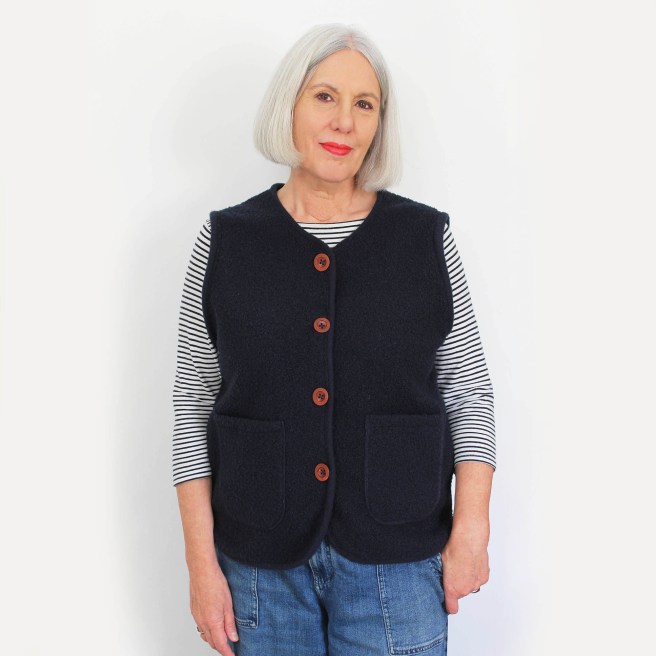
Gertrude Gilet sewing pattern by Sewgirl to make a snug little essential item for any wardrobe. Its the perfect body warmer, wear over tees or sweats and layer under jackets for extra cosiness. Its the perfect garment for in between seasons when you aren’t too sure whether to wrap up or keep cool.
This gilet is suitable to be made up in cuddly knitted Boucle fabrics, Teddy Sherpa fleece or Curly sheep fabrics, alternatively woven fabrics are also suitable with or without a lining. If using a woven fabric aim for a slightly heavier weight and double sided fabric is preferable.
Lining it is an option which is explained in the pattern-, however make sure not to use anything too heavy in weight. I think this garment works better unlined as it is lighter and less bulky.
Gertrude Gilet can be made in sizes 8-24. For size measurements see the chart below. The pattern is written in English only and has metric and imperial measurements. The level is ‘easy’ – there are buttonholes and binding to attach so if you have previous experience that is an advantage, however I recommend practising these techniques on a piece of scrap fabric until you feel comfortable. Using an overlocker is also advantageous , however inner raw edges can be zig zagged or bound with extra binding.
Scroll to hour 1.00 to watch Fiona making an a section of Gertrude Gilet on Sewing Street TV.
The unlined woven fabric gilet (above) is finished with cotton binding all around the edges. Pocket edge binding is optional. The boucle version (below), has self-made binding made from horizontally cut strips. The pockets are not bound but simply hemmed at the top edge, then overlocked around the outer raw edges, and stitched on to the front, exposing the overlocked outer edges. This pocket method is for ease of sewing with stretch fabrics.
The Boucle version uses self-made binding using the back of the fabric as a feature. Being a knitted fabric, it is cut on the horizontal width of the fabric (not diagonal). The woven version uses bought bias binding for all the raw edges. You can make your own but frankly its easier and cheaper to buy it by the metre. The gilet has four feature 20-25mm (3/4″- 1″) buttons.
Wear Gertrude gilet with jeans, trousers or skirts or under a long floaty long sleeve dress (such as Sewgirl Frida/Talluah shown below ) would also look great! This gilet below was created with cable knit fabric and a single stretch jersey lining. It has been edge bound using the lining fabric for the binding.
Here are the details about sizing and finished garment measurements with fabric requirements.
For those who are curious, this pattern name was inspired by a gardening legend Gertrude Jekyl. She probably never wore a gilet in her time, but I imagine if she was living and working today she would probably love to wear one in the garden on a chilly Autumn or Spring day.
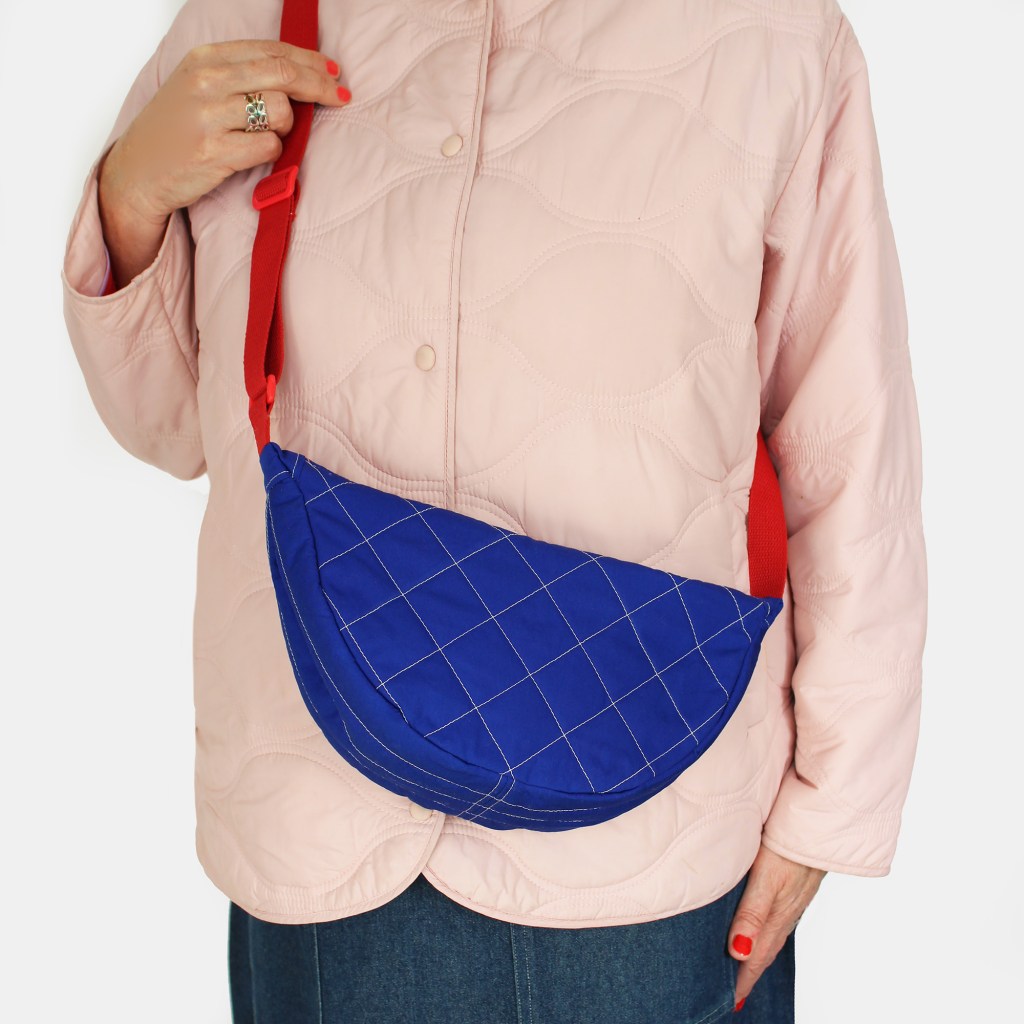
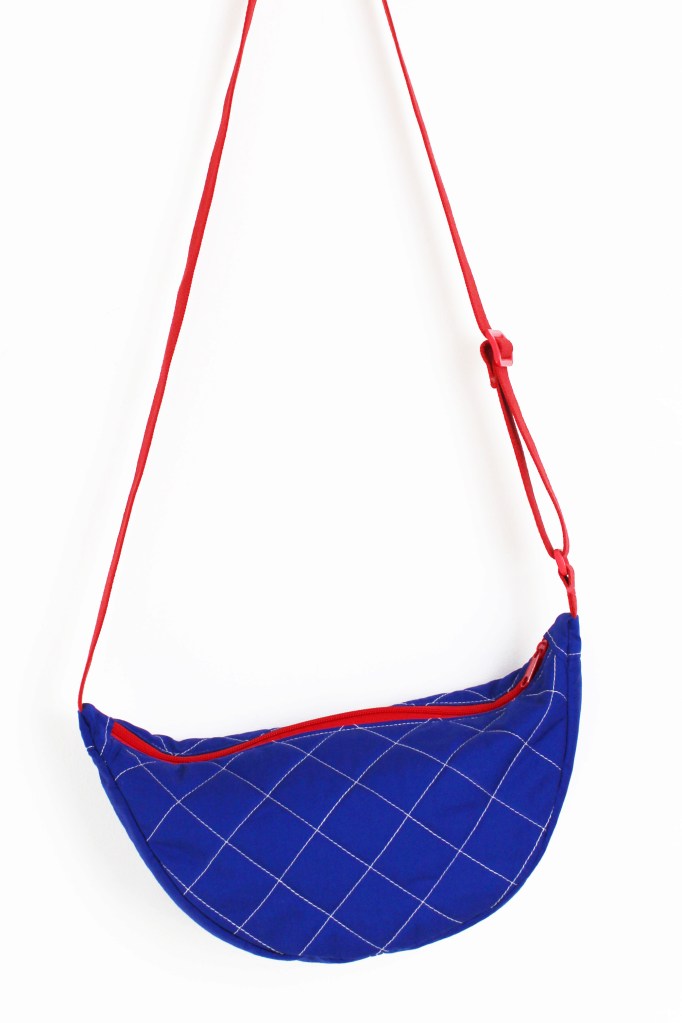
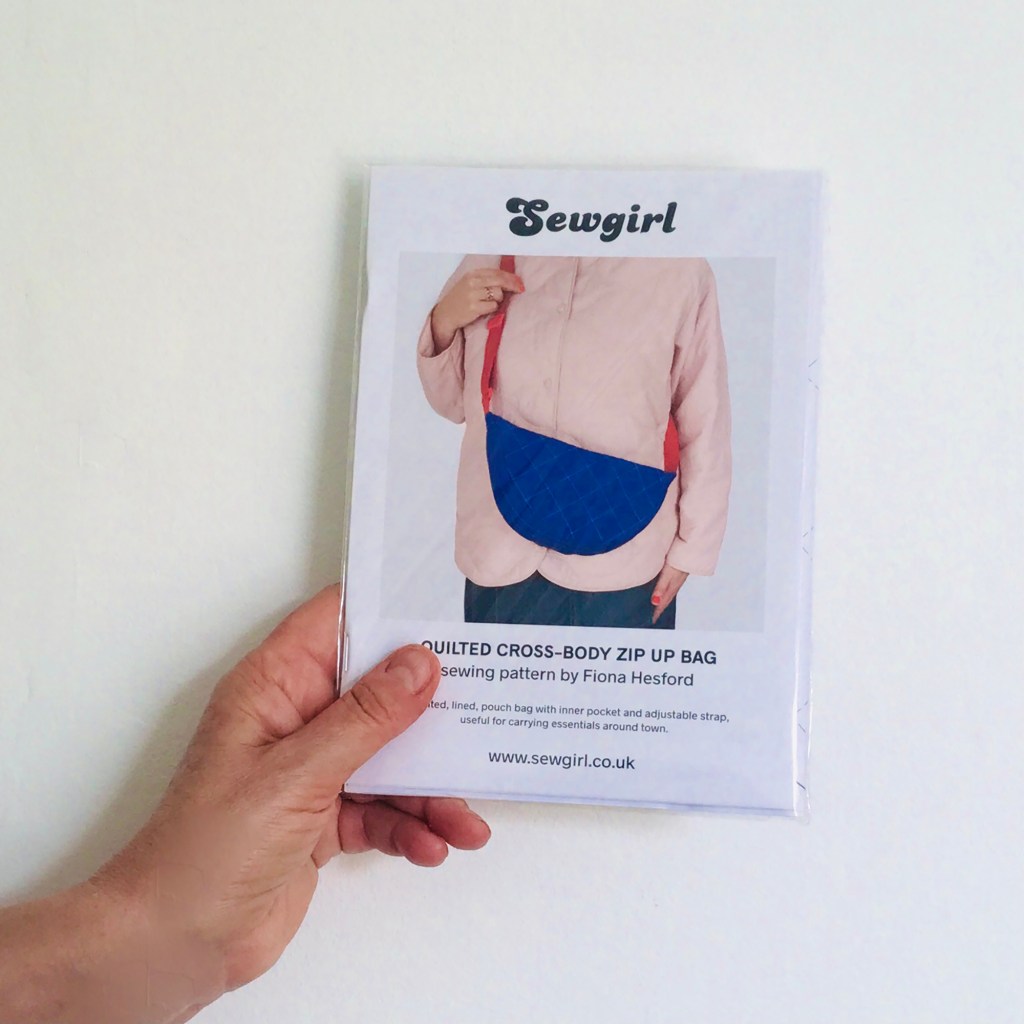
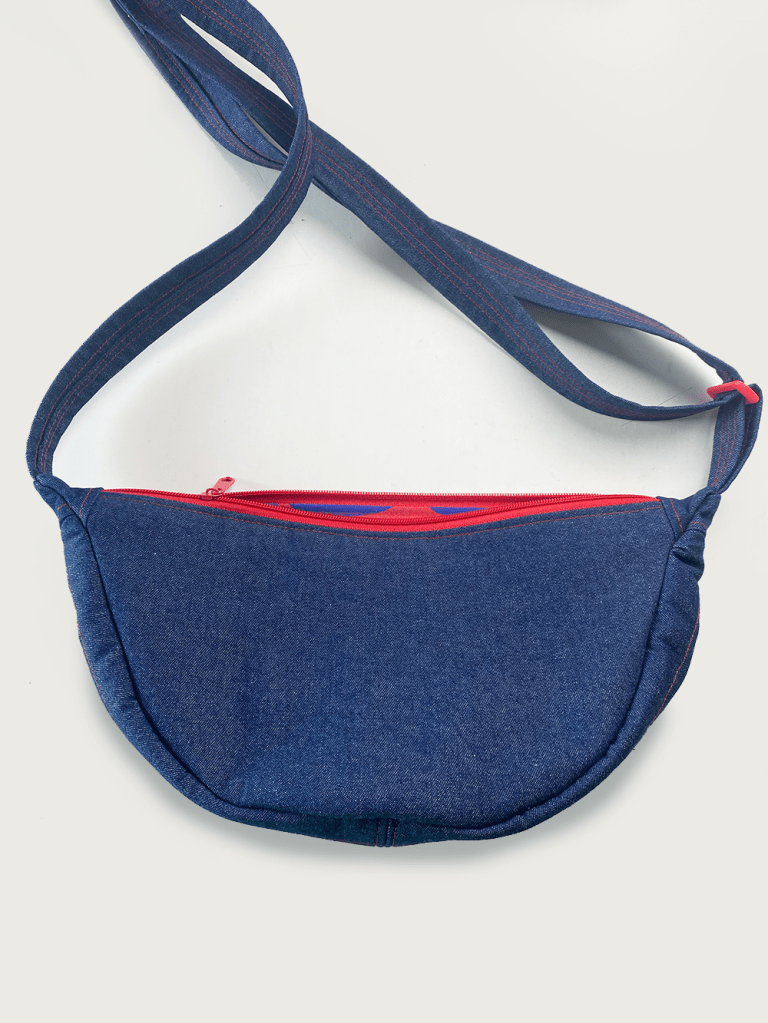
This useful, ergonomic bag, designed by Sewgirl, is great for everyday use. Its surprisingly roomy inside, with a zip fastening, inner pocket and a long adjustable strap. Make in your favourite gorgeous printed cotton fabrics or simple plain denim, corduroy, velvet or cotton with funky patterned lining.
Suitable for any medium-weight fabric, with cotton lining and fleece interfacing.
Cross body bag is available to buy both as a paper pattern and also a PDF download.
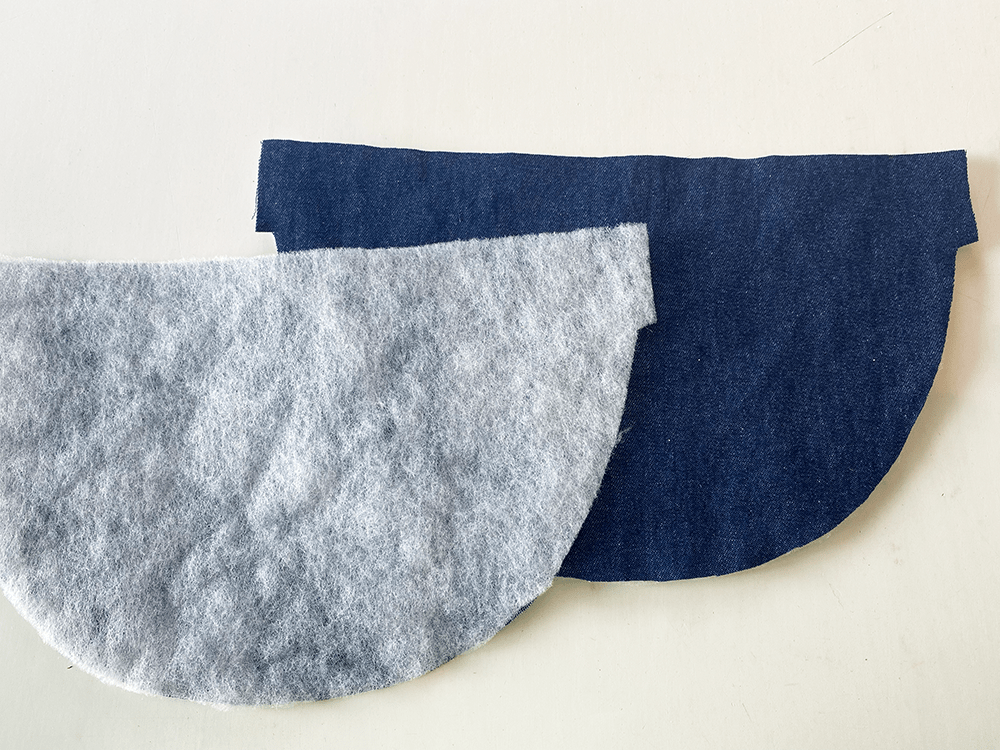
Add fleece interfacing to the Front and Back outer pieces and the Base outer pieces(Visilene H630 is good).
QUILTING: You can add quilting lines wherever you fancy such as trellis pattern on the outer bag and tramlines on the base which are marked on the templates, or why not cook up your own quilting line designs to make it unique to you? Alternatively, leave this bit out if you prefer and just leave plain and let the fabric pattern be the star of the show!
Tip; Iron or stick (with textile spray glue) to a larger piece of interfacing, then trim the excess around each piece. Lining and tabs do not need interfacing.
Base section
PIC 1PIC 2PIC 3PIC 4
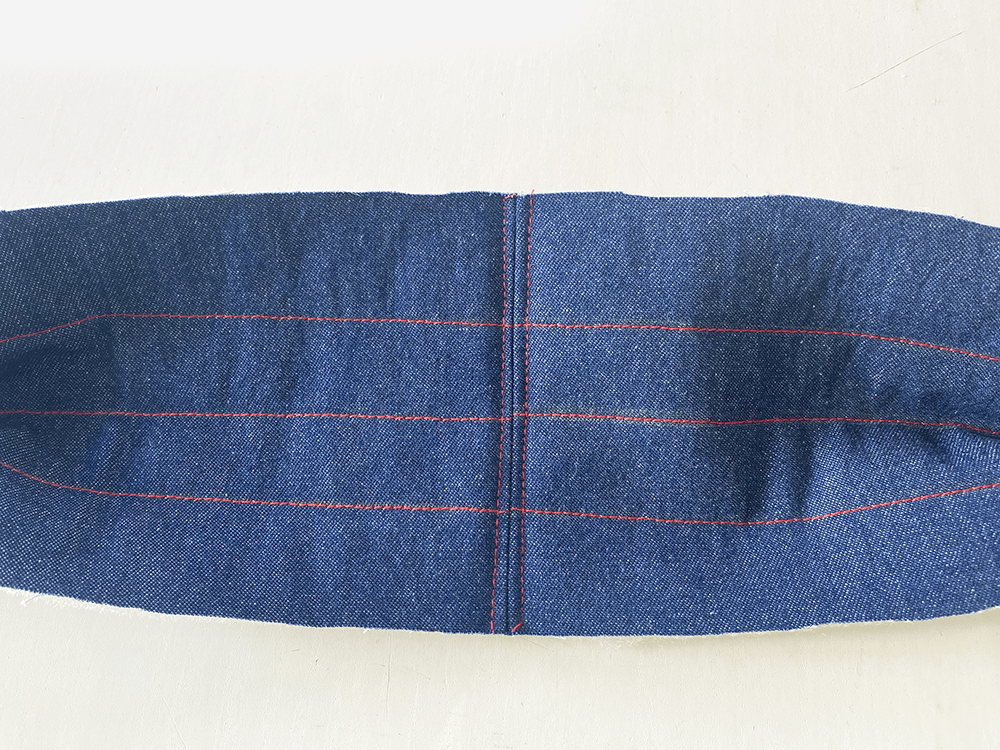
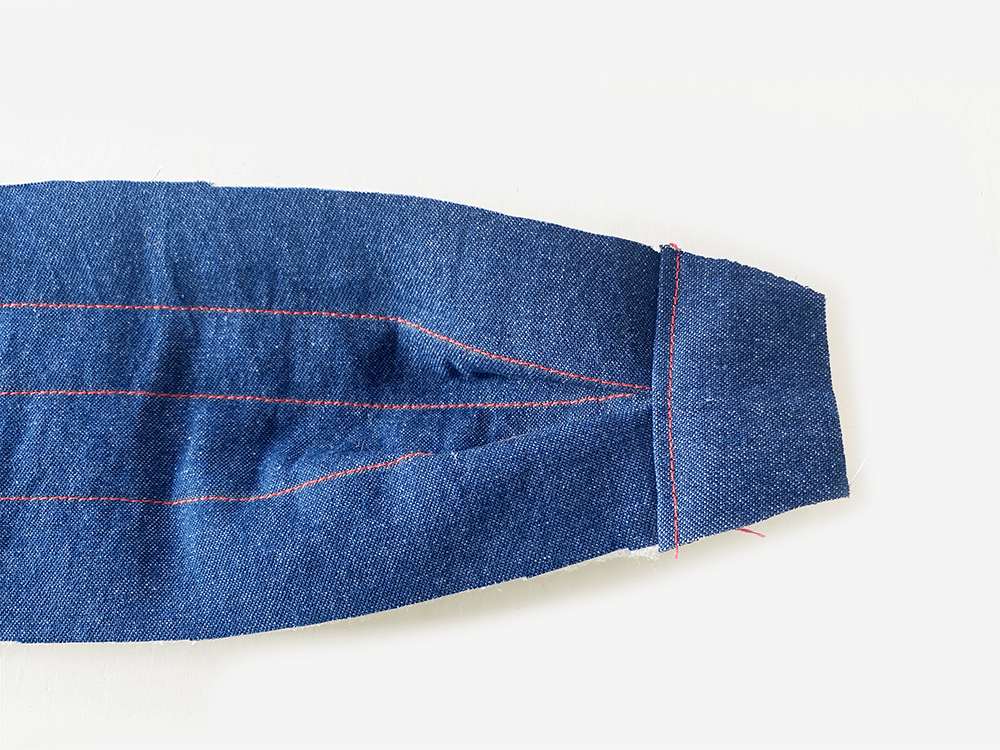
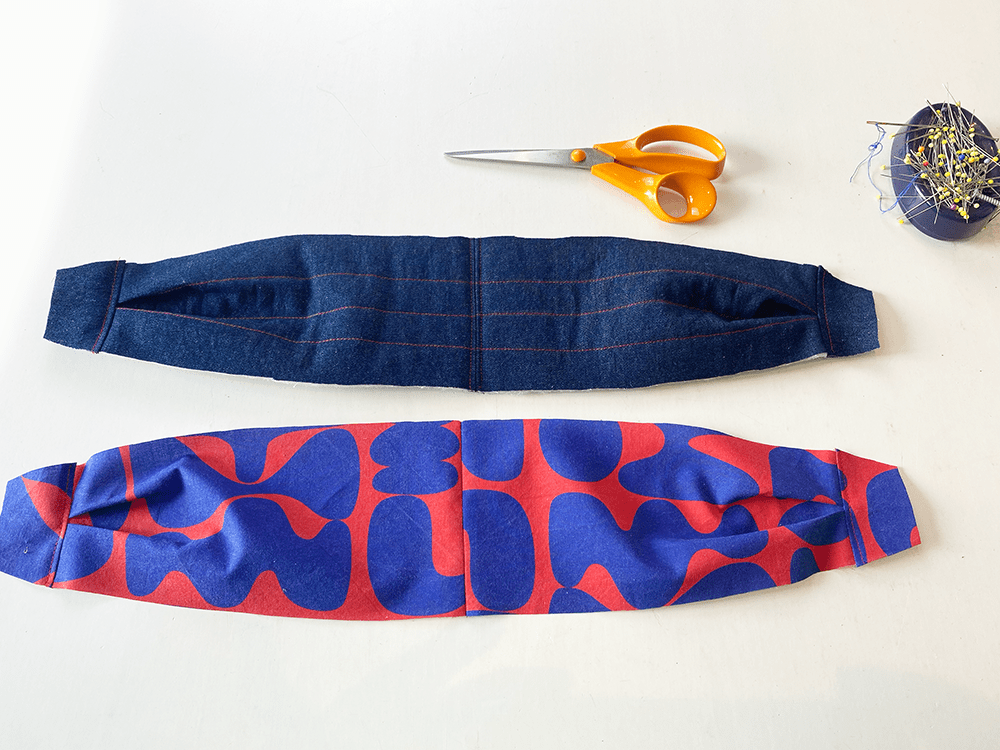
So you can see here that Ive added the fleece to the Base sections and stitched some tramlines exactly as marked on the template. (Pic 1) Then join the Base sections, pin right sides together. Stitch. Press the seam allowance open. Topstitch. (Pic 2) Make a pleat at each short side edge. Machine tack to hold. (Pic 3) Pin the Tab on top of pleats. Stitch across. (Pic 4) Press outwards. Topstitch on the Tab side of the seam.
Repeat these steps with the two Lining Base pieces and two lining tab pieces.
So you should have two pleated base sections: one in Outer fabric and one in Lining. Both with their tabs attached.
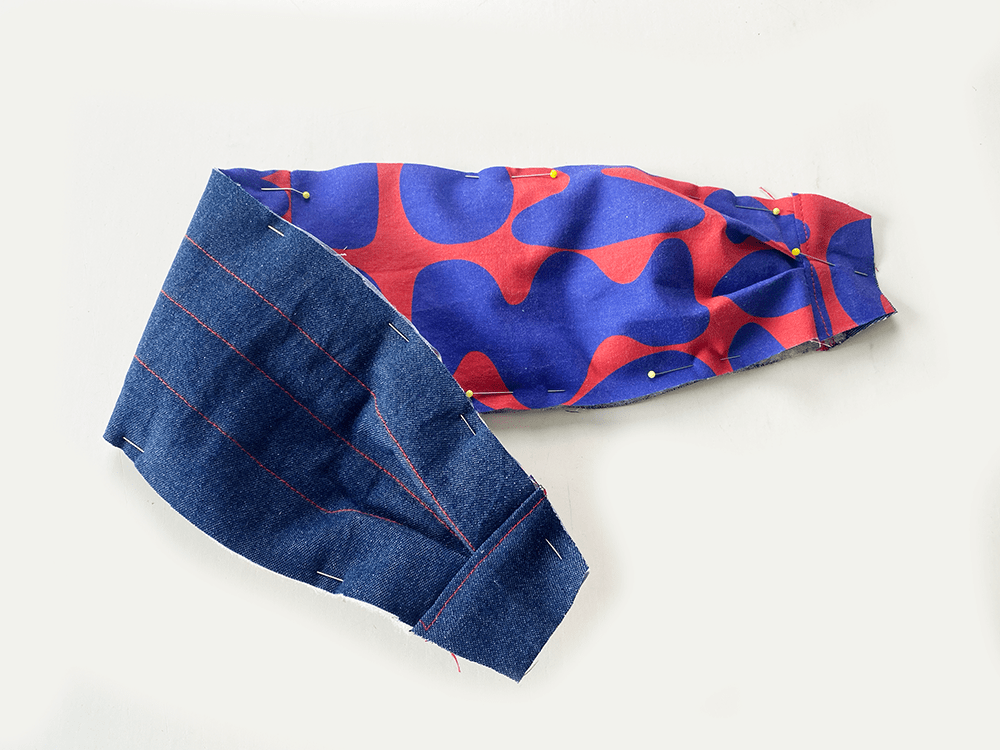
With the wrong sides facing together. Pin the two base pieces (Outer and Lining) together all around the other edge. Machine tack within the seam allowance all around the outer edge to secure them together.
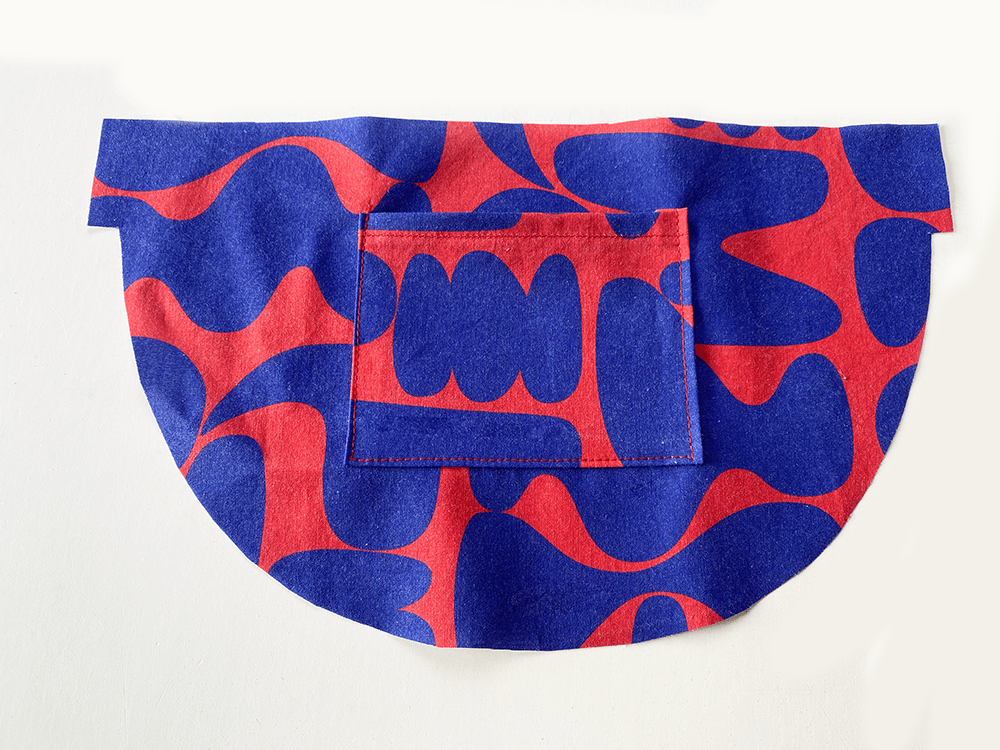
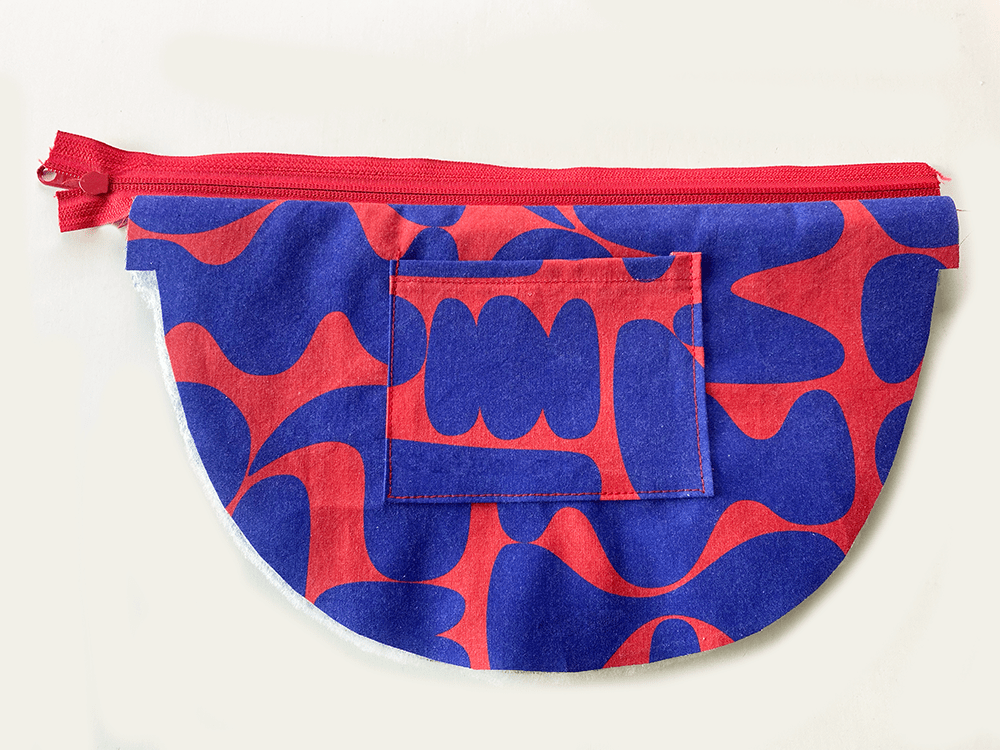
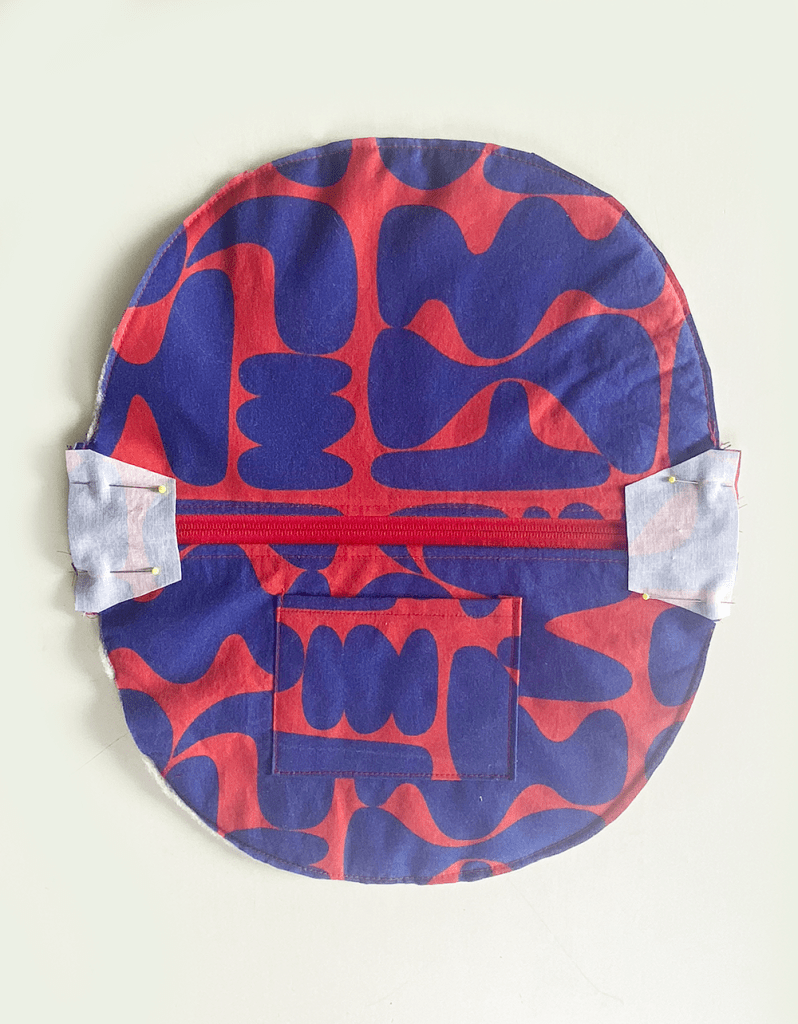
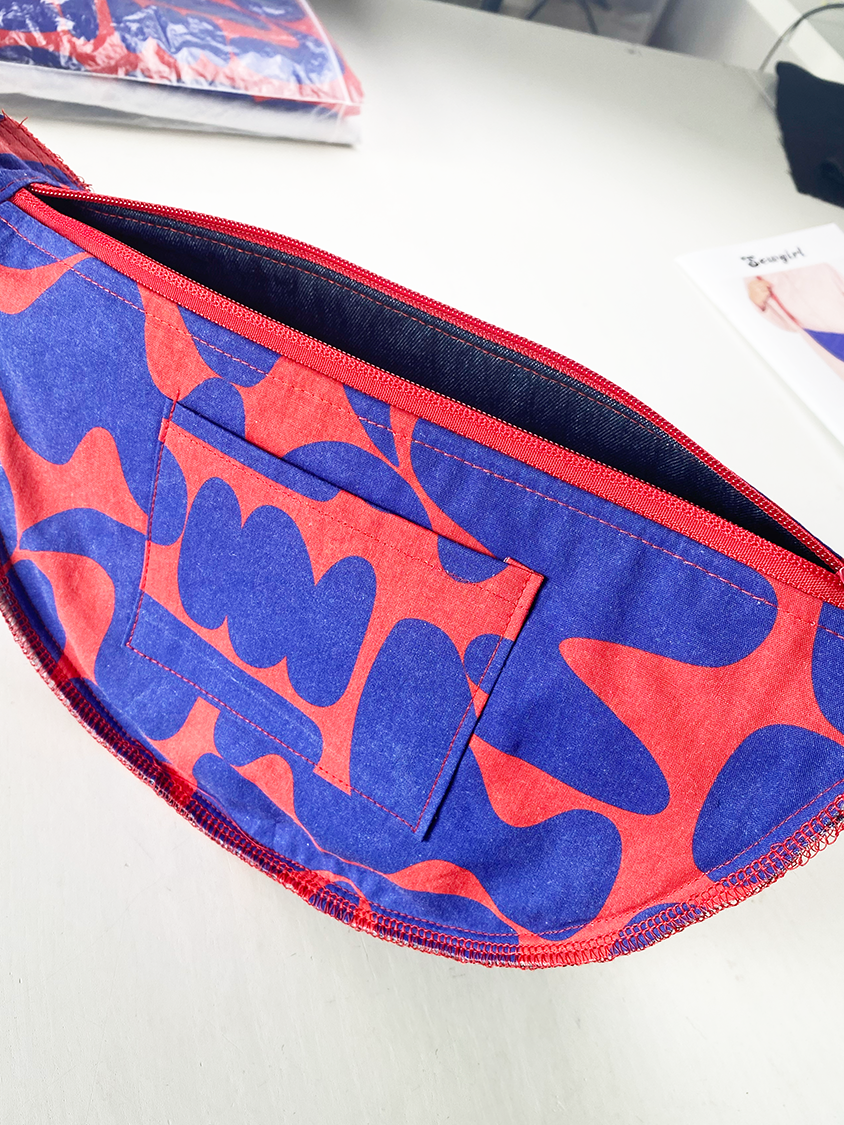
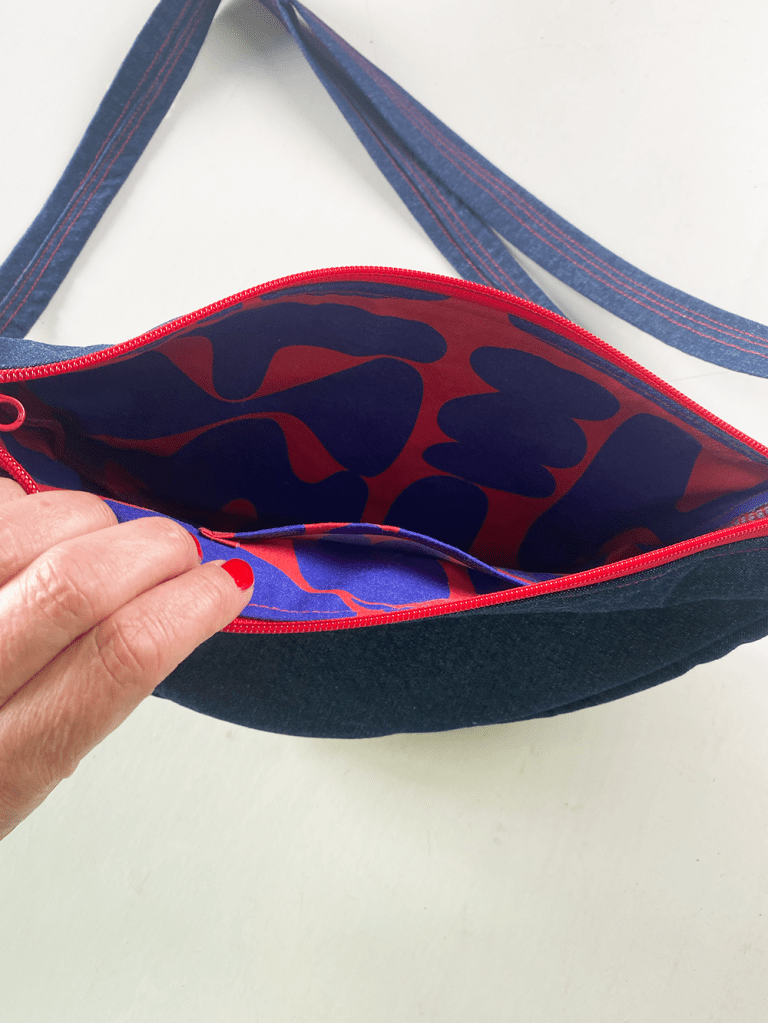
Lining Pocket
Fold over and press the top (long) edge of the pocket. Sew. Fold over and press the remaining three pocket sides. Pin to one Lining Bag piece. Topstitch around the three folded edges.
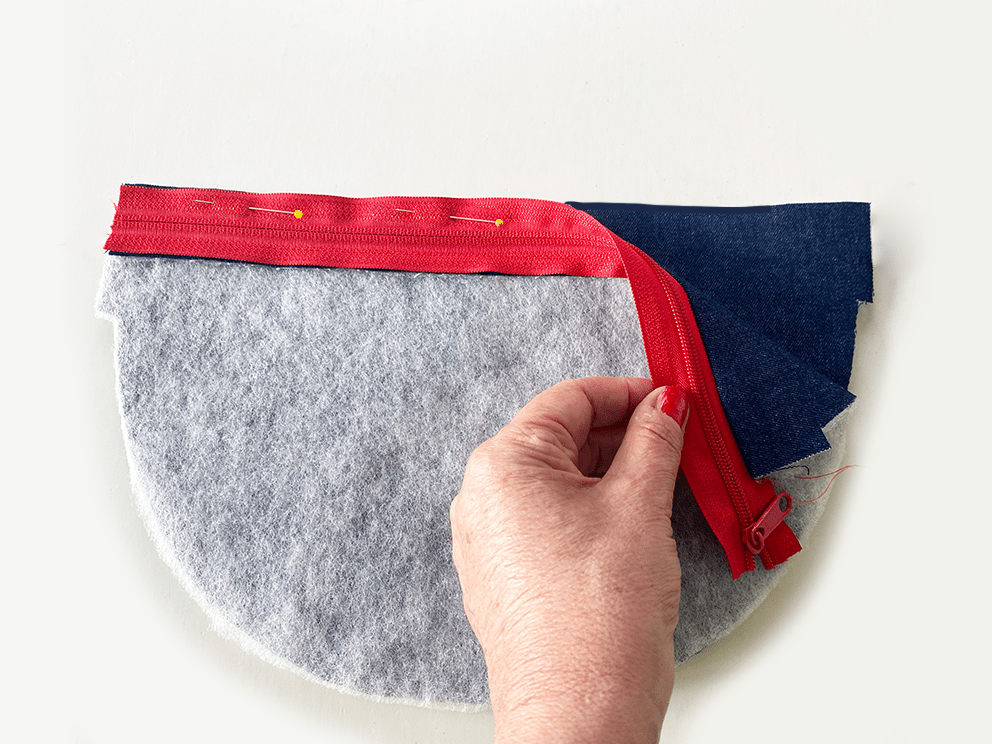
Attaching the Zip
I like to use no 5 continuous zipping but you can use a standard dress zip instead (not open ended).
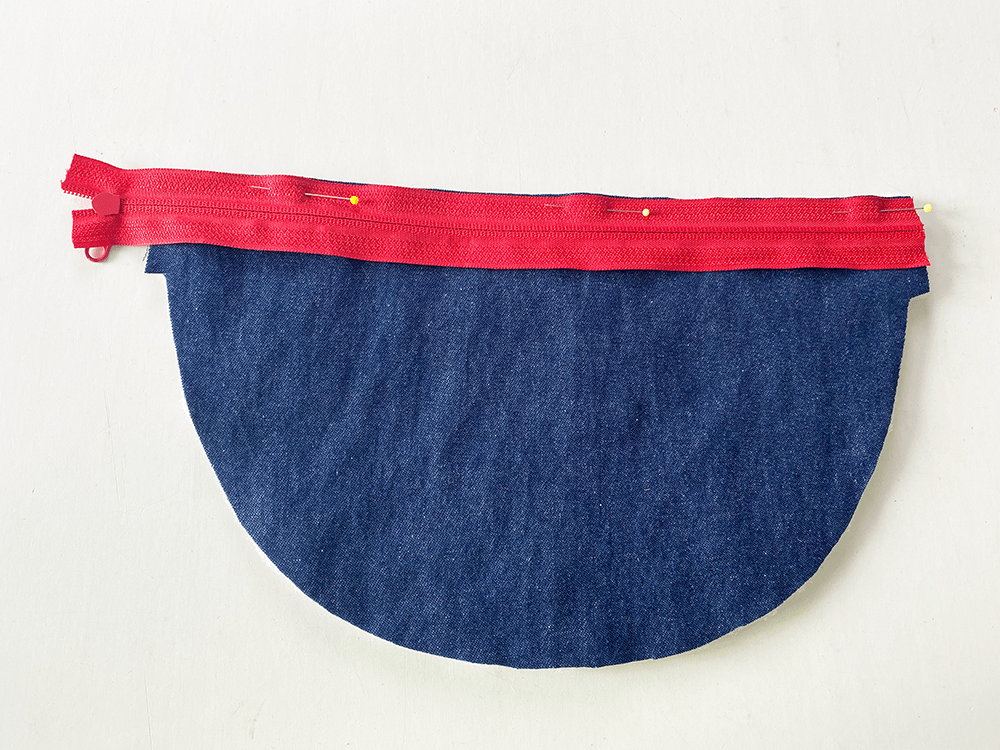
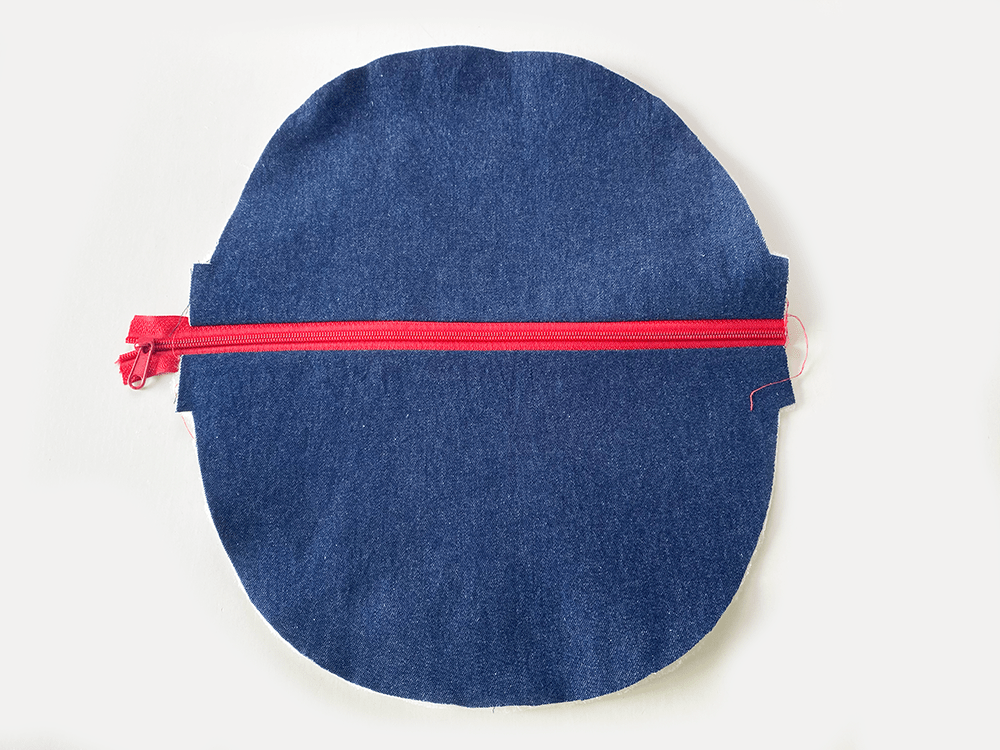
With the zip right side facing downwards, pin the zip fabric edge to one Outer Bag top edge right side. Sew 1cm from the raw edge. Press. (Tip: swing the needle position towards to zip teeth or attach a zip foot).
Pin the Zip fabric edge to the top raw edge of the second Bag Outer piece. Make sure the right side of the zip is facing the right side of the fabric.
Now repeat with the Lining and the other side of the Zip tab ….think “zip sandwich’.
Then repeat with the remaining lining piece and the other side of the zip on the opposite side.
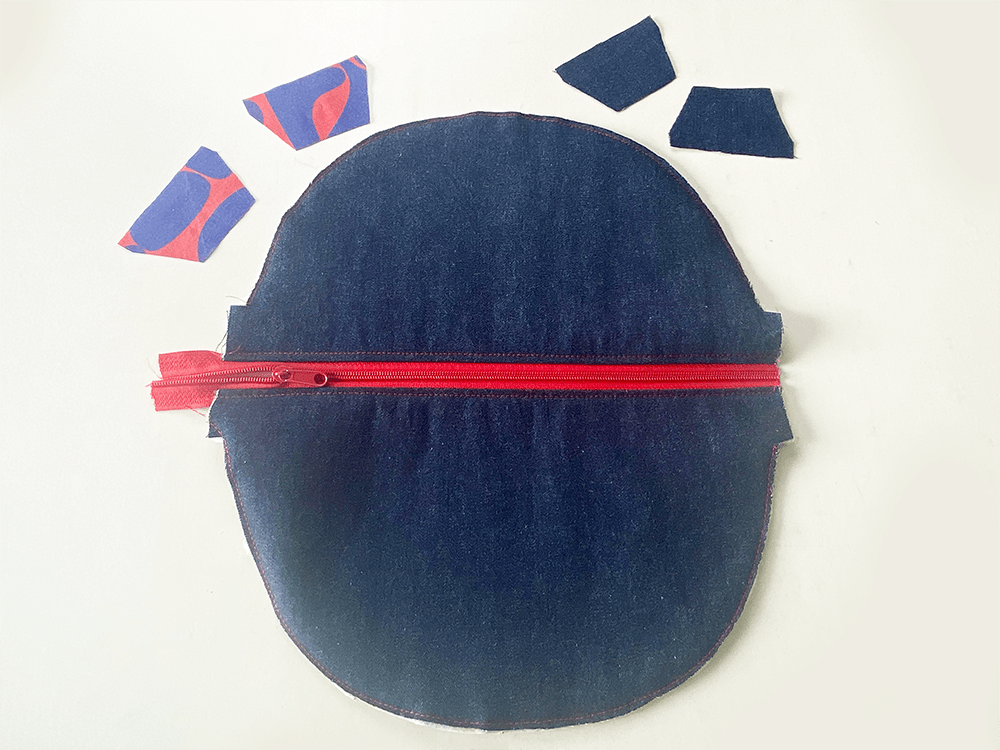
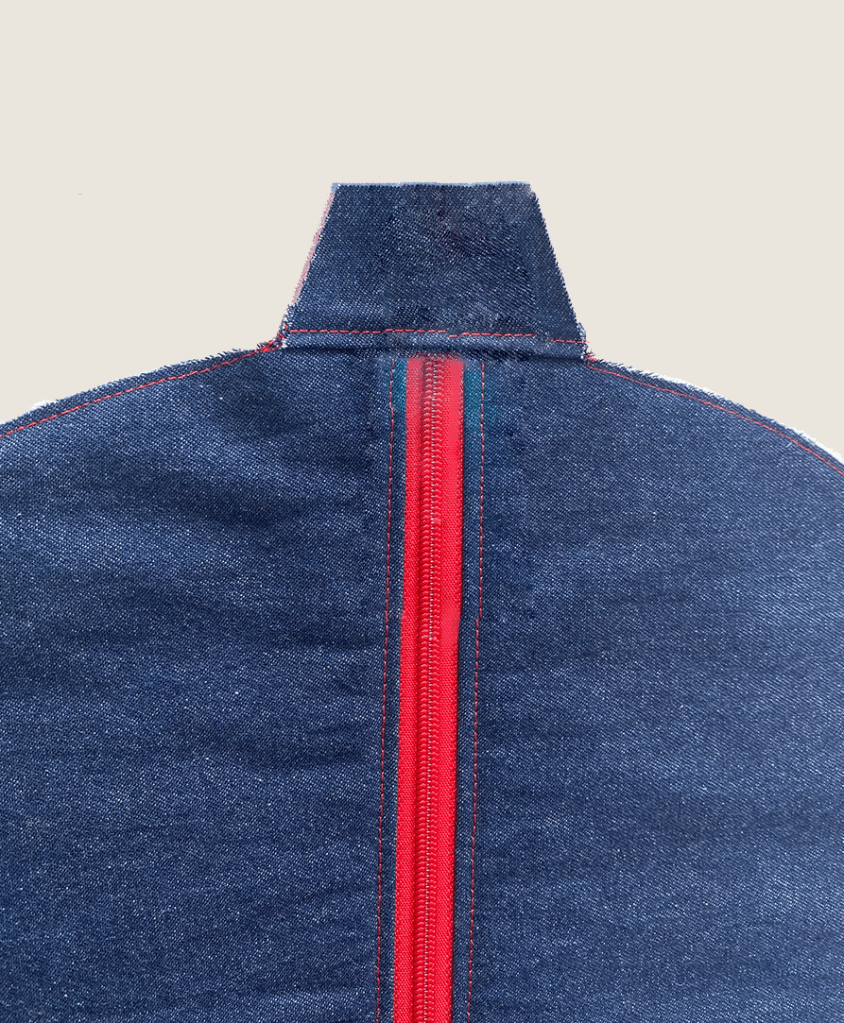
Front and Back Outer.
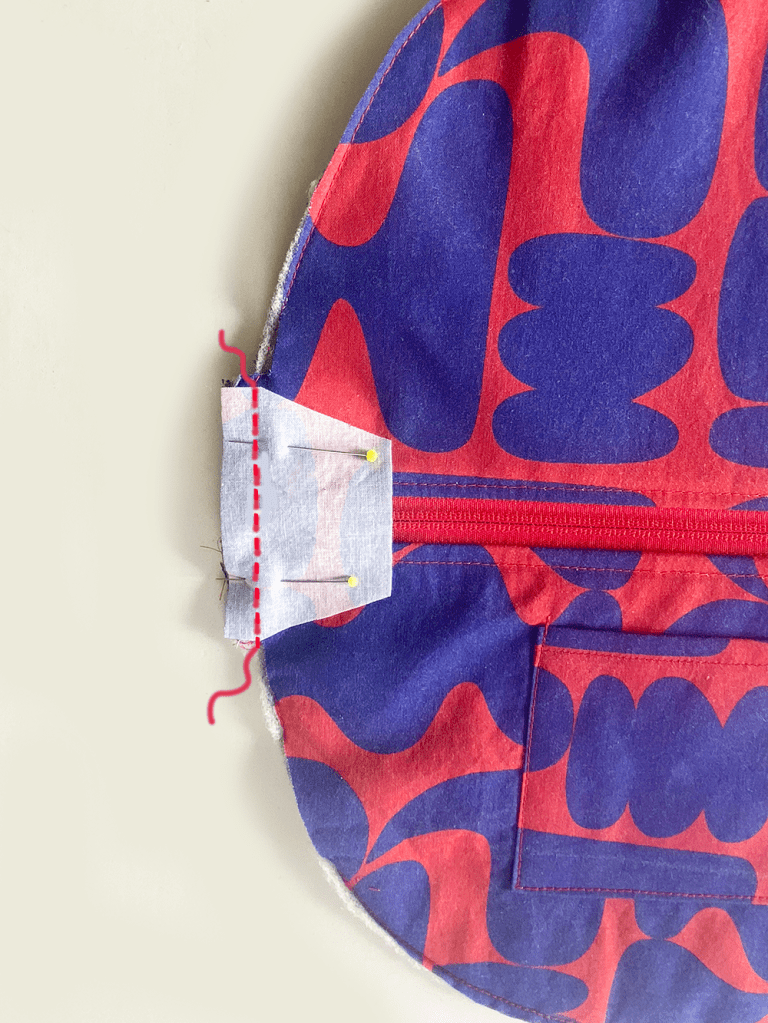
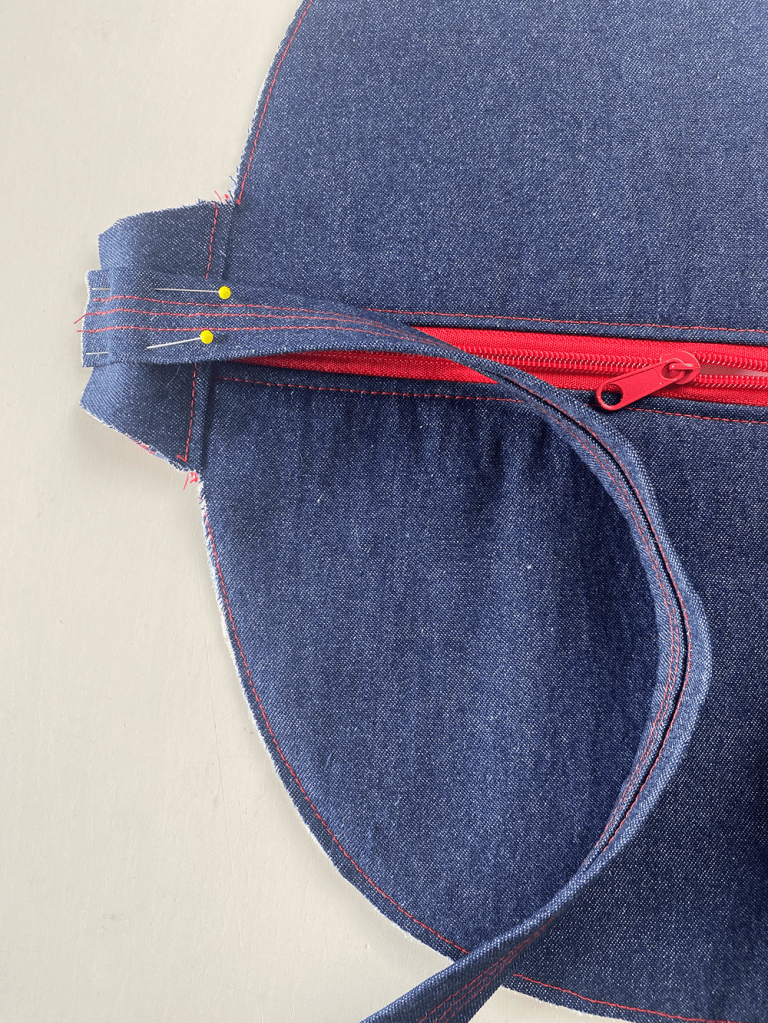
Topstitch either side of the zip with the Lining pressed open on the reverse side. Machine tack the Lining and outer together all around. Push the Zip head into the bag section, secure the zip ends together. Now grab your tabs…..
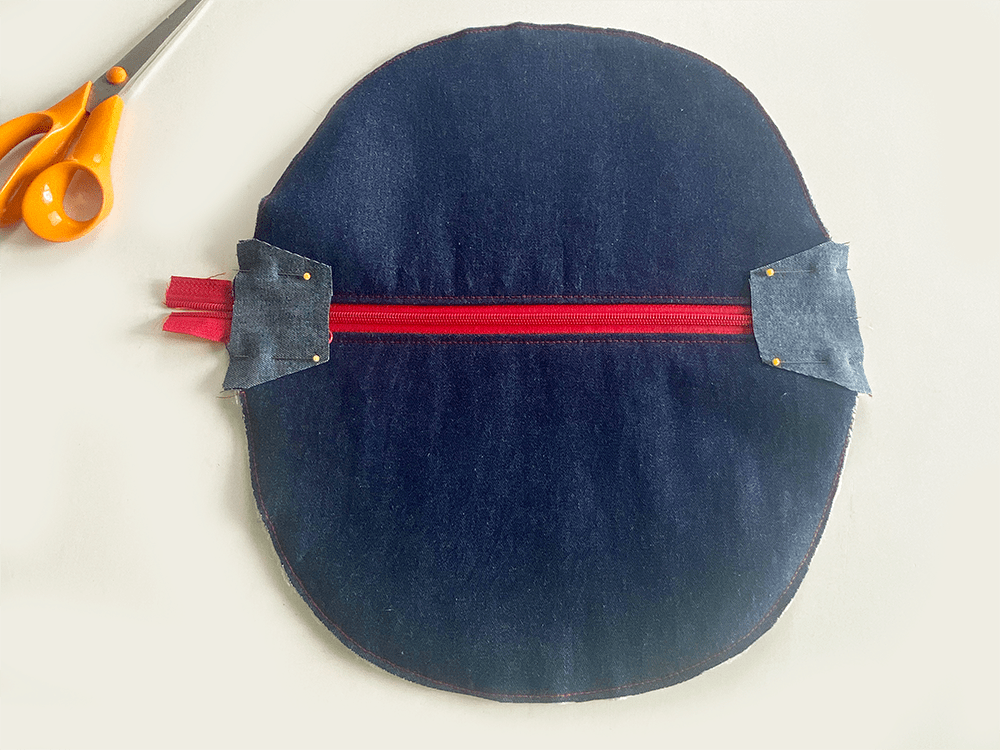
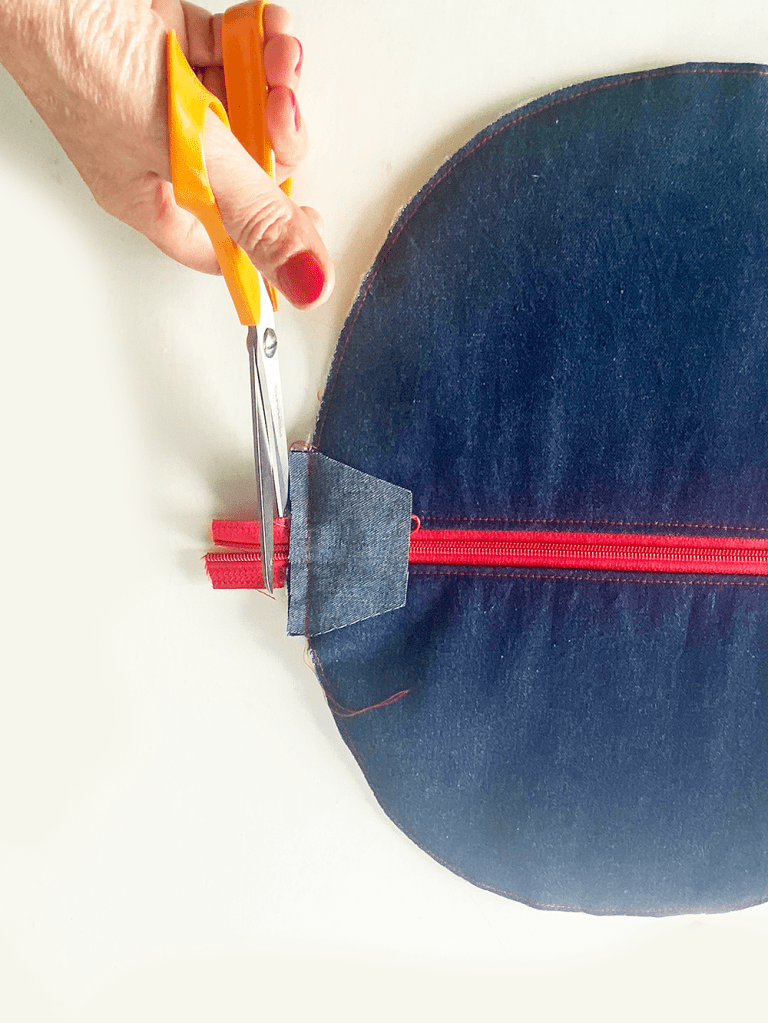
Tabs
Pin the Outer Tabs at each side. Ensure the zip open ended sides are together.
Sew across the Tab. Trim off any excess zip extending beyond the bag. Press the Tab outwards.
Pin the Lining Tabs to the Lining inside. Sew. Press the Tabs outwards.
Stitch across the Tab. Press outwards. Topstitch across the Tab on the Right right close to the seam line.
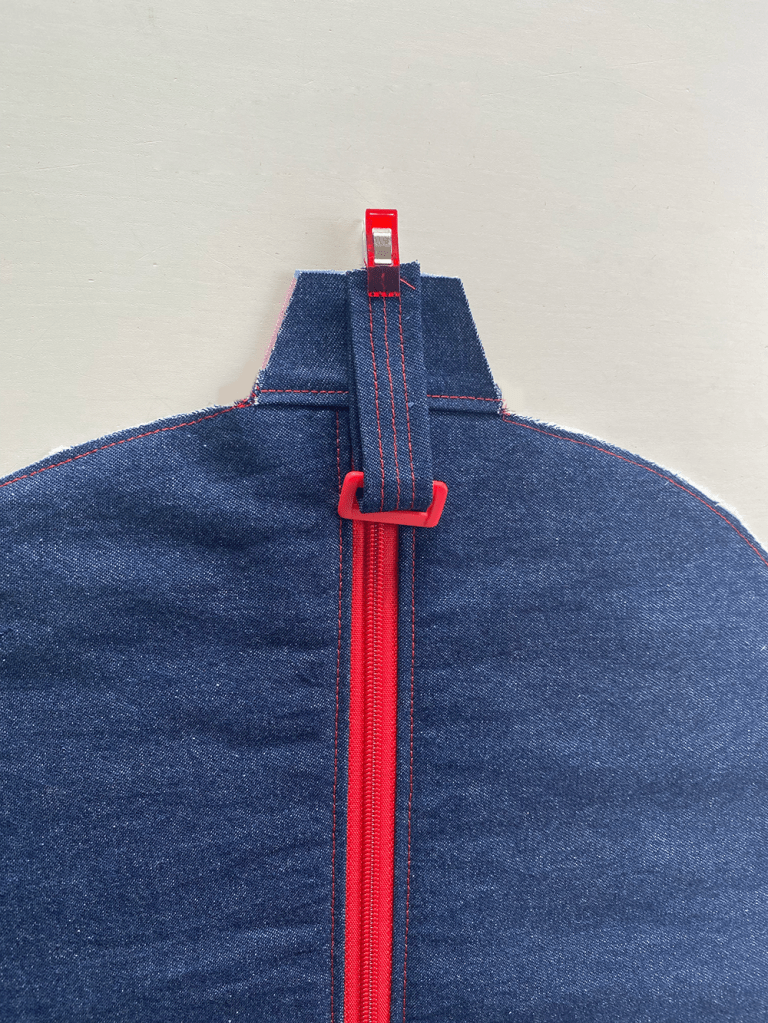
Attaching the Strap
You can make your own strap or use a pre bought woven 1″ /25mm cotton webbing. If making your own strap you will need to cut a strip of outer fabric 7cm wide by 140cm/ 150cm (55″-60″). Fold in the outer long edges each side by 1cm, press. Now fold the strap in half aligning the long folded edges. Press. Sew.
Insert the rectangle ring or D-ring to the Strap short piece. Fold in half. Pin the raw edges to the Tab short edge, positioned centrally.
Insert one end of the long strap piece into and out of the Rectangle slider. Sew to the strap to secure the slider. Then insert the opposite end into and out of the attached ring, pass it up and over the slider centre bar, then extend out to the opposite Tab end, positioned centrally. Pin. Sew.
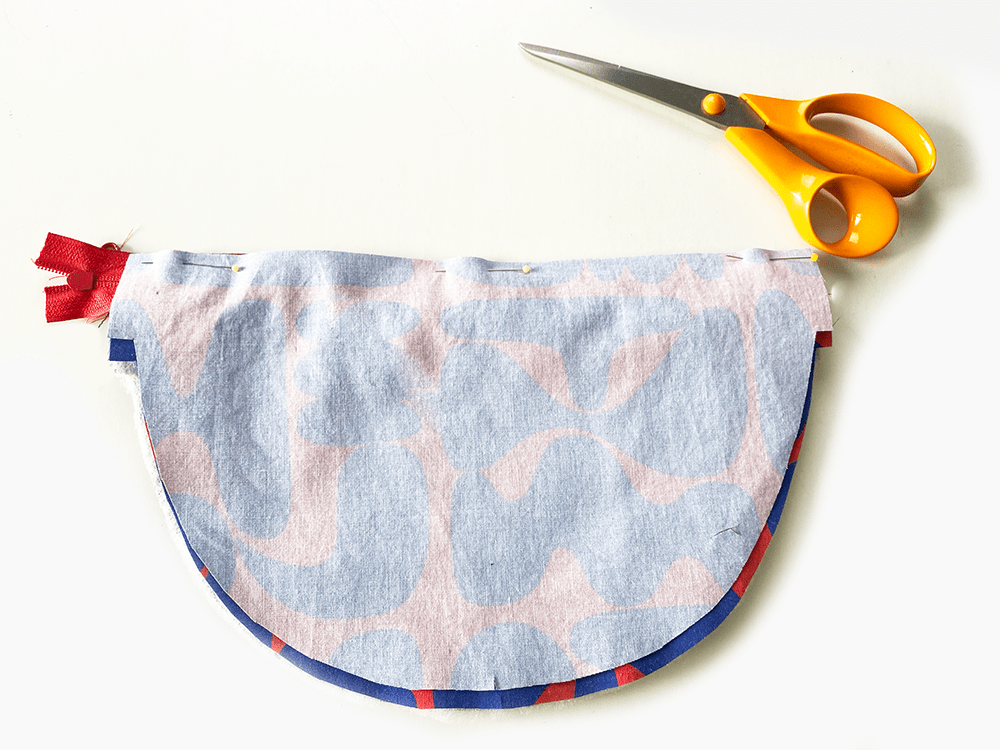
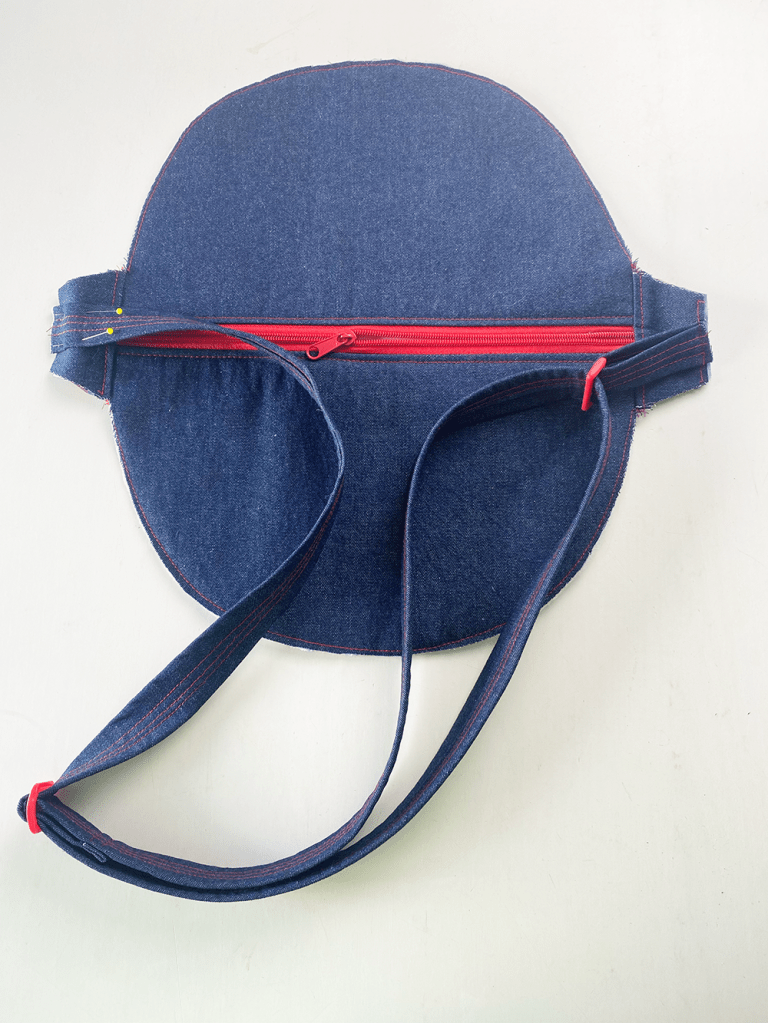
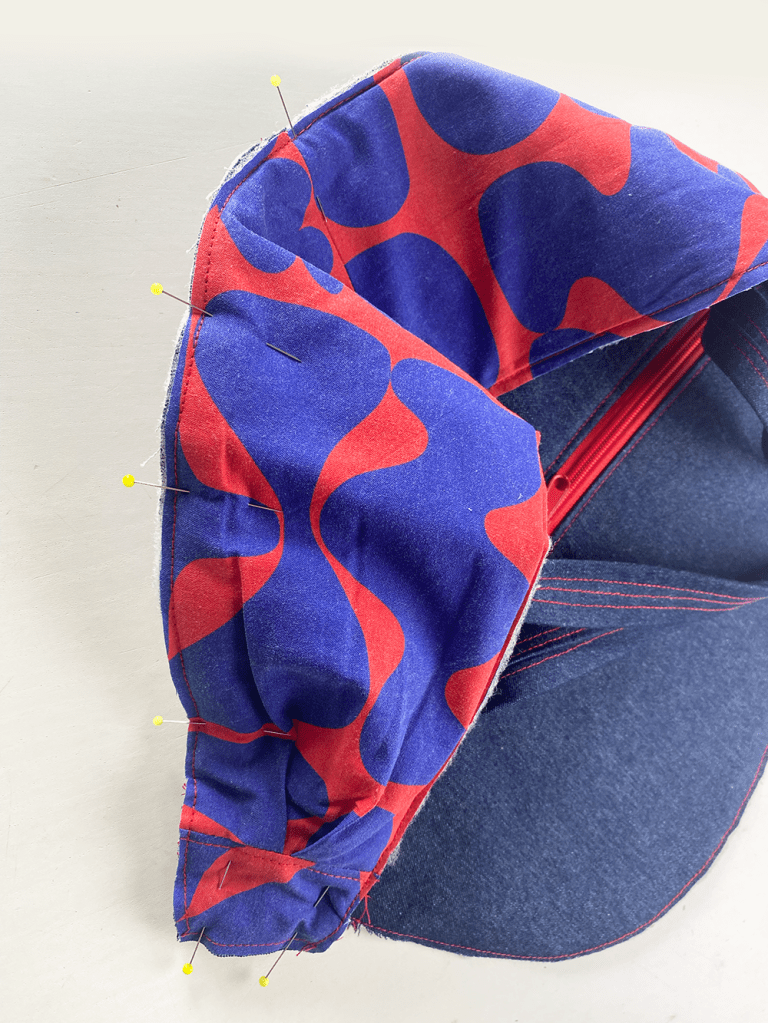
Joining the Bag to the Base section
Pin or clip the Base to the bag, aligning the outer raw edges. Tip: work on one side at a time, matching up the centre points and the Tab ends. Hand tack to secure temporarily. Sew each side from the bag centre to the Tab each side. Remove tacking after sewing. Tip: it helps to swing the needle position over to the left to make sewing easier.
The bag is left with two raw edges inside which can be finished with an overlocker or, for a much neater finish, use a length of bias binding.
BINDING THE RAW EDGES: You will need a 1m (1 yd) length of 25mm (1″) binding into two equal lengths. Sew one unfolded side to one side of the seam. Fold the binding over the raw edge, then stitch down the other side. Trim the excess binding.
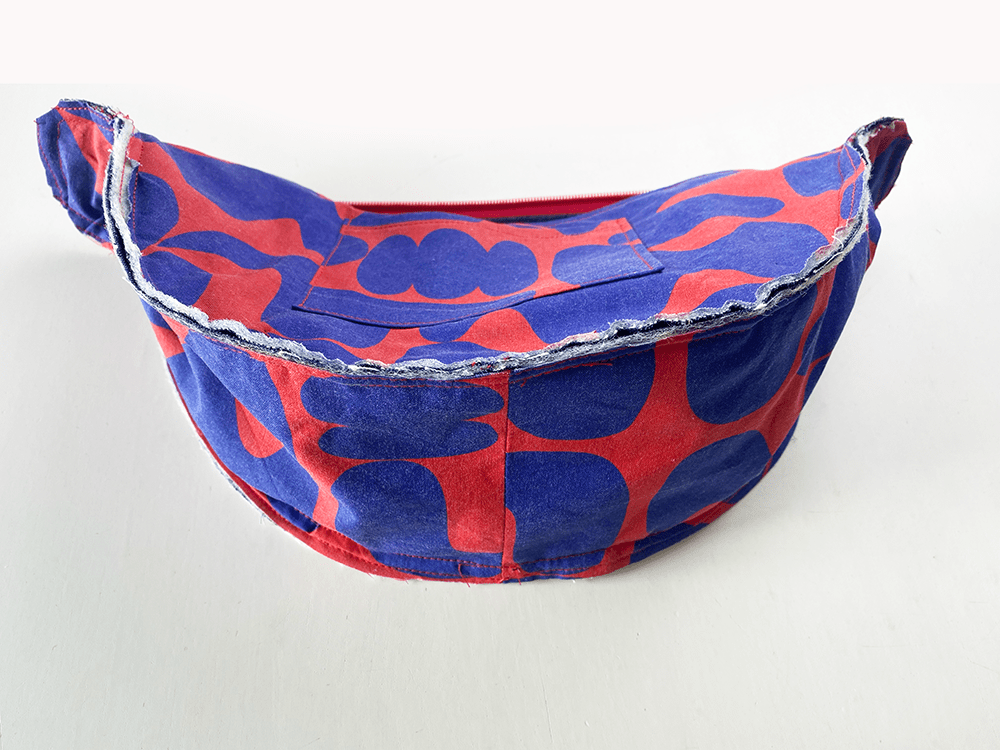
Turn the bag inside out, push out the tab ends by pulling the strap.
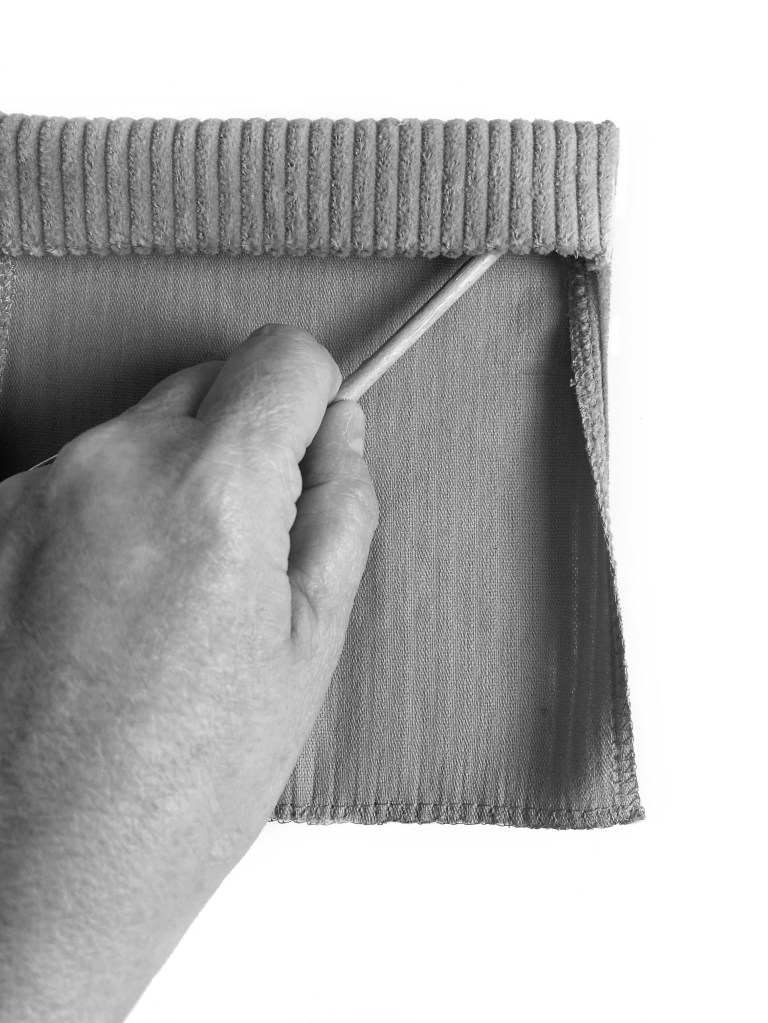
Press the bag, poking out the seam edges from the inside with a poking tool such as a chunky knitting needle or a chopstick.
All images and text are subject to copyright. Sewgirl 2024